Showing posts with label dessert. Show all posts

Monday, February 11

Valentine's Day Treats: Lots Of Sweet Recipes On My Latest Recipe Roundup For FoodieView


Chocolate Babycakes With Mocha Buttercream

Valentine's Day is fast approaching, and while the traditional card and box of candy or bouquet of flowers definitely lets that special someone know you care, a homemade treat from the kitchen truly says I love you. You'll find a wide variety of romantic recipes from around the web - including Chocolate Mousse Tartlettes, Coconut Orange Cake, Homemade Berry Marshmallows, and these Chocolate Babycakes (made using my super easy Emergency Chocolate Cake recipe I wrote about back in 2005) - in my Valentine's Day Treats Recipe Roundup at FoodieView
.

FoodieView is a neat site run by some really nice foodies that makes "good food easy to find, whether you're dining in or dining out." Check out the restaurant guides for nine major cities (more will be added) or search through over 1 million recipes from places like Cooking Light, Eating Well, Gourmet/Bon Appetit, Fine Cooking, Food Network, Sunset, and Saveur. The neatest part about the FoodieView search engine is that you can narrow down your search criteria by ingredient, dish, cuisine, special considerations (gluten free, low carb, vegetarian, etc.), sources, and more, including famous chefs.

My last FoodieView Recipe Roundup covered Cozy Breads For Cold Winter Days, and my next one will be all about potatoes. You'll find all of the FoodieView Recipe Roundups here, and you can subscribe to them via e-mail here.

So what's your favorite Valentine's Day treat? If you've written about it on your blog, you're welcome to leave a link to it in the comments section.

Sweet tooth still not satisfied? You might also enjoy some of my other recipes:
Decidedly Different Chocolate Chip Cookies (And How To Correctly Hug A Sheep)
Chocolate Biscotti For Beginners
Toasted Almond Chocolate Chip Biscotti
Crazy Cookies (with chocolate, butterscotch, coconut, nuts, & oats)
Molasses Ginger Spice Snaps
Spicy Pumpkin Pecan Raisin Muffins
Mexican Monkey Cake
Blueberry Breakfast Bars
Apple Blueberry Crumble Bars
Really Raspberry Tartlets
Cranberry Christmas Scones (tasty any time of year)
Lazy Susan's Whole Wheat Scones With Currants & Oats

Don't worry - we eat more than dessert here on the farm. We enjoy lots of homemade bread, too. And you'll find plenty of my Less Fuss, More Flavor savory recipes (let's hear it for vegetables!) in the sidebar of the Farmgirl Fare homepage under Previous Posts: Food Stuff W/ Recipes. May you always eat well.

© Copyright 2008 FarmgirlFare.com, the award-winning blog where dessert often comes first, and it's never hard to rationalize eating chocolate cake for breakfast.

Monday, August 6

Apple Blueberry Crumble Bars Recipe & The Ups and Downs of My Blueberry Connection


Apple Blueberry Crumble Bars with an oat crust and streusel topping

"Hello?"

"Hi, this is Susan, your blueberry customer who raises sheep."

"Of course. How are you? How many lambs did you have this year?"

My local blueberry supplier recently acquired a small flock of his own, and he loves to talk sheep, but eventually I was able to steer him back to the matter at hand.

"I was calling to see how the blueberries are doing this year."

"You remember that bad freeze we had back in April?" Oh yes.

"Well, things aren't looking too good." Oh no.

"I can put you on The List." I could hear paper fluttering in the background. "I've got pages and pages of people here. You wouldn't believe how many customers have been calling about blueberries. Everybody calls when they open up their last bag from the freezer." Yep, that would be me.

"Um, I think I should already be on The List. I ordered five gallons when I picked up my five gallons last year."

"Oh, then you're probably on it."

"So how many blueberries do you think you'll get?"

"Maybe 50 or 60 gallons if I'm lucky." This was not sounding good.

"And how many do you normally get?"

"I should be getting 400. Last year I got 250, though the smaller harvest meant the berries were all large and juicy." I remember. "During the year I barter. When I buy something from someone or have them do work for me, they say, 'Just pay me in blueberries.' At this point I'm not even sure I'll have enough to pay them all." This was just getting better and better.

"If you find somebody else selling blueberries, I'd buy them." Great. Like who?

Then we went back to talking about sheep, and the conversation ended with him extending an invitation to come over one day soon for a lunch of homegrown lamb enchiladas made with chiles from last year's garden and corn tortillas from his own corn, served up with a salad of freshly picked lettuce.

"This isn't just one of those off-the-cuff invitations," he assured me. "This is real. I can't find anybody around here to eat this stuff with me." Okay, so maybe all was not lost—just my year's supply of berries.

The first summer I spent in Missouri, I planted a giant garden that provided me with, among other things, an enormous number of cucumbers, and I was determined that not a single one should go to waste. (This was before I kept ravenous, veggie loving chickens, which allows me to be a lot lazier and not feel guilty about it.)

I remember asking a friend if she thought I should go ahead and put up more than the 36 jars of dill pickles I already had stashed in a cupboard in my studio/office.

"You might as well. You may not get any cucumbers next year."

"Really? Why?" Was there some big fatal cucumber blight predicted that I didn't know about? "What's going to happen next year?"

"I have no idea. Anything could happen. You never know what could go wrong."

To a newish gardener who was still glowing from recent success and hadn't yet had many natural disasters befall her bounty, total crop failure seemed impossible, not to mention totally unfair.

Twelve Missouri farm years later, I understand completely.

Blueberries are in season in many places right now. If you find someone selling them, buy them. Just be sure to buy enough for next year, too.


One of the nicest things about blueberries is that they freeze beautifully, so you can easily enjoy them, and these bars, all year long. You don't even have to spread them out in a single layer on baking sheets like you do for raspberries or blackberries. To freeze blueberries, just fill up a zipper freezer bag or plastic container and toss them into the freezer.

An outing to a pick-your-own farm is a wonderful way to spend the day with kids and take home some delicious bounty.
PickYourOwn.org is a great resource for finding pick-your-own farms in your area and even includes listings in other countries.


Farmgirl Susan's Apple Blueberry Crumble Bars
Makes on 9"x13" pan — 12 to 16 large bars

**Click here to print this recipe**

Some of you will recognize these as a variation of the Blueberry Bonanza Breakfast Bars I created last summer, when I did get my five gallons of fresh blueberries. In September I made a peachy blueberry version, and a friend I shared some with has been raving and hinting about them ever since.

A few months ago I wangled her into leaving the craziness on her farm to come spend the day giving wormer shots to the 91 sheep on mine, bribing her with the promise of large quantities of kitchen garden bounty and homemade baked goods. I even sent her home with frozen pizza. (I was the one who ended up with the best present of all that day, though, as this was the friend who brought Whitey the fertilized eggs.)

"Did you make any of those blueberry peach things?" she asked when she called to say she was on her way.

"I couldn't. I didn't have any peaches. But I made you some with apples and blueberries instead."

"That sounds. . . interesting." I took this to be nice talk for Yuck.

When she arrived I offered her one of the experimental apple blueberry bars as an energy boost before we got to work, and after two thoughtfully chewed bites she turned to me and said, "I do believe these taste better than the ones with peaches."

Of course the best thing about these bars is that adding the apples makes my now precious blueberries go a lot further.

Don't let the three separate layers in this recipe scare you away; they come together quickly and you only need to dirty up two mixing bowls. With the oatmeal crust and streusel topping, these bars remind me of an eat-with-your-hands cross between apple blueberry pie and apple blueberry crisp.

They can be enjoyed any time of day: put one in a lunchbox, pack some on a picnic, or munch on one in the car on your way to pick up the kids at school. You can cut them into squares, wrap them up individually, and freeze them for an instant snack.

For a comfort food dessert of the highest order, cut into the pan while they're still warm and gooey and serve them up in bowls alongside scoops of vanilla ice cream and topped with a handful of fresh blueberries.

My blueberries are large and not super sweet. If yours are the smaller and sweeter wild variety, you may want to use a little less sugar in the middle layer. Choose your favorite kind of apple; a combination of tart and sweet is very nice.

Feel free to substitute whole wheat flour for some or all of the white flour in the crust and/or the streusel topping. To give them another healthy boost, you could mix some chopped walnuts or almonds or pecans into the topping.

As always, I urge you to seek out local and organic ingredients; they really do make a difference. Even organic sugars are becoming mainstream.

Bottom Layer
2 cups organic old-fashioned oats (not quick oats)
1 cup organic all-purpose flour
1 cup (packed) light brown sugar
1/2 teaspoon baking soda
1/4 teaspoon salt
12 Tablespoons (1½ sticks/6 ounces) organic butter, melted
1 teaspoon pure vanilla extract

Top Layer
1 cup organic all-purpose flour
1/2 cup (packed) light brown sugar
1/2 cup (1 stick/4 oz) organic butter or natural vegetable oil sticks such as Earth Balance

Middle Layer
2 cups fresh or frozen blueberries
3 generous cups unpeeled chopped apples (about 5 small/19 oz)
3/4 cup granulated sugar
3 Tablespoons all-purpose flour
1 teaspoon cinnamon
1/4 teaspoon freshly ground nutmeg (1/2 teaspoon if pre-ground)

For the Bottom Layer:
Heat the oven to 425 degrees. Grease a 9" x 13" pan. (I love my  Chicago Metallic commercial bake and roast pans and these heavy duty USA Pans are really nice too.)

In a large bowl, combine the oats, flour, brown sugar, baking soda, and salt. Stir in the melted butter and vanilla until thoroughly combined. Press this mixture evenly into the bottom of the pan with your fingers. I also use the bottom of a stainless steel measuring cup to help make the crust flat and even.

For the top layer:
Place the flour, brown sugar, and butter in a small bowl and use a fork, pastry blender, or your fingers to combine until the mixture resembles large crumbs (some pea-sized clumps are okay). Set aside.

For the middle layer:
Place the blueberries and apples in the bowl you mixed the bottom layer in. Add the sugar, flour, cinnamon, and nutmeg and toss until well combined.

Sprinkle the top layer evenly over the fruit mixture. Bake at 425 degrees for 15 minutes, then lower the oven temperature to 350 degrees and bake until the top is golden and looks "dry," but the edges aren't too brown, about 25 to 35 minutes.

Let cool in pan on a wire rack. Serve warm or at room temperature, with ice cream if desired. Store leftover bars in a cool place or refrigerate. They may also be individually wrapped in plastic and frozen.

Still hungry? You'll find links to all my sweet and savory Less Fuss, More Flavor recipes in the Farmgirl Fare Recipe Index.

© FarmgirlFare.com, the fruit filled foodie farm blog where Farmgirl Susan shares photos & stories of her crazy country life on 240 remote Missouri acres.

Saturday, December 9

Cookie Recipe: Molasses Ginger Spice Snaps

Old-fashioned molasses ginger spice snap cookies
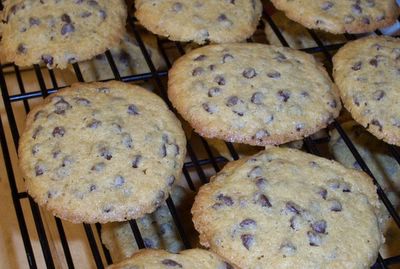
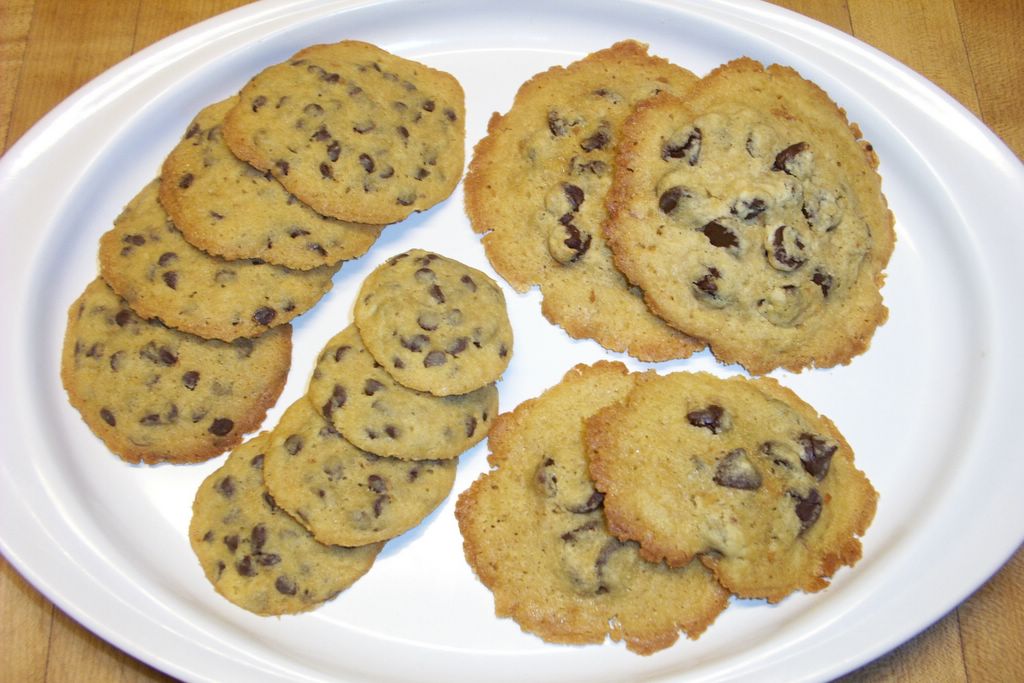
These cute little cookies are perfect for holiday munching and giving.

December 2010 Update: Click here to for the big, soft, and chewy version of these cookies, made with (or without) raisins.

When I moved from urban Northern California to the wilds of Missouri (where I'd never been in my life) back in 1994, I dragged a number of things along with me that I will most likely never use again, but haven't yet been able to part with: my last few pairs of high-heeled shoes (absurdly out of fashion, I'm sure), a barely started sweater-knitting project and $80 worth of unused wool yarn, and over two dozen—now half-rusted—metal cookie cutters.

When I was a kid, several times each year my mother would dig out various cookie cutters and we would proceed to make what I still believe are the best rolled sugar cookies in the world. Each baked and cooled cookie was then carefully spread with buttercream frosting made using the recipe on the back of the C&H powdered sugar box, because I do not come from the type of people who would ever dream of making something as pointless and unpalatable as royal icing when you could use buttercream instead.

Last year I was talking to my mother on the phone while she and my stepfather were finishing up a batch of these very cookies. "Joel! You're putting on too much frosting and making the cookies look funny!" Then after a moment she gave an exasperated sigh, because the solution was painfully obvious. "Just eat the extra frosting!"

The shape of the cutters and the color of the frosting we used depended on the season: we made pink hearts for Valentine's Day, yellow chicks and blue bunnies for Easter, and red & green stars, stockings, bells, reindeer, and Santa holding his sack full of presents for Christmas.

Sometimes we would go all out and decorate the frosted cookies with colored candy sprinkles or those tiny silver balls that you can still buy in places like England and Australia but which are now illegal in the United States.

When I grew up and became Head Cookie Baker in the household, I purchased my own collection of cutters, purloined the secret recipe from my mother, and proceeded to continue the frosted cookie holiday tradition.

Things have changed.

While I now happily spend countless hours baking my own bread and growing dozens of types of heirloom vegetables, I never seem to find the time to do all of that rolling and cutting and frosting.

Cookies should be round and sliced from a log or made with a scoop is my new motto. Needless to say, you will never find a single gingerbread man or woman or child or cat or snowflake lurking among the hundreds of holiday goodies I cheerfully churn out each December.

You will however, find lots and lots of these cute little round cookies hanging around my kitchen. Several years ago I did painstakingly make dozens of cheddar-dill crackers in the shape of penguins because I thought the recipient's kids would be amused by them. Little did I know the childrens' starving mother would inhale every single penguin while driving to pick up her little darlings from soccer practice without noticing a single one.

I was introduced to the world of dark and spicy desserts very late in life. Growing up, I cannot recall ever seeing a jar of molasses in the house—perhaps because it didn't go well with buttercream.

About ten years ago a friend offered me a square hunk of homemade cake that was a deep, dark brown but did not appear to be chocolate. My friend explained that it was gingerbread. Never one to pass up dessert, I took a tentative bite and could not believe what I'd been missing.

I begged her for the recipe and went home and baked my own gingerbread cake, substituting homemade applesauce for some of the butter and adding more spices. I soon learned that recipes for this stuff abound, and that some people even frost it with chocolate buttercream. Where had I been?

Then one day my hunky farmguy Joe asked me if I would bake him some spice cake but make cupcakes instead, because then more of the cake touches the pan and that, in his opinion, is the best part.

"You mean like gingerbread?" I asked.

"No, like spice cake."

Sure enough, on the same page as a recipe for Gingerbread, my trusted Betty Crocker cookbook offered a recipe for Old-Fashioned Spice Cake that did not call for molasses and met with Joe's approval.

I added applesauce and raisins to the batter, frosted the cupcakes using the recommended recipe for Caramel Frosting, and watched as my approval rating went through the roof. According to the detailed notes I thankfully wrote in the margin, this happened in April of 2001.

A few years later I decided to try my hand at making spice cookies. I made them big and soft with raisins and the girl at the local natural foods store told me they were the best cookies she had eaten in her life. I made them small and crunchy and am now expected to bake up a large batch every time my mother comes to the farm, with survival packages of cookies shipped to her between visits.

The only difficult thing about this recipe is figuring out exactly what to call it. The cookies have all the makings of gingerbread, including molasses, but the original recipe mine is adapted from referred to them as spice cookies. A hopeful look through a random sample of older cookbooks on my shelf resulted in mass confusion.

I found recipes for Ginger-Sugar Cookies and Spiced Molasses Cookies and Ginger Snaps. In the Joy Of Cooking there was a recipe for Old-Fashioned Molasses Cookies made with buttermilk that "are highly spiced." The Gingersnaps were described as "like 'boughten' ones in texture but with a dreamy flavor."

And then there were the Ginger Thins, which I immediately decided should be called Gnash Your Teeth Ginger Thins because you are expected to make "about 300 3/4-inch wafers" by putting "dots of 1/8 teaspoon of dough 1-inch apart on a greased cookie sheet." Right.

The most comprehensive list of recipes was in The Settlement Cookbook, first published in 1901 and sporting the trademarked phrase, "The Way To A Man's Heart" on the cover of my 32nd edition from 1965. In the index under "Cookies, Spice" I found no fewer than twelve different listings.

There were Ginger Creams, Ginger Snaps, Ginger Wafers, Hermits (with raisins), Molasses Hermits, Card Gingerbread (which you make by thinly spreading the batter in a 9"x13" pan, sprinkling it with sugar, then cutting into squares after baking), Spice Cookies, and Raisin Spice Cookies (which were completely different than the plain old Spice Cookies), and Christmas Spice Cookies. There were recipes for Anise Spice Cookies and Springerle, which are also made with anise.

But the best find of my search came from a 1964 copy of The American Heritage Cookbook And Illustrated History Of American Eating & Drinking (Number 2 in, I assume, a series) that I picked up for $2.00 at a used bookstore a few years ago but never read.

This is a cookbook with a sense of humor. Next to the recipe for Gingersnaps it says that "these Gingersnaps, Miss Harland instructed in Common Sense in the Household, 'will keep for weeks, if locked up.'"

Having found no right or wrong answer to my spice/snap/ginger/molasses cookie question, I decided to play it safe and include everything in the name of mine. Call these Molasses Ginger Spice Snaps whatever you like, just don't be surprised when they disappear quickly if they aren't locked up.

Molasses ginger spice snap cookies 1
Click here to see the whole photo shoot.

Farmgirl Susan's Molasses Ginger Spice Snaps
Makes about 12 dozen 2-inch cookies or 2 dozen 4-inch cookies
Recipe may be halved—Adapted from a Diane Mott Davidson Goldy book


**Click here to print this recipe**

These cookies are delicious both large and small, and the little ones taste very, good with a glass of bubbly champagne. You can make them soft, or you can bake them a few more minutes so that they're nice and crunchy.

Everybody seems to have a favorite way of eating them, and even if you accidentally overcook a tray and believe that they are burnt, most likely there is somebody hanging around who will think they're perfect. If not, you can mail them to my mother.

I highly recommend investing in a couple of heavy duty rimmed commercial baking sheets; at about $15 each, they're one of the best kitchen deals around. I've been using some of mine for over 20 years for everything from baking scones to roasting Brussels sprouts, not to mention baking thousands of cookies.

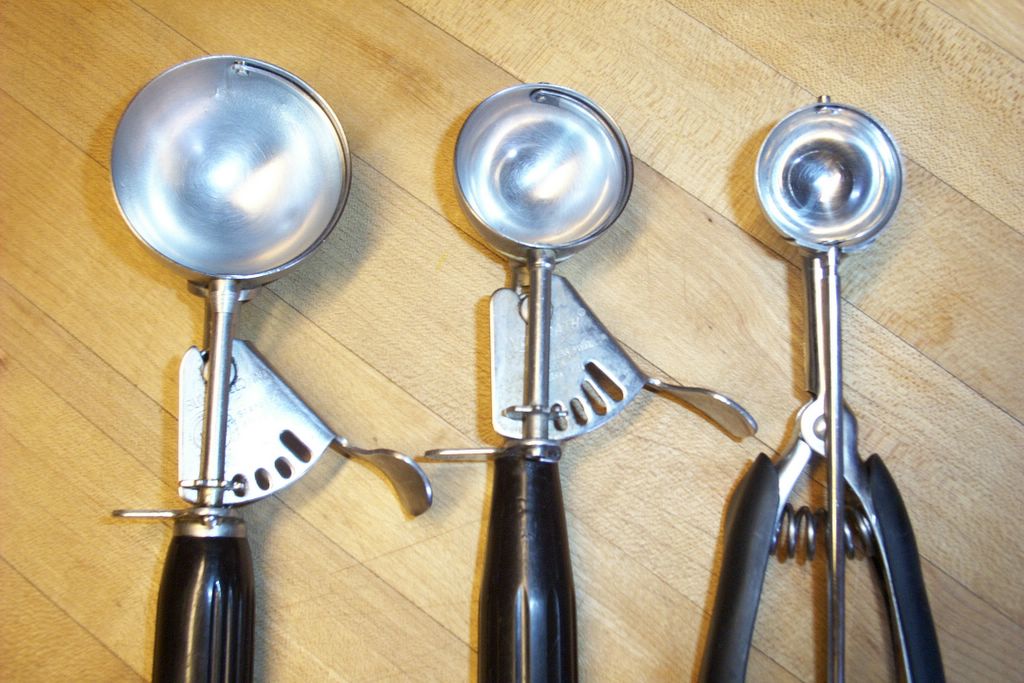
Most molasses spice cookie recipes call for forming each cookie into a little ball. I never have the patience for that. It's easy to make perfectly round cookies if you portion out the dough with a stainless steel scoop. I own five or six different sizes and have had some of them for over 20 years, too. For these cookies I use a 2-teaspoon scoop.

The key to making really good spice cookies is to use the best and freshest spices you can find. If you can't remember when you bought that dusty jar of ground ginger or cloves, it's time to toss it out. Freshly ground nutmeg is wonderful, and whole nutmeg will last for years. Plus you get to use a cute little grater to make it.

As with most cookies, these freeze beautifully. They also stay fresh at room temperature for several days, making them perfect for holiday gift giving. I pack them by the dozen in little cello bags and tie with a colorful ribbon. I like the cello bags from Continental Packaging Corporation. These are real cello bags (many are not), prices are reasonable, there is no minimum order, and they ship quickly.

As always, I urge you to seek out organic and local ingredients; they really do make a difference. If you prefer, you can substitute 2 sticks (1 cup) of the butter with natural, non-hydrogenated vegetable oil sticks, such as Earth Balance.

Ingredients:

1½ cups (3 sticks/12 ounces) organic butter, softened
2 cups granulated sugar
2 large eggs
1/2 cup molasses (not blackstrap) or pure cane syrup
(I use Steen's)
4 cups organic all-purpose flour
4 teaspoons baking soda
1 teaspoon salt
3 teaspoons ground cinnamon
4 teaspoons ground ginger
2 to 3 teaspoons ground cloves
1/2 teaspoon freshly ground nutmeg (or 1 teaspoon pre-ground)

Optional for larger cookies:
1½ cups organic raisins

Instructions:

Heat the oven to 375 degrees.

In a large bowl, cream the butter and sugar with an electric mixer (I use a hand held mixer) on high speed for about 3 minutes. Beat in the eggs and molasses until well blended.

Reduce the speed and mix in the flour, baking soda, salt, cinnamon, ginger, cloves, and nutmeg until well combined. (You can mix the dry ingredients together first in a separate bowl, but I never do.) Stir in the raisins if you're using them.

The dough will be very soft, so put it in the fridge or freezer for a little while to harden up (very cold dough will take a minute or two longer to bake).

Use a a 2-teaspoon scoop to portion out the dough and place the cookies on a heavy duty baking sheet lined with unbleached parchment paper (this is wonderful stuff, and you can reuse the same piece for the entire batch of cookies). The cookies will spread; I can fit 24 small cookies or 6 large cookies on a half-size commercial sheet pan (approximately 13" x 18").

Bake 10 to 14 minutes for 2-inch cookies, depending on desired consistency. In my oven, baking half-frozen, 2-teaspoon dough scoops for 14 minutes gives me 2-inch crunchy cookies. Reduce baking time for softer cookies.

For big and soft large cookies, bake until the centers are set, about 15 to 18 minutes. For crunchier large cookies, bake them a few minutes longer.

Still hungry? You'll find links to all my sweet and savory Less Fuss, More Flavor recipes in the Farmgirl Fare Recipe Index.

© FarmgirlFare.com, the sweet and spicy foodie farm blog where Farmgirl Susan shares stories & photos of her crazy country life on 240 remote Missouri acres - and we sometimes eat cookies for breakfast.

Friday, April 14

Toasted Almond Chocolate Chip Biscotti Recipe & Some Biscotti Baking Tips

Kitchen (& Chocolate) Therapy


Back in February, new reader
Jeph let me know that he had had delicious success with my Cranberry Christmas Scones and Chocolate Biscotti. His colleagues, he reported, had gobbled them up. Now he was wondering if I happened to have a recipe for almond biscotti up my sleeve. I did not, but I had been wanting to write about something sweet, I adore biscotti, and I was inspired by his request. So I made one up.

The first batch was flawless.The dough was easy to work with, the slices cut without breaking apart, and the finished cookies baked to an even perfection. They had a nice, slightly soft crunch (if that makes sense), yet held up to dunking. This totally new creation fell together so easily that, although I took notes, I didn't pay too much attention to exactly what I was doing. Which was fine because I immediately dismissed them as slightly blah, a bit on the boring side, definitely not sweet enough, and pointedly moved on.

Four more batches of biscotti later, I realized I was heading straight into another
Pita Project. Fortunately that was when I ran out of almonds and sugar. It was also when I realized that the original batch I had been comparison nibbling over the last five days was, in fact, quite tasty. All I needed to do was to recreate it. Several more batches of biscotti later. . .

Along the way, I learned some things.

—If you desire a fool-proof, totally stress-free biscotti baking experience, stick to my
Chocolate Biscotti For Beginners.

—If you use semi-sweet chocolate chips in your biscotti batter, they will melt during the first bake and make a big mess when you go to do your slicing. Dark chocolate (bittersweet) chips work well (and the ones I used were smaller than the standard semi-sweet chips, which was nice). Mini semi-sweet chocolate chips work well. Bittersweet/Dark chocolate chunks might work, but I haven't tried using them.

—If you don't let the toasted almonds cool, they will melt the chocolate chips when you stir them into the batter and make a mess. (I now spread mine on a plate and stick them in the freezer to quickly cool.)

—Biscotti are, by definition, dry cookies. By baking them twice, you are essentially drying them out. The dryness is what gives them their distinctive crunch (and longer shelf life than softer cookies). But weather, humidity, type of flour, size of eggs, and, quite possibly, the alignment of the planets all contribute to the "wetness" of your batter. So even if you are carefully weighing your ingredients, different batches of batter are going to require slightly different "drying" (baking) times. Also, everyone has a different opinion as to just how dry biscotti should be. All of this can be rather exasperating.

—If your cooled biscotti are not crisp enough for your (or someone else's) liking, simply stick them back in the oven for a while.

—If you add just one extra half cup of sugar to this recipe, you will end up with completely different cookies. They will be sweeter, but they will also be much crunchier. And they will require a longer second bake. If you are a fan of break-your-teeth-crunchy biscotti, this version might very well be your dream cookie, and you should probably try it. But you are responsible for all baking times and dental work.


Farmgirl's Toasted Almond Chocolate Chip Biscotti
Makes About 36 Pieces

This is is a pleasant, all around, not particularly sweet biscotti that lasts for several days and improves with age. (It also freezes well.) It holds up to dunking but is also yummy by itself. In my opinion, it goes well with everything from a cup of hot coffee to a cold glass of champagne.
If you're craving a sweeter (or fancier) dessert, you could dip one side of each piece in melted chocolate. Or you could dunk your biscotti in amaretto. Or you could break up a few pieces and stir them into some very nice ice cream and drizzle it with chocolate sauce or amaretto. The possibilities, really, are endless. The egg white glaze is totally optional but does give the tops of the biscotti a very nice shine.

3/4 cup (2-1/4 ounces) sliced almonds, toasted at 350°F for 8 to 10 minutes & cooled
1 stick (1/2 cup/4 ounces) butter, softened
1 cup (8 ounces) sugar
2 large eggs
1 teaspoon real almond extract
1 teaspoon real vanilla extract
2-1/2 cups (13 ounces) all-purpose flour
1-1/2 teaspoons (1/4 ounce) baking powder (Make sure it's fresh!)
1/2 teaspoon (1/8 ounce) salt
3/4 cup (5 ounces) dark chocolate chips or mini semi-sweet chocolate chips

1 beaten egg white for glaze, optional

1. Heat oven to 350°F. Toast almonds and let cool.

2. Place butter, sugar, eggs, and extracts in a bowl and beat until well blended (I use an electric hand mixer on medium for about one minute).

3. Beat in flour, baking powder, and salt and mix just until dough forms. Stir in almonds and chocolate chips. Dough will be stiff.

4. Divide dough in half and pat each half into a 3" x 9" flat log. Brush with egg glaze if desired.

5. Bake logs on a greased or parchment lined heavy duty baking sheet for 30 to 35 minutes, until golden brown and just beginning to crack on top. Reduce oven to 300°F.

6. Let cool 15 mintues (or longer) and slice into 1/2-inch slices (I use a large serrated knife).

7. Lay slices on their sides on baking sheet and bake for 15 minutes, then flip slices and bake an additional 15 to 20 minutes, until cookies are dry and crisp. (Note: they will crisp up more as they cool.)

8. Store in an airtight container up to several days or freeze. Flavors improve with age.

Still have a sweet tooth? You might also enjoy these recipes:
Whole Wheat Chocolate Chip Raisin Cookies (and how to hug a sheep)
Yip Yap Whole Wheat Chocolate Chip Banana Snaps
Baby Chocolate Chip and Toffee Shortbread Cookies
Molasses Ginger Spice Snaps
Chocolate Biscotti For Beginners
Choco-Oat-Butterscotch-Coconut Crazy Cookies
100% Whole Grain Bran Muffins (four different flavors)
100% Whole Grain Ginger Pear Bran Muffins
Chocolate, Cinnamon & Banana Mexican Monkey Cake
Blueberry Breakfast Bars
Just Peachy Blueberry Breakfast Bars
Apple Blueberry Crumble Bars
Easy Orange Yogurt Loaf Cake
Heavenly Lemon Coconut Quick Bread
100% Whole Grain Ginger Pear Bran Muffins
Cranberry Christmas Scones
Spicy Pumpkin Pecan Raisin Muffins
Really Raspberry Tartlets
Easy Emergency Chocolate Cake
Chocolate Babycakes

© Copyright FarmgirlFare.com, the sugar and sweet foodie farm blog where Farmgirl Susan shares recipes, stories, and photos from her crazy country life on 240 remote Missouri acres—and we sometimes start the day by eating cookies for breakfast—with a nice big glass of milk to make them healthy of course.

Tuesday, December 13

Recipe: Easy Chocolate Biscotti Cookies For Beginners

Easy Chocolate Biscotti Recipe - perfect for holiday gift giving! — FarmgirlFare.com
Perfect for gift giving, homemade biscotti is easier to make than you think.

Update: Every year in early December this becomes one of the most popular recipes on Farmgirl Fare. Click here for a sampling of rave reviews and signature touches from Farmgirl Fare readers.

I used to be intimidated by biscotti. It always looked so elegant and so unavailable to the humble home baker. How did each piece come out looking that perfect? The entire process of making biscotti was mystifying.

But when I finally worked up the courage to bake some, I discovered the most wonderful thing: there is no mystery to biscotti. It's easy to make, even on your first try. All it takes is a little time and the right recipe.

Traditional Italian biscotti is not my kind of cookie. It doesn't contain butter, it's flavored with anise, and it's break-your-teeth hard because it's meant to be dunked in coffee before biting into it.


My recipe, on the other hand, turns tradition on its ear. It calls for butter, produces a cookie with a nice crunch that stands up to dunking but also tastes fine on its own, and is chocolate. I love it.

This dough is extremely easy to work with because it bypasses the one aspect of biscotti making that can cause difficulty, and that is all the "stuff" that's often mixed in: nuts, dried fruit, chocolate chunks, and so forth.

Those tasty and attractive looking add-ins make it harder to shape the logs, and even harder to cut the biscotti into nice, even, perfect looking slices. You can, of course, stir in whatever extras you like. Just remember that I warned you.

Another thing that makes this biscotti recipe an excellent choice for beginners is the fact that the dough is dark because of the chocolate, so no one will be able to tell if you overbaked your biscotti or if all of the pieces aren't the same lovely shade of golden brown.

The only other thing you need to know about biscotti is that it is, by definition, a twice baked cookie, so it does take some time from start to finish. First you form the dough into 'logs' and bake them.


After the baked logs have cooled, you slice them up.


Then you bake the slices, turning them over halfway through the baking time.


I'll admit this part is kind of a hassle, but it's really not too bad. I know that some people prefer to stand the pieces up so they don't have to turn them, but if I tried that, I'm sure they would all collapse like one of those giant domino things while I was moving the baking sheet from the counter to the oven—that is if I could even get them to stand up in the first place. I find it easier to simply flip the slices over.

Because it looks so perfect, and because it stays fresh for many days, homemade biscotti makes for a very nice gift. Package it in little cellophane bags tied with a colorful ribbon (I like this brand), and people will think you spent a fortune on them at a fancy bakery. Revealing the truth is, of course, up to you.

I highly recommend investing in a couple of heavy duty commercial baker's half sheet pans; they're one of the best kitchen deals around. I've been using some of mine for over 20 years for everything from baking scones to roasting brussels sprouts, not to mention baking thousands of cookies. I usually line them with sheets of unbleached parchment paper, which is wonderful stuff.

As always, I urge you to seek out local and organic ingredients; they really do make a difference. Organic flours are easy to find, and even organic sugar and organic cocoa powder are becoming mainstream.

Farmgirl Susan's Easy Chocolate Biscotti
Makes about 36 Pieces

**Click here to print this recipe**

Ingredients:

2/3 cup (4 ounces) semisweet or dark chocolate chips (or chopped chocolate)
1/2 cup (1 stick/4 ounces) organic butter
2 large eggs
1 cup granulated sugar
1 teaspoon pure vanilla extract
2 to 2¼ cups organic all-purpose flour
1/2 cup unsweetened cocoa powder
1½ teaspoons baking powder
(make sure it's fresh!)
1 teaspoon salt

1 beaten egg white for glaze (optional)


Make it a mochaccino!
Adding 1 Tablespoon of instant espresso powder (I use Medaglia D'Oro) in with the dry ingredients does amazing things to this biscotti.

Instructions:

1. Heat the oven to 350°. Melt the butter and chocolate together (I put them in a Pyrex measuring cup and microwave them) and set aside.

2. With an electric hand mixer, beat the eggs and sugar until lightened, about two minutes.

3. Add the vanilla and chocolate mixture.

4. Mix in the flour, cocoa, baking powder, and salt just until combined. You should have a soft, but not sticky, dough. Add the extra 1/4 cup of flour if dough is too sticky.

5. Divide the dough in half. On a lightly floured surface, form each half into a log that is 3½ inches by 9 inches. Place the logs on a heavy duty baking sheet and brush with egg white if desired (I use a silicone brush). Bake for 20 to 25 minutes or until the tops are set. Update: some readers have said their loaves sliced better when cooked a little less than 25 minutes, so I've changed the directions accordingly.

6. Reduce the oven to 275°. Let the logs cool as long as you can (the cooler they are, the easier to cut), and then slice into 1/2-inch thick slices (I use my large serrated bread knife and push it through the loaves rather than 'sawing' the slices).


7. Arrange the slices on baking sheet and bake for 20 minutes. Remove from the oven, carefully turn the slices over, and bake for another 20 minutes.

8. Cool completely on a wire rack. Store in an airtight container or freeze.

Still hungry? Try these other Farmgirl Fare treats:

Muffins and Scones
Cranberry Christmas Scones (tasty any time of year)

Can't live on sweets alone? You'll find links to all my sweet and savory Less Fuss, More Flavor recipes in the Farmgirl Fare Recipe Index.


© FarmgirlFare.com, the chocoholic foodie farm blog where Farmgirl Susan shares stories & photos of her crazy country life on 240 remote Missouri acres—and there can never be too much chocolate.

Wednesday, November 9

Recipe: Cinnamon Chocolate Banana Mexican Monkey Cake

Chocolate Cinnamon Banana Mexican Monkey Cake - FarmgirlFare.com

I know. You were expecting bread. Oatmeal Toasting Bread, to be exact. And the Hearty Lentil & Smoked Sausage Soup I promised to go with it. I'm getting there, really. (Update: The recipes are up! Click here for the bread and here for the soup.)

In the meantime, there was this yummy looking cake sitting on the counter begging to be photographed. And since I have yet to see anyone not, well, go bananas over it, I figured some of you might be interested in the recipe. Just a little something to hold you over until I serve up what you're really waiting for of course.

This is one of those handy cakes that you can pretty much rationalize eating any time of day. My hunky farmguy Joe polished off a piece this morning with breakfast. And while it can by no means be considered health food, nutritionally speaking it does have more going for it than, say, a couple of Chocolate Babycakes. There are the bananas of course, plus walnuts and cinnamon, which has a long history as both a spice and a medicine. And everyone knows that chocolate is good for you.

You could probably even sneak a little whole wheat flour into the recipe if you felt like it. What you do not want to sneak in, though, is that one extra overripe banana desperately staring up at you. Trust me on this.

Tempting as it may be, it will do very strange things to the bottom half of the cake. Measure out your 1¼ cups of mashed bananas and stop right there. Toss the last one into a smoothie or, if you must, the compost pile. I fed mine to the chickens.

This recipe is adapted from one that appeared in Bon Appetit magazine a few years ago. The snappy name is mine. The 'Mexican' part comes from the combination of chocolate and cinnamon that is popular in Mexico, not because this is a Mexican cake.

As always, I urge you to seek out local and organic ingredients; they really do make a difference.

Farmgirl Susan's Mexican Monkey Cake
Makes one 8-Inch square cake—Adapted from Bon Appétit

**Click here to print this recipe**

1½ cups semi-sweet chocolate chips
2/3 cup (packed) golden brown sugar
2/3 cup chopped walnuts (optional)
2 teaspoons ground cinnamon


1/2 cup (1 stick/4 ounces) organic butter, softened (or 1/2 cup trans-fat free vegetable oil sticks, such as Earth Balance)
3/4 cup granulated sugar
1 large egg
1¼ cups mashed, very ripe bananas (the riper the better)
2 Tablespoons organic yogurt or sour cream
1 Tablespoon organic milk
1½ cups organic all-purpose flour
3/4 teaspoon baking soda
3/4 teaspoon baking powder
1/2 teaspoon salt

Heat the oven to 350°. Grease an 8-inch square baking pan. In a small bowl, combine chocolate chips, brown sugar, walnuts (if desired), and cinnamon; set aside.

In a large bowl, beat the butter, sugar, and egg with an electric mixer until fluffy, about 1 to 2 minutes (I use a hand held mixer). Add the bananas, yogurt, and milk, and mix well. On low speed, beat in flour, baking soda, baking powder, and salt just until well combined.

Spread slightly more than half of the batter in the pan. Sprinkle with half of the cinnamon streusel. Carefully spread the remaining batter over the streusel and then top with the rest of the streusel.

Bake until a toothpick inserted in the center of the cake comes out clean, about 40 to 50 minutes. Cool in pan on a wire rack. Serve warm or at room temperature.

This cake tastes even better the next day, and it freezes beautifully. You can freeze the cake whole or cut it into pieces, wrap them tightly in plastic, and place them in a zipper freezer bag. Defrost at room temperature—or in the microwave if you are being attacked by The Chocolate Force.

Other sweet recipes on FarmgirlFare.com:
--Blueberry Breakfast Bars
--Just Peachy Blueberry Breakfast Bars
--Blueberry Bran Muffins (plus two other flavors of bran muffins)
--Cranberry Christmas Scones (tasty any time of year)
--Spicy Pumpkin Pecan Raisin Muffins
--Really Raspberry Tartlets
--Emergency Chocolate Cake
--Chocolate Babycakes
--Crazy Cookies
--Molasses Ginger Spice Snaps
--Chocolate Biscotti For Beginners
--Toasted Almond Chocolate Chip Biscotti

Still hungry? You'll find links to all my sweet and savory Less Fuss, More Flavor recipes in the Farmgirl Fare Recipe Index.

© FarmgirlFare.com

Tuesday, September 13

Two Continents, One Recipe, Cookies All Around


Please Pass The Milk

So what do you get when you combine two foodie friends, one global book swap, an intriguing new recipe, and the magic of email? About as close to "baking together" as two girls on opposite sides of the world can get. (Along with the discovery that one can, in fact, wake up in the morning with a cookie batter hangover. Note: Eating nothing but the baked version of said cookie batter for breakfast and lunch the following day does not help nearly as much as you would think.)

I've said before that I'm a sucker for chocolate chip cookie recipes. And I certainly can't resist a baking challenge--even if it does begin a half hour before my bedtime. Here's what happened.

Back in July, my pal Amy at Beauty Joy Food organized a book swap. (If you missed out on this fun event, do not despair; Amy has promised to host future swaps. She is even trying to get me to host one.) Our pal Clare at Eat Stuff in Australia signed up and received a copy of the New York Cookbook by Molly O'Neill from her swap partner. She dove into it yesterday and came up with a simple recipe for chocolate chip cookies which she then emailed to me to see what I thought of it. It immediately piqued my interest for two reasons: 1)It didn't call for any leavening, and 2)It had such a high ratio of butter to dry ingredients. I wanted to make these cookies.

A brilliant plan was quickly hatched. We would try out the recipe at the same time and compare the results of what happens when you are baking the exact same thing half a world away. I already knew from experience that when I changed even one little thing in a chocolate chip cookie recipe, it often caused a completely different outcome. This was going to be interesting. We would each write about our experiences, comparing results and including the recipe--which Clare would convert to metric for her post. And we would simultaneously publish our posts.

And so, with a flurry of emails (What is your brown sugar like? First tray is in the oven! Where are those pictures? Are you sure it said teaspoon and not Tablespoon? Where ARE you?) and a dusting of flour, our trans-continental bake-a-thon began. It was almost too much fun. (It was definitely too much cookie batter. I am 100% convinced that I inherited a gigantic batter-eating gene from my mother.)

The original recipe is from David "The Cookie King" Leiderman in New York and is called "Delicious Butterscotch Chocolate Chunk Cookies." He describes the cookies as "easy to make and absolutely delicious," adding that "they develop a butterscotch flavor as they bake and are extremely fragile."

The recipe was easy to make, but it also didn't look like it would yield much. I decided to make two batches so I would have enough batter to play around with different kinds of chocolate and various sizes of cookies. I made two minor adjustments to the recipe. I used 1 teaspoon of vanilla extract instead of 1/2 teaspoon, and I used chocolate chips instead of chopped bittersweet chocolate.


Pure & Sweet

I used Horizon Organic butter, C & H golden brown sugar, farm fresh eggs, and Heartland Mill organic, all-purpose flour. The big chips are Ghirardelli Double Chocolate Premium Baking Chips which are larger than most standard, American semisweet chocolate chips. The tiny chips are Nestle Toll House Semi-Sweet Chocolate Mini Morsels. I used the double chocolate chips in one batch and the mini chips in the other. The only other changes had to do with the size of the cookies and the baking times. Even the Baby Bear cookies (which were about half the size the Cookie King called for) were not close to being done after 6 to 8 minutes.


I Stole These From The Three Bears

I used three different scoops to make three sizes of cookies. If you fill them with water, the "Papa Bear" scoop holds 1/4 cup (or 2 fluid ounces), the "Mama Bear" scoop holds 2 Tablespoons, and the "Baby Bear" scoop holds 1 Tablespoon.

As you can see, just those two little changes made quite a difference when it came to the finished products.


All These And More From One Recipe

All of the cookies tasted really good. As far as the "butterscotch flavor," well, if you nibbled on just the brown edges of the double chocolate chip Mama and Papa Bears, you could almost kind of sorta taste it. But one bite with chocolate and it was obliberated. On the other hand, all of the cookies except the mini chip Baby Bears were definitely "extremely fragile" as he stated. Although the brown edges appear to be crunchy in the photo, they are actually very soft. Why one would want to make cookies this susceptible to falling apart I do not know--except perhaps to use it as a handy excuse not to be able to share them with anyone. (In fact, I do believe I employed just that line of reasoning last week after I made a batch of Rae's amazingly chocolately Brownie Bite Cookies that she wrote about recently on Bunnyfoot.)

My personal favorites were the Mama and Baby Bear sizes made with the mini chips. They spread more evenly and also held together better than the others. Plus they're cuter. My notes for the cookies made with the larger chips simply say "weird." They were clunky and didn't spread right. And they really fell apart easily.

While this recipe did not shoot right up to the top of the New Favorites list, it is definitely a keeper. And I realized that because the cookies were so soft, they would be good for making ice cream sandwiches since all the ice cream would not smoosh out the sides like it does when you bite into one made with crunchy cookies. To make: Freeze the cookies, and then assemble sandwiches using slightly softened ice cream. Put the sandwiches back into the freezer until hard. (Or enjoy right away with large napkin at the ready.) I made some with vanilla bean ice cream, and they were very, very good. I bet they would be even better with my favorite, coffee ice cream.


Save Some Cookies And Make A Few Of These
So that's my version of our all night/all day, highly entertaining baking adventure. We are both low on sleep and high on sugar right now, but it was worth it. The recipe, including my changes, is below. To hop over to Sydney and read Clare's side of the story, all you have to do is click right here. Isn't technology amazing?

David Leiderman's
Delicious Butterscotch Chocolate Chip Cookies
As Interpreted By Farmgirl

2 sticks (1 cup) butter, softened
1 cup packed light brown sugar
1/2 teaspoon salt
1 teaspoon vanilla
1 large egg
1-1/4 cups all-purpose flour
1-1/3 cups chocolate chips (about 8 ounces)

Preheat oven to 350 degrees. Combine butter, brown sugar, salt, vanilla, and egg in a bowl and beat to make a smooth batter. (I used an electric hand mixer on medium speed for about 1 minute.) Add flour and chocolate chips, stirring with a rubber spatula until no traces of flour remain. (My butter was really soft, so I put the finished batter in the freezer for about 10 minutes to stiffen it up a bit before baking.) Using a scoop or spoon, drop batter onto a parchment-lined, heavy duty baking sheet. Bake until barely brown (or a little longer if desired). Cool on a wire rack. Yield depends on size of cookies. Makes about 4 dozen Baby Bear (1 Tablespoon) size.

Baking times in my oven:
Papa Bears: 16-17 minutes
Mama Bears: 14 minutes
Baby Bears: 10 minutes.
Note: Because the instructions said "bake until barely brown," I may have erred on the side of caution and probably could have baked all the cookies a little longer. This might have helped with the fragility factor.

Saturday, July 23

Recipe: Really Raspberry Tartlets With Cream Cheese Pastry Crust & Cream Cheese Filling


Showing Off My Homegrown Raspberries

Note: I had every intention of sitting down today and writing out the rest of my tips for better bread baking. But it is too hot to even think about baking bread, and so I offer up this more refreshing post instead. Despite the heat, I am planning to make sourdough onion rye tomorrow, so hopefully that will inspire me to finish the list. Check back soon!

I recently celebrated a major success in the garden. After eleven years, I finally harvested my first raspberry crop. It wasn't big enough to make jars and jars of jam or anything (oh, just the thought makes my mouth water), but it was deinitely more than the two or three berries that made up previous bounties.
I have planted various types of raspberry canes at least six different times in at least six different places, but for one reason or another (poor soil, not enough sun, poisoned by the roots of a nearby walnut tree), they never did very well. And then two years ago, my little brown raspberry-growing thumb turned green. That was the time my Latham red raspberry canes arrived in the mail before I was ready for them. Not only had I been unable to locate 30 linear feet of suitable growing space that was safe from marauding sheep, but the moonsigns were also wrong--it wasn't a good time to plant (and I needed all the help I could get).
If the roots are sufficiently moist, most mail-ordered plants and canes and even trees can usually survive a few extra days in their original packaging. I was looking at weeks. Desperate, I decided to temporarily plant them (much too close together) in the mounded-up soil along the south-facing side of the greenhouse. They went wild.
Inspired, last April I purchased six baby raspberry plants at a nearby farmer's market for fifty cents apiece. They were "suckers" that had been dug up from the seller's garden, which meant that they were already accustomed to our inhospitable climate. I was assured that they were trouble-free and would produce delicious berries all summer long. I planted them along the north-facing side of the greenhouse and mulched them with lots of hay and sheep manure. They are so happy that some of them are already covered with blossoms.
But back to my ruby red bounty. What to do with them? What to do? Something so precious as one's first raspberry crop requires thoughtful consideration. No gobbling them up straight from the colander. No burying them in brownies or smashing them into a sauce. They should be presented in their original luscious beauty, but in a way that will make the small harvest go further. Aha! I dusted off my recipe for Really Raspberry Tartlets.
I created this recipe years ago when I was still living in California. I would buy pints and pints of both red and golden raspberries from Kozlowski Farms at the Thursday Night Farmer's Market and make two-toned tartlets. In her book, The Berry Bible, author Janie Hibler explains that "when seeds of red raspberries are grown, about one out of every 1,000 produces yellow or apricot colored fruit rather than red. Other than color, these raspberries are the same as typical red raspberries. The most widely grown cultivar is Fall Gold." I believe Kozlowski Farms was the first commercial grower of golden raspberries.
These sweet little treats combine two of my favorite things--cheesecake and berry pie--into one wonderfully easy dessert. And although I often say that fresh garden bounty is best enjoyed unadorned, I think these tartlets actually bring out the flavor of the raspberries. (And your friends and loved ones will be much happier than if you just served them a tiny dish of seven or eight naked berries.)
They travel well and are perfect for all kinds of meals and settings. You can pack them on a picnic or brush them with a red currant jelly glaze and serve them at a formal dinner. You can arrange them on a large platter garnished with fresh mint leaves and set them out at a buffet. They require no silverware, are not messy, and can be eaten standing up.
I call them Really Raspberry Tartlets not because of their overpowering berryness (though I suppose you could pile a lot more berries onto them if you wanted to), but because that is what they are: a really nice way to showcase your raspberries, really simple to make, really easy to gobble up two or three before you've realized it.
They are made with a very friendly cream cheese pastry which you do not even have to roll out. I actually taught an entire class devoted to this delightful dough called "Never Fail Cream Cheese Pastry To The Rescue." If you have never produced a decent crust in your life, you can successfully make one with this recipe. Variations of it abound in cookbooks; it is a caterer's secret weapon.
I do suggest that you make enough to allow for more than one tartlet per person, as they tend to disappear rather quickly. As always, I encourage you to use organic ingredients whenever possible.
Really Raspberry Tartlets
Makes 10--May Be Doubled
Pastry:
1 cup flour
4 ounces (1/2 package) cream cheese, softened
1/2 cup (one stick) butter, softened
1/4 teaspoon salt
Using an electric mixer, mix together flour, cream cheese, butter, and salt until a dough forms.Wrap the dough in plastic and refrigerate at least 30 minutes (or up to 24 hours). If chilled longer than 1 hour, let the dough warm up at room temperature for about 20 minutes. If you are in a hurry, you can place the dough in the freezer to chill for 15-20 minutes.
Divide the dough into 10 balls and place them in a standard size muffin pan. Press each dough ball into the bottom and up the sides of the muffin cup to form a shell. Bake at 350 degrees until nicely browned, about 20-25 minutes. Carefully invert the pan to the remove baked shells, and cool on a wire rack. (Note: the pastry shells can be made a day in advance or even frozen).
Cream Cheese Filling:
8 ounces (one package) cream cheese, softened
1/2 cup powdered sugar
1 Tablespoon fresh lemon juice
Approximately 2-1/2 cups fresh raspberries (you can also use blackberries or blueberries)
1/2 cup red currant jelly (optional)
With an electric mixer, beat the cream cheese with the powdered sugar until smooth. Beat in the lemon juice. (May be made a day ahead; chill until ready to use.) Spread a heaping tablespoon of the cream cheese mixture on the bottom of each cooled pastry shell. Arrange the berries on top.
For a more formal presentation, just before serving, heat 1/2 cup red currant jelly in a small saucepan and use a pastry brush to glaze berries with the warm jelly.
Refrigerate until ready to serve. The tartlets will keep for several days in the refrigerator (though they will not look quite as pretty as when first made). The cream cheese filling will soften and almost melt into the pastry shell, giving them a different (but very nice) taste and texture.

© 2005 FarmgirlFare.com, the award-winning blog where Farmgirl Susan shares stories & photos of her crazy country life on 240 remote Missouri acres - and where it's okay to eat raspberry tarts for breakfast because after all, they do contain fruit.