Showing posts with label chocolate. Show all posts

Monday, February 11

Valentine's Day Treats: Lots Of Sweet Recipes On My Latest Recipe Roundup For FoodieView


Chocolate Babycakes With Mocha Buttercream

Valentine's Day is fast approaching, and while the traditional card and box of candy or bouquet of flowers definitely lets that special someone know you care, a homemade treat from the kitchen truly says I love you. You'll find a wide variety of romantic recipes from around the web - including Chocolate Mousse Tartlettes, Coconut Orange Cake, Homemade Berry Marshmallows, and these Chocolate Babycakes (made using my super easy Emergency Chocolate Cake recipe I wrote about back in 2005) - in my Valentine's Day Treats Recipe Roundup at FoodieView
.

FoodieView is a neat site run by some really nice foodies that makes "good food easy to find, whether you're dining in or dining out." Check out the restaurant guides for nine major cities (more will be added) or search through over 1 million recipes from places like Cooking Light, Eating Well, Gourmet/Bon Appetit, Fine Cooking, Food Network, Sunset, and Saveur. The neatest part about the FoodieView search engine is that you can narrow down your search criteria by ingredient, dish, cuisine, special considerations (gluten free, low carb, vegetarian, etc.), sources, and more, including famous chefs.

My last FoodieView Recipe Roundup covered Cozy Breads For Cold Winter Days, and my next one will be all about potatoes. You'll find all of the FoodieView Recipe Roundups here, and you can subscribe to them via e-mail here.

So what's your favorite Valentine's Day treat? If you've written about it on your blog, you're welcome to leave a link to it in the comments section.

Sweet tooth still not satisfied? You might also enjoy some of my other recipes:
Decidedly Different Chocolate Chip Cookies (And How To Correctly Hug A Sheep)
Chocolate Biscotti For Beginners
Toasted Almond Chocolate Chip Biscotti
Crazy Cookies (with chocolate, butterscotch, coconut, nuts, & oats)
Molasses Ginger Spice Snaps
Spicy Pumpkin Pecan Raisin Muffins
Mexican Monkey Cake
Blueberry Breakfast Bars
Apple Blueberry Crumble Bars
Really Raspberry Tartlets
Cranberry Christmas Scones (tasty any time of year)
Lazy Susan's Whole Wheat Scones With Currants & Oats

Don't worry - we eat more than dessert here on the farm. We enjoy lots of homemade bread, too. And you'll find plenty of my Less Fuss, More Flavor savory recipes (let's hear it for vegetables!) in the sidebar of the Farmgirl Fare homepage under Previous Posts: Food Stuff W/ Recipes. May you always eat well.

© Copyright 2008 FarmgirlFare.com, the award-winning blog where dessert often comes first, and it's never hard to rationalize eating chocolate cake for breakfast.

Friday, April 14

Toasted Almond Chocolate Chip Biscotti Recipe & Some Biscotti Baking Tips

Kitchen (& Chocolate) Therapy


Back in February, new reader
Jeph let me know that he had had delicious success with my Cranberry Christmas Scones and Chocolate Biscotti. His colleagues, he reported, had gobbled them up. Now he was wondering if I happened to have a recipe for almond biscotti up my sleeve. I did not, but I had been wanting to write about something sweet, I adore biscotti, and I was inspired by his request. So I made one up.

The first batch was flawless.The dough was easy to work with, the slices cut without breaking apart, and the finished cookies baked to an even perfection. They had a nice, slightly soft crunch (if that makes sense), yet held up to dunking. This totally new creation fell together so easily that, although I took notes, I didn't pay too much attention to exactly what I was doing. Which was fine because I immediately dismissed them as slightly blah, a bit on the boring side, definitely not sweet enough, and pointedly moved on.

Four more batches of biscotti later, I realized I was heading straight into another
Pita Project. Fortunately that was when I ran out of almonds and sugar. It was also when I realized that the original batch I had been comparison nibbling over the last five days was, in fact, quite tasty. All I needed to do was to recreate it. Several more batches of biscotti later. . .

Along the way, I learned some things.

—If you desire a fool-proof, totally stress-free biscotti baking experience, stick to my
Chocolate Biscotti For Beginners.

—If you use semi-sweet chocolate chips in your biscotti batter, they will melt during the first bake and make a big mess when you go to do your slicing. Dark chocolate (bittersweet) chips work well (and the ones I used were smaller than the standard semi-sweet chips, which was nice). Mini semi-sweet chocolate chips work well. Bittersweet/Dark chocolate chunks might work, but I haven't tried using them.

—If you don't let the toasted almonds cool, they will melt the chocolate chips when you stir them into the batter and make a mess. (I now spread mine on a plate and stick them in the freezer to quickly cool.)

—Biscotti are, by definition, dry cookies. By baking them twice, you are essentially drying them out. The dryness is what gives them their distinctive crunch (and longer shelf life than softer cookies). But weather, humidity, type of flour, size of eggs, and, quite possibly, the alignment of the planets all contribute to the "wetness" of your batter. So even if you are carefully weighing your ingredients, different batches of batter are going to require slightly different "drying" (baking) times. Also, everyone has a different opinion as to just how dry biscotti should be. All of this can be rather exasperating.

—If your cooled biscotti are not crisp enough for your (or someone else's) liking, simply stick them back in the oven for a while.

—If you add just one extra half cup of sugar to this recipe, you will end up with completely different cookies. They will be sweeter, but they will also be much crunchier. And they will require a longer second bake. If you are a fan of break-your-teeth-crunchy biscotti, this version might very well be your dream cookie, and you should probably try it. But you are responsible for all baking times and dental work.


Farmgirl's Toasted Almond Chocolate Chip Biscotti
Makes About 36 Pieces

This is is a pleasant, all around, not particularly sweet biscotti that lasts for several days and improves with age. (It also freezes well.) It holds up to dunking but is also yummy by itself. In my opinion, it goes well with everything from a cup of hot coffee to a cold glass of champagne.
If you're craving a sweeter (or fancier) dessert, you could dip one side of each piece in melted chocolate. Or you could dunk your biscotti in amaretto. Or you could break up a few pieces and stir them into some very nice ice cream and drizzle it with chocolate sauce or amaretto. The possibilities, really, are endless. The egg white glaze is totally optional but does give the tops of the biscotti a very nice shine.

3/4 cup (2-1/4 ounces) sliced almonds, toasted at 350°F for 8 to 10 minutes & cooled
1 stick (1/2 cup/4 ounces) butter, softened
1 cup (8 ounces) sugar
2 large eggs
1 teaspoon real almond extract
1 teaspoon real vanilla extract
2-1/2 cups (13 ounces) all-purpose flour
1-1/2 teaspoons (1/4 ounce) baking powder (Make sure it's fresh!)
1/2 teaspoon (1/8 ounce) salt
3/4 cup (5 ounces) dark chocolate chips or mini semi-sweet chocolate chips

1 beaten egg white for glaze, optional

1. Heat oven to 350°F. Toast almonds and let cool.

2. Place butter, sugar, eggs, and extracts in a bowl and beat until well blended (I use an electric hand mixer on medium for about one minute).

3. Beat in flour, baking powder, and salt and mix just until dough forms. Stir in almonds and chocolate chips. Dough will be stiff.

4. Divide dough in half and pat each half into a 3" x 9" flat log. Brush with egg glaze if desired.

5. Bake logs on a greased or parchment lined heavy duty baking sheet for 30 to 35 minutes, until golden brown and just beginning to crack on top. Reduce oven to 300°F.

6. Let cool 15 mintues (or longer) and slice into 1/2-inch slices (I use a large serrated knife).

7. Lay slices on their sides on baking sheet and bake for 15 minutes, then flip slices and bake an additional 15 to 20 minutes, until cookies are dry and crisp. (Note: they will crisp up more as they cool.)

8. Store in an airtight container up to several days or freeze. Flavors improve with age.

Still have a sweet tooth? You might also enjoy these recipes:
Whole Wheat Chocolate Chip Raisin Cookies (and how to hug a sheep)
Yip Yap Whole Wheat Chocolate Chip Banana Snaps
Baby Chocolate Chip and Toffee Shortbread Cookies
Molasses Ginger Spice Snaps
Chocolate Biscotti For Beginners
Choco-Oat-Butterscotch-Coconut Crazy Cookies
100% Whole Grain Bran Muffins (four different flavors)
100% Whole Grain Ginger Pear Bran Muffins
Chocolate, Cinnamon & Banana Mexican Monkey Cake
Blueberry Breakfast Bars
Just Peachy Blueberry Breakfast Bars
Apple Blueberry Crumble Bars
Easy Orange Yogurt Loaf Cake
Heavenly Lemon Coconut Quick Bread
100% Whole Grain Ginger Pear Bran Muffins
Cranberry Christmas Scones
Spicy Pumpkin Pecan Raisin Muffins
Really Raspberry Tartlets
Easy Emergency Chocolate Cake
Chocolate Babycakes

© Copyright FarmgirlFare.com, the sugar and sweet foodie farm blog where Farmgirl Susan shares recipes, stories, and photos from her crazy country life on 240 remote Missouri acres—and we sometimes start the day by eating cookies for breakfast—with a nice big glass of milk to make them healthy of course.

Tuesday, December 13

Recipe: Easy Chocolate Biscotti Cookies For Beginners

Easy Chocolate Biscotti Recipe - perfect for holiday gift giving! — FarmgirlFare.com
Perfect for gift giving, homemade biscotti is easier to make than you think.

Update: Every year in early December this becomes one of the most popular recipes on Farmgirl Fare. Click here for a sampling of rave reviews and signature touches from Farmgirl Fare readers.

I used to be intimidated by biscotti. It always looked so elegant and so unavailable to the humble home baker. How did each piece come out looking that perfect? The entire process of making biscotti was mystifying.

But when I finally worked up the courage to bake some, I discovered the most wonderful thing: there is no mystery to biscotti. It's easy to make, even on your first try. All it takes is a little time and the right recipe.

Traditional Italian biscotti is not my kind of cookie. It doesn't contain butter, it's flavored with anise, and it's break-your-teeth hard because it's meant to be dunked in coffee before biting into it.


My recipe, on the other hand, turns tradition on its ear. It calls for butter, produces a cookie with a nice crunch that stands up to dunking but also tastes fine on its own, and is chocolate. I love it.

This dough is extremely easy to work with because it bypasses the one aspect of biscotti making that can cause difficulty, and that is all the "stuff" that's often mixed in: nuts, dried fruit, chocolate chunks, and so forth.

Those tasty and attractive looking add-ins make it harder to shape the logs, and even harder to cut the biscotti into nice, even, perfect looking slices. You can, of course, stir in whatever extras you like. Just remember that I warned you.

Another thing that makes this biscotti recipe an excellent choice for beginners is the fact that the dough is dark because of the chocolate, so no one will be able to tell if you overbaked your biscotti or if all of the pieces aren't the same lovely shade of golden brown.

The only other thing you need to know about biscotti is that it is, by definition, a twice baked cookie, so it does take some time from start to finish. First you form the dough into 'logs' and bake them.


After the baked logs have cooled, you slice them up.


Then you bake the slices, turning them over halfway through the baking time.


I'll admit this part is kind of a hassle, but it's really not too bad. I know that some people prefer to stand the pieces up so they don't have to turn them, but if I tried that, I'm sure they would all collapse like one of those giant domino things while I was moving the baking sheet from the counter to the oven—that is if I could even get them to stand up in the first place. I find it easier to simply flip the slices over.

Because it looks so perfect, and because it stays fresh for many days, homemade biscotti makes for a very nice gift. Package it in little cellophane bags tied with a colorful ribbon (I like this brand), and people will think you spent a fortune on them at a fancy bakery. Revealing the truth is, of course, up to you.

I highly recommend investing in a couple of heavy duty commercial baker's half sheet pans; they're one of the best kitchen deals around. I've been using some of mine for over 20 years for everything from baking scones to roasting brussels sprouts, not to mention baking thousands of cookies. I usually line them with sheets of unbleached parchment paper, which is wonderful stuff.

As always, I urge you to seek out local and organic ingredients; they really do make a difference. Organic flours are easy to find, and even organic sugar and organic cocoa powder are becoming mainstream.

Farmgirl Susan's Easy Chocolate Biscotti
Makes about 36 Pieces

**Click here to print this recipe**

Ingredients:

2/3 cup (4 ounces) semisweet or dark chocolate chips (or chopped chocolate)
1/2 cup (1 stick/4 ounces) organic butter
2 large eggs
1 cup granulated sugar
1 teaspoon pure vanilla extract
2 to 2¼ cups organic all-purpose flour
1/2 cup unsweetened cocoa powder
1½ teaspoons baking powder
(make sure it's fresh!)
1 teaspoon salt

1 beaten egg white for glaze (optional)


Make it a mochaccino!
Adding 1 Tablespoon of instant espresso powder (I use Medaglia D'Oro) in with the dry ingredients does amazing things to this biscotti.

Instructions:

1. Heat the oven to 350°. Melt the butter and chocolate together (I put them in a Pyrex measuring cup and microwave them) and set aside.

2. With an electric hand mixer, beat the eggs and sugar until lightened, about two minutes.

3. Add the vanilla and chocolate mixture.

4. Mix in the flour, cocoa, baking powder, and salt just until combined. You should have a soft, but not sticky, dough. Add the extra 1/4 cup of flour if dough is too sticky.

5. Divide the dough in half. On a lightly floured surface, form each half into a log that is 3½ inches by 9 inches. Place the logs on a heavy duty baking sheet and brush with egg white if desired (I use a silicone brush). Bake for 20 to 25 minutes or until the tops are set. Update: some readers have said their loaves sliced better when cooked a little less than 25 minutes, so I've changed the directions accordingly.

6. Reduce the oven to 275°. Let the logs cool as long as you can (the cooler they are, the easier to cut), and then slice into 1/2-inch thick slices (I use my large serrated bread knife and push it through the loaves rather than 'sawing' the slices).


7. Arrange the slices on baking sheet and bake for 20 minutes. Remove from the oven, carefully turn the slices over, and bake for another 20 minutes.

8. Cool completely on a wire rack. Store in an airtight container or freeze.

Still hungry? Try these other Farmgirl Fare treats:

Muffins and Scones
Cranberry Christmas Scones (tasty any time of year)

Can't live on sweets alone? You'll find links to all my sweet and savory Less Fuss, More Flavor recipes in the Farmgirl Fare Recipe Index.


© FarmgirlFare.com, the chocoholic foodie farm blog where Farmgirl Susan shares stories & photos of her crazy country life on 240 remote Missouri acres—and there can never be too much chocolate.

Wednesday, November 9

Recipe: Cinnamon Chocolate Banana Mexican Monkey Cake

Chocolate Cinnamon Banana Mexican Monkey Cake - FarmgirlFare.com

I know. You were expecting bread. Oatmeal Toasting Bread, to be exact. And the Hearty Lentil & Smoked Sausage Soup I promised to go with it. I'm getting there, really. (Update: The recipes are up! Click here for the bread and here for the soup.)

In the meantime, there was this yummy looking cake sitting on the counter begging to be photographed. And since I have yet to see anyone not, well, go bananas over it, I figured some of you might be interested in the recipe. Just a little something to hold you over until I serve up what you're really waiting for of course.

This is one of those handy cakes that you can pretty much rationalize eating any time of day. My hunky farmguy Joe polished off a piece this morning with breakfast. And while it can by no means be considered health food, nutritionally speaking it does have more going for it than, say, a couple of Chocolate Babycakes. There are the bananas of course, plus walnuts and cinnamon, which has a long history as both a spice and a medicine. And everyone knows that chocolate is good for you.

You could probably even sneak a little whole wheat flour into the recipe if you felt like it. What you do not want to sneak in, though, is that one extra overripe banana desperately staring up at you. Trust me on this.

Tempting as it may be, it will do very strange things to the bottom half of the cake. Measure out your 1¼ cups of mashed bananas and stop right there. Toss the last one into a smoothie or, if you must, the compost pile. I fed mine to the chickens.

This recipe is adapted from one that appeared in Bon Appetit magazine a few years ago. The snappy name is mine. The 'Mexican' part comes from the combination of chocolate and cinnamon that is popular in Mexico, not because this is a Mexican cake.

As always, I urge you to seek out local and organic ingredients; they really do make a difference.

Farmgirl Susan's Mexican Monkey Cake
Makes one 8-Inch square cake—Adapted from Bon Appétit

**Click here to print this recipe**

1½ cups semi-sweet chocolate chips
2/3 cup (packed) golden brown sugar
2/3 cup chopped walnuts (optional)
2 teaspoons ground cinnamon


1/2 cup (1 stick/4 ounces) organic butter, softened (or 1/2 cup trans-fat free vegetable oil sticks, such as Earth Balance)
3/4 cup granulated sugar
1 large egg
1¼ cups mashed, very ripe bananas (the riper the better)
2 Tablespoons organic yogurt or sour cream
1 Tablespoon organic milk
1½ cups organic all-purpose flour
3/4 teaspoon baking soda
3/4 teaspoon baking powder
1/2 teaspoon salt

Heat the oven to 350°. Grease an 8-inch square baking pan. In a small bowl, combine chocolate chips, brown sugar, walnuts (if desired), and cinnamon; set aside.

In a large bowl, beat the butter, sugar, and egg with an electric mixer until fluffy, about 1 to 2 minutes (I use a hand held mixer). Add the bananas, yogurt, and milk, and mix well. On low speed, beat in flour, baking soda, baking powder, and salt just until well combined.

Spread slightly more than half of the batter in the pan. Sprinkle with half of the cinnamon streusel. Carefully spread the remaining batter over the streusel and then top with the rest of the streusel.

Bake until a toothpick inserted in the center of the cake comes out clean, about 40 to 50 minutes. Cool in pan on a wire rack. Serve warm or at room temperature.

This cake tastes even better the next day, and it freezes beautifully. You can freeze the cake whole or cut it into pieces, wrap them tightly in plastic, and place them in a zipper freezer bag. Defrost at room temperature—or in the microwave if you are being attacked by The Chocolate Force.

Other sweet recipes on FarmgirlFare.com:
--Blueberry Breakfast Bars
--Just Peachy Blueberry Breakfast Bars
--Blueberry Bran Muffins (plus two other flavors of bran muffins)
--Cranberry Christmas Scones (tasty any time of year)
--Spicy Pumpkin Pecan Raisin Muffins
--Really Raspberry Tartlets
--Emergency Chocolate Cake
--Chocolate Babycakes
--Crazy Cookies
--Molasses Ginger Spice Snaps
--Chocolate Biscotti For Beginners
--Toasted Almond Chocolate Chip Biscotti

Still hungry? You'll find links to all my sweet and savory Less Fuss, More Flavor recipes in the Farmgirl Fare Recipe Index.

© FarmgirlFare.com

Tuesday, September 13

Two Continents, One Recipe, Cookies All Around


Please Pass The Milk

So what do you get when you combine two foodie friends, one global book swap, an intriguing new recipe, and the magic of email? About as close to "baking together" as two girls on opposite sides of the world can get. (Along with the discovery that one can, in fact, wake up in the morning with a cookie batter hangover. Note: Eating nothing but the baked version of said cookie batter for breakfast and lunch the following day does not help nearly as much as you would think.)

I've said before that I'm a sucker for chocolate chip cookie recipes. And I certainly can't resist a baking challenge--even if it does begin a half hour before my bedtime. Here's what happened.

Back in July, my pal Amy at Beauty Joy Food organized a book swap. (If you missed out on this fun event, do not despair; Amy has promised to host future swaps. She is even trying to get me to host one.) Our pal Clare at Eat Stuff in Australia signed up and received a copy of the New York Cookbook by Molly O'Neill from her swap partner. She dove into it yesterday and came up with a simple recipe for chocolate chip cookies which she then emailed to me to see what I thought of it. It immediately piqued my interest for two reasons: 1)It didn't call for any leavening, and 2)It had such a high ratio of butter to dry ingredients. I wanted to make these cookies.

A brilliant plan was quickly hatched. We would try out the recipe at the same time and compare the results of what happens when you are baking the exact same thing half a world away. I already knew from experience that when I changed even one little thing in a chocolate chip cookie recipe, it often caused a completely different outcome. This was going to be interesting. We would each write about our experiences, comparing results and including the recipe--which Clare would convert to metric for her post. And we would simultaneously publish our posts.

And so, with a flurry of emails (What is your brown sugar like? First tray is in the oven! Where are those pictures? Are you sure it said teaspoon and not Tablespoon? Where ARE you?) and a dusting of flour, our trans-continental bake-a-thon began. It was almost too much fun. (It was definitely too much cookie batter. I am 100% convinced that I inherited a gigantic batter-eating gene from my mother.)

The original recipe is from David "The Cookie King" Leiderman in New York and is called "Delicious Butterscotch Chocolate Chunk Cookies." He describes the cookies as "easy to make and absolutely delicious," adding that "they develop a butterscotch flavor as they bake and are extremely fragile."

The recipe was easy to make, but it also didn't look like it would yield much. I decided to make two batches so I would have enough batter to play around with different kinds of chocolate and various sizes of cookies. I made two minor adjustments to the recipe. I used 1 teaspoon of vanilla extract instead of 1/2 teaspoon, and I used chocolate chips instead of chopped bittersweet chocolate.
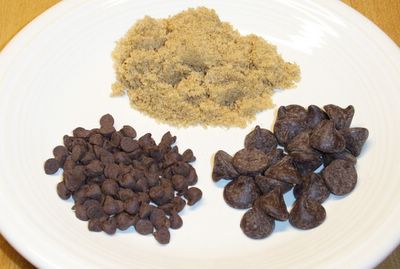

Pure & Sweet

I used Horizon Organic butter, C & H golden brown sugar, farm fresh eggs, and Heartland Mill organic, all-purpose flour. The big chips are Ghirardelli Double Chocolate Premium Baking Chips which are larger than most standard, American semisweet chocolate chips. The tiny chips are Nestle Toll House Semi-Sweet Chocolate Mini Morsels. I used the double chocolate chips in one batch and the mini chips in the other. The only other changes had to do with the size of the cookies and the baking times. Even the Baby Bear cookies (which were about half the size the Cookie King called for) were not close to being done after 6 to 8 minutes.


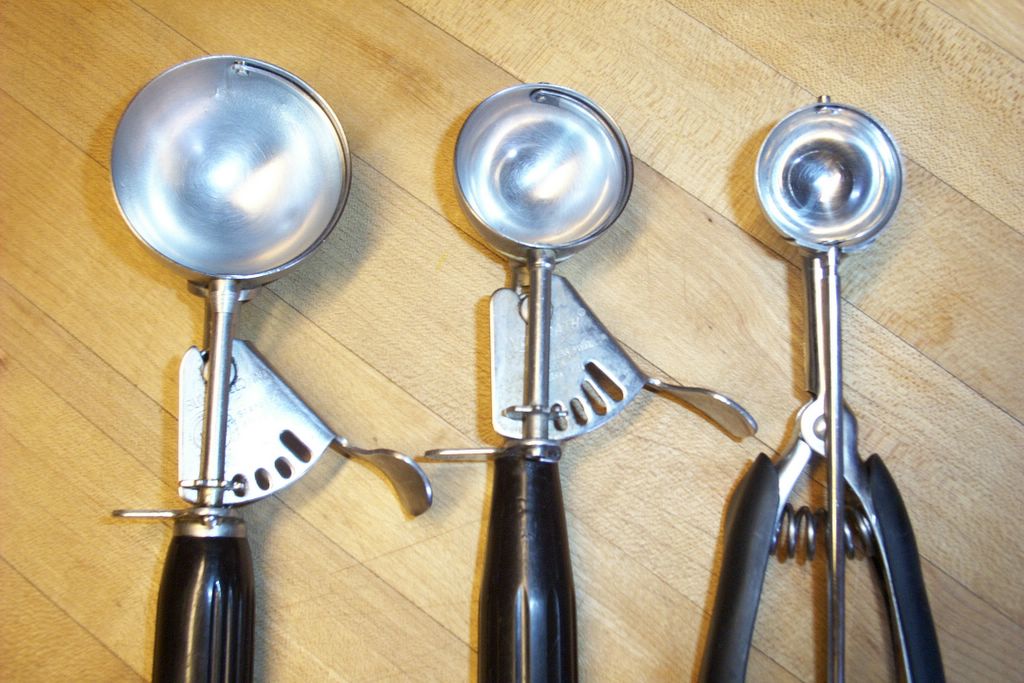
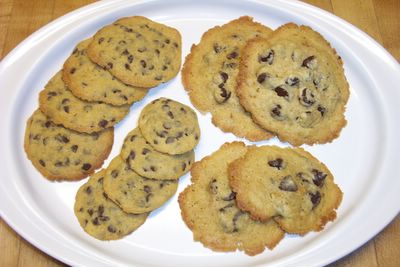
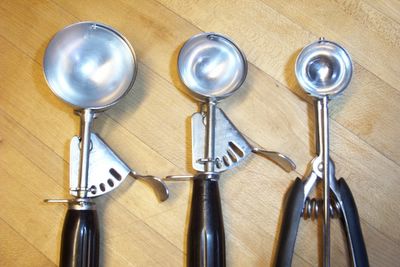
I Stole These From The Three Bears

I used three different scoops to make three sizes of cookies. If you fill them with water, the "Papa Bear" scoop holds 1/4 cup (or 2 fluid ounces), the "Mama Bear" scoop holds 2 Tablespoons, and the "Baby Bear" scoop holds 1 Tablespoon.

As you can see, just those two little changes made quite a difference when it came to the finished products.


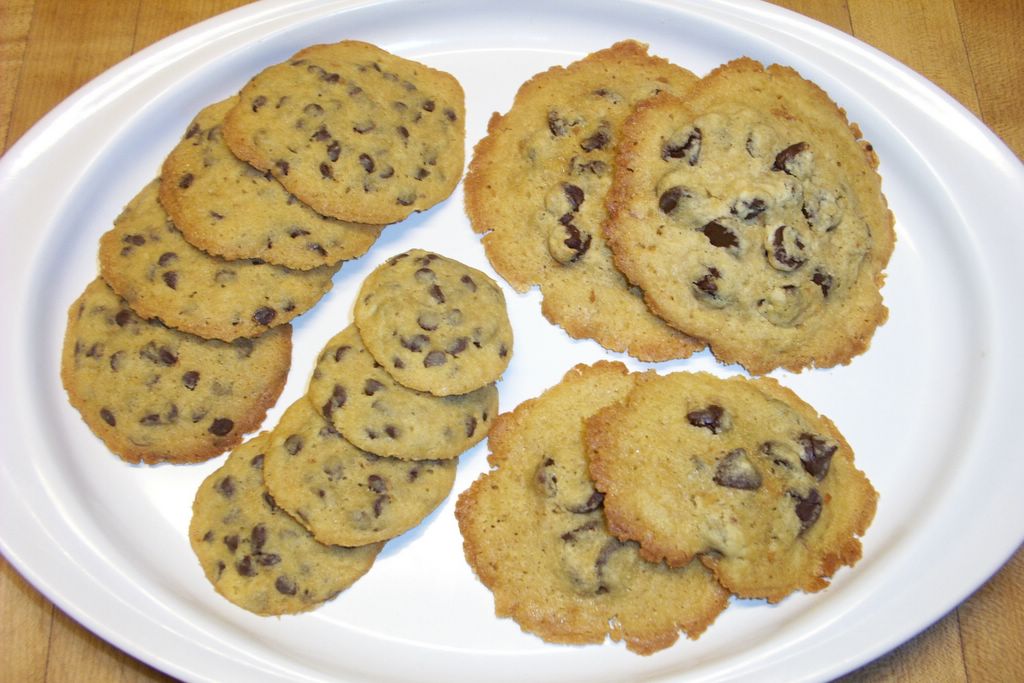
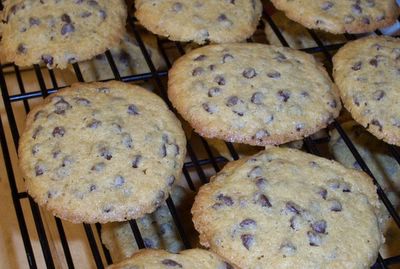
All These And More From One Recipe

All of the cookies tasted really good. As far as the "butterscotch flavor," well, if you nibbled on just the brown edges of the double chocolate chip Mama and Papa Bears, you could almost kind of sorta taste it. But one bite with chocolate and it was obliberated. On the other hand, all of the cookies except the mini chip Baby Bears were definitely "extremely fragile" as he stated. Although the brown edges appear to be crunchy in the photo, they are actually very soft. Why one would want to make cookies this susceptible to falling apart I do not know--except perhaps to use it as a handy excuse not to be able to share them with anyone. (In fact, I do believe I employed just that line of reasoning last week after I made a batch of Rae's amazingly chocolately Brownie Bite Cookies that she wrote about recently on Bunnyfoot.)

My personal favorites were the Mama and Baby Bear sizes made with the mini chips. They spread more evenly and also held together better than the others. Plus they're cuter. My notes for the cookies made with the larger chips simply say "weird." They were clunky and didn't spread right. And they really fell apart easily.

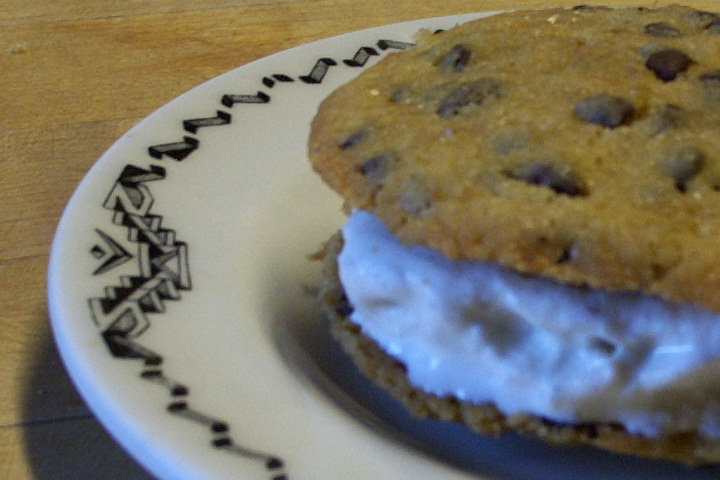
While this recipe did not shoot right up to the top of the New Favorites list, it is definitely a keeper. And I realized that because the cookies were so soft, they would be good for making ice cream sandwiches since all the ice cream would not smoosh out the sides like it does when you bite into one made with crunchy cookies. To make: Freeze the cookies, and then assemble sandwiches using slightly softened ice cream. Put the sandwiches back into the freezer until hard. (Or enjoy right away with large napkin at the ready.) I made some with vanilla bean ice cream, and they were very, very good. I bet they would be even better with my favorite, coffee ice cream.


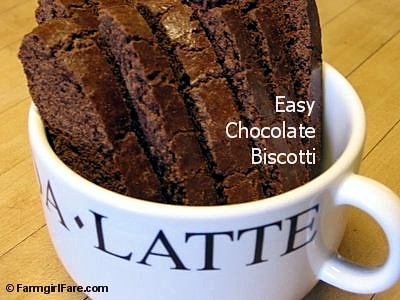
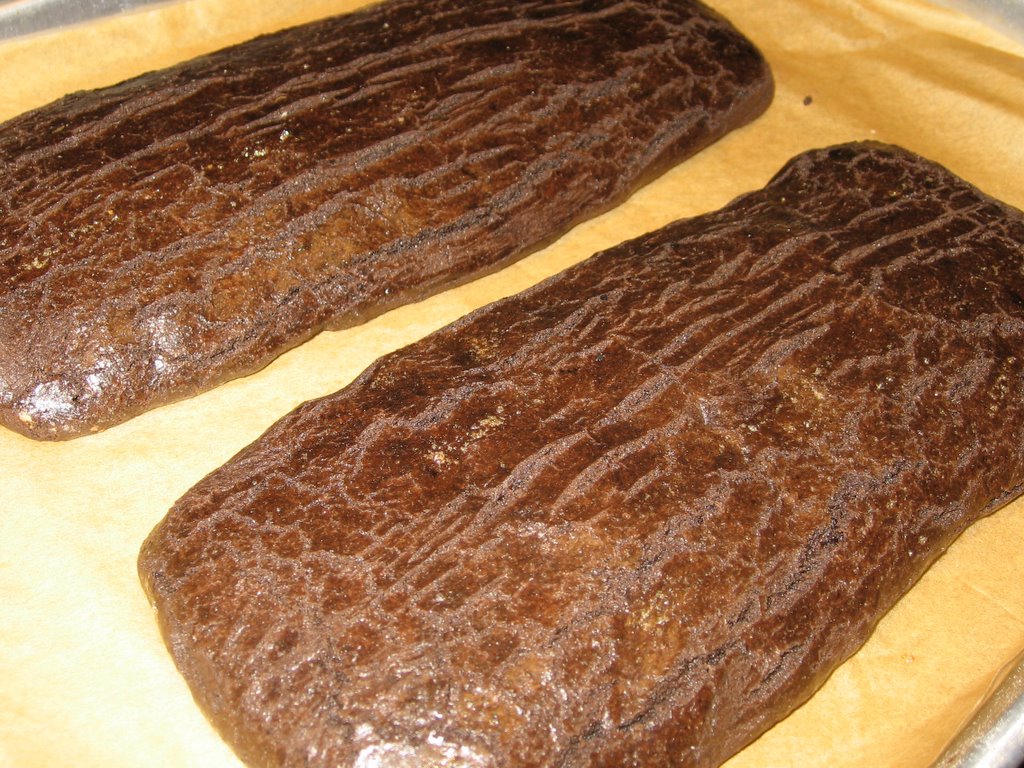
Save Some Cookies And Make A Few Of These
So that's my version of our all night/all day, highly entertaining baking adventure. We are both low on sleep and high on sugar right now, but it was worth it. The recipe, including my changes, is below. To hop over to Sydney and read Clare's side of the story, all you have to do is click right here. Isn't technology amazing?

David Leiderman's
Delicious Butterscotch Chocolate Chip Cookies
As Interpreted By Farmgirl

2 sticks (1 cup) butter, softened
1 cup packed light brown sugar
1/2 teaspoon salt
1 teaspoon vanilla
1 large egg
1-1/4 cups all-purpose flour
1-1/3 cups chocolate chips (about 8 ounces)

Preheat oven to 350 degrees. Combine butter, brown sugar, salt, vanilla, and egg in a bowl and beat to make a smooth batter. (I used an electric hand mixer on medium speed for about 1 minute.) Add flour and chocolate chips, stirring with a rubber spatula until no traces of flour remain. (My butter was really soft, so I put the finished batter in the freezer for about 10 minutes to stiffen it up a bit before baking.) Using a scoop or spoon, drop batter onto a parchment-lined, heavy duty baking sheet. Bake until barely brown (or a little longer if desired). Cool on a wire rack. Yield depends on size of cookies. Makes about 4 dozen Baby Bear (1 Tablespoon) size.

Baking times in my oven:
Papa Bears: 16-17 minutes
Mama Bears: 14 minutes
Baby Bears: 10 minutes.
Note: Because the instructions said "bake until barely brown," I may have erred on the side of caution and probably could have baked all the cookies a little longer. This might have helped with the fragility factor.