


January 2011 Update: More tips! You might also enjoy my new post, How To Shape Bread Dough Into Sandwich Loaves and Some Simple Bread Baking Tips.
This Daily Farm Photo of two freshly baked loaves of my pain au levain prompted some requests for tips on how to bake better crusty, free form breads, so I came up with 10 simple things you can do to immediately improve your loaves.
Then I realized one sentence on each would not suffice. So this post is much longer than originally planned. Also, I tend to get carried away on the subject of bread.
Then I realized one sentence on each would not suffice. So this post is much longer than originally planned. Also, I tend to get carried away on the subject of bread.
Let me preface this list by stating three things. One, bread bakers are an opinionated bunch. Two, there are at least six million opinions regarding bread baking out there. And three, most of these opinions contradict one another.
Such a basic process can easily get very complicated. And very confusing. Start delving through a pile of books on bread baking, and in no time at all your head will be spinning and your brain will feel as if it's made of dough. (I speak from experience.)
Such a basic process can easily get very complicated. And very confusing. Start delving through a pile of books on bread baking, and in no time at all your head will be spinning and your brain will feel as if it's made of dough. (I speak from experience.)
This is by no means a comprehensive lesson on bread baking, or even a basic introduction. If you've never baked a loaf of bread in your life, I recommend you begin by making pizza dough. Click here for my simple recipe.

Farmhouse White Sandwich Bread (recipe here)
From there, I suggest trying my popular Farmhouse White Sandwich Bread, which is a classic, basic loaf that's perfect for beginning bread bakers. And once you're comfortable with the basic formula you can go on to experiment by adding various other ingredients to the dough (the recipe post includes several suggestions).
If you're ready to try making crusty, European-style loaves such as the ones pictured above—or if you're looking for ways to improve the breads you're already making—I offer you these tips.
They're not deep, dark secrets. They're not magic tricks. They're simply ten things that made my breads better and resulted in the loaves you see here.
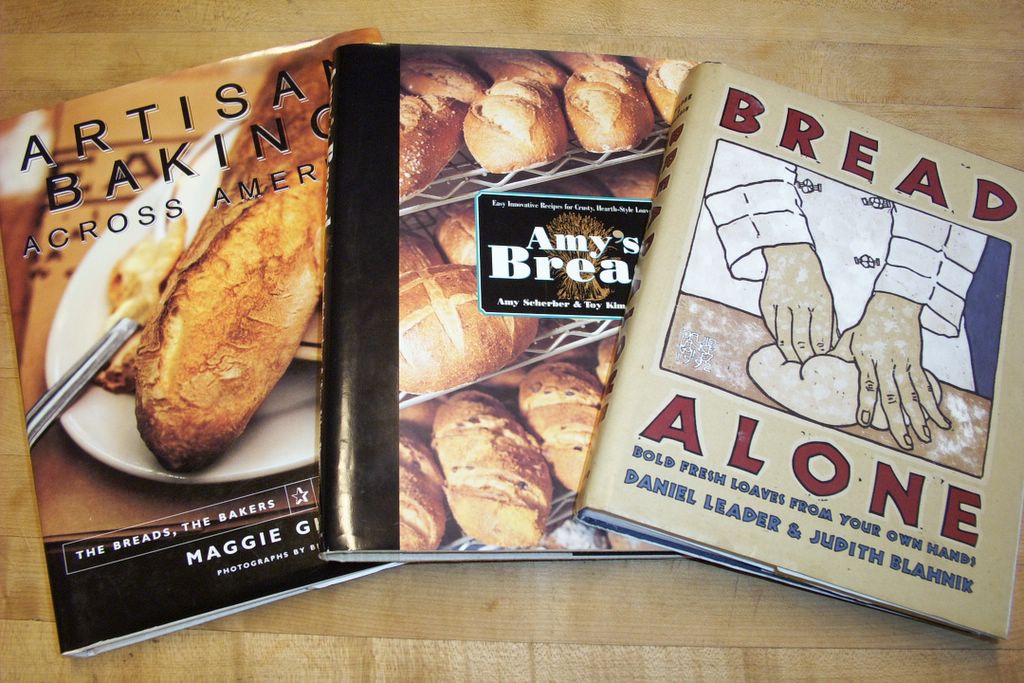
Even the covers of these bread baking cookbooks are inspiring.
1. Do some reading.
Just don't overdo it. Pick one bread book and read it from cover to cover. If you like it and it makes sense to you, read it again. Then try a recipe. If you like the result—or if it came out terrible but you know it has potential—make it again. And again and again and again.
I believe that it's better to make one bread 10 times than to make 10 breads one time. You can't get to know a bread by making it only once.
I have a pile of cookbooks devoted to bread, but the only one that lives in my kitchen is Bread Alone by Daniel Leader. I've turned to it so many times it's now in about four pieces. It's a wonderful book, full of everything from detailed information on ingredients and mouthwatering recipes (and photos) to stories about visiting an organic grain grower and starting the Bread Alone bakery in upstate New York.
It's easy to read, and the recipes are accessible even to a beginner. At first it may seem daunting, but it's not. Start with his learning loaves and move on from there. After 20 years this book is still in print, and for good reason.
Update: Daniel Leader's latest book, Local Breads: Sourdough and Whole-Grain Recipes from Europe's Best Artisan Bakers, is fabulous. It's the culmination of dozens of trips to Europe over the past two decades in search of bakers who are still using time-honored methods and ingredients to create loaves unique to their towns and cities.
Part travelogue, part bread making class, and part gastronomic history lesson, the book is full of colorful stories of local artisans and their authentic treasured recipes, many of which have been shared for the first time, and all of which have been translated by Daniel for American home bakers. I love it even more than Bread Alone.
Another excellent bread book also comes from a New York bakery. Amy's Bread, Revised and Updated: Artisan-Style Breads, Sandiwches, Pizzas, and More from new York City's Favorite Bakery is packed with useful information (especially for beginners) and offers recipes for tempting loaves of all kinds and all degrees of difficulty.
Artisan Baking Across America is a gorgeous book "to bake from, to learn from, to read for the sheer pleasure of realizing the devotion and mastery that go into the making of our best daily bread." It includes stunning photographs, intimate portraits of all kinds of artisan bread bakeries and bakers, and some of their best recipes.
Bernard Clayton's New Complete Book Of Breads offers over 300 recipes for every type of bread you can imagine, and each recipe includes instructions for making the dough with your hands, an electric mixer, and a food processor. The recipe for pita bread alone was worth the price of the book.
It's easy to read, and the recipes are accessible even to a beginner. At first it may seem daunting, but it's not. Start with his learning loaves and move on from there. After 20 years this book is still in print, and for good reason.
Update: Daniel Leader's latest book, Local Breads: Sourdough and Whole-Grain Recipes from Europe's Best Artisan Bakers, is fabulous. It's the culmination of dozens of trips to Europe over the past two decades in search of bakers who are still using time-honored methods and ingredients to create loaves unique to their towns and cities.
Part travelogue, part bread making class, and part gastronomic history lesson, the book is full of colorful stories of local artisans and their authentic treasured recipes, many of which have been shared for the first time, and all of which have been translated by Daniel for American home bakers. I love it even more than Bread Alone.
If you're a beginning bread baker, the beautiful step by step color photos and general information in Bread: Artisan Breads from Baguettes and Bagels to Focaccia and Brioche can help demystify the whole bread baking process, while inspiring you to start kneading. I really like the Italian Rosemary Raisin Bread, and my Carrot Herb Rolls (made with fresh herbs and lots of shredded carrots) are adapted from Bread. The stuffed focaccia is really good.
Another excellent bread book also comes from a New York bakery. Amy's Bread, Revised and Updated: Artisan-Style Breads, Sandiwches, Pizzas, and More from new York City's Favorite Bakery is packed with useful information (especially for beginners) and offers recipes for tempting loaves of all kinds and all degrees of difficulty.
Artisan Baking Across America is a gorgeous book "to bake from, to learn from, to read for the sheer pleasure of realizing the devotion and mastery that go into the making of our best daily bread." It includes stunning photographs, intimate portraits of all kinds of artisan bread bakeries and bakers, and some of their best recipes.
Bernard Clayton's New Complete Book Of Breads offers over 300 recipes for every type of bread you can imagine, and each recipe includes instructions for making the dough with your hands, an electric mixer, and a food processor. The recipe for pita bread alone was worth the price of the book.
Bread in novels: There's another bestselling book called Bread Alone. It's a quiet novel written by my good friend Judi Hendricks, and it, too, is wonderful. Much of the story takes place in a Seattle bakery, and Judi confided in me that she loves Daniel Leader's Bread Alone so much she named her novel after it.
I've read itat least three five or six times, and it always inspires me to bake bread. The sequel, The Baker's Apprentice is a delicious read as well.
2015 Update: Baker's Blues, the third novel in the Bread Alone series is out! Click here for a special conversation I had with Judi about food, writing, and her long awaited new book.
Yet another similarly titled book is Sarah-Kate Lynch's By Bread Alone, a quirky novel I enjoy re-reading every couple of years.

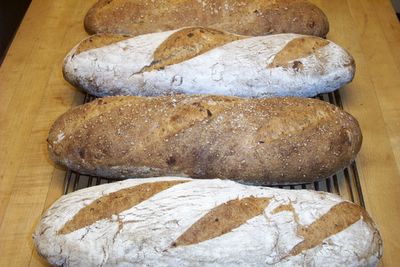
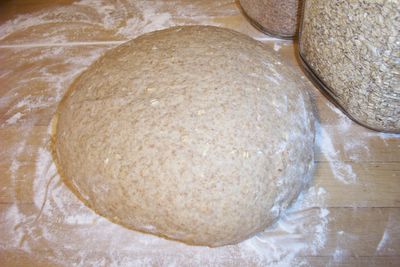
Oatmeal Toasting Bread 'Old' Dough (oatmeal bread recipe here)
3. Use a sourdough starter or a sponge or a poolish or a lump of old dough.
The wooden bowl is the bread baker's equivalent of the cast iron skillet. The more you mix and rise your dough in it, the more seasoned it becomes. Clean it with only a plastic scraper and a damp cloth. Wash it with water if you must, but never use soap (though if you buy a used wooden bowl, you'll need to clean it thoroughly with soapy water and soak it briefly in a mild bleach solution before the first use).
Old yeast cells will survive in the bowl, enhancing fermentation and building flavor in your doughs.
To keep your loaves (and pizzas) from sticking to the peel when you slide them into the oven, lay a piece of unbleached parchment paper (which is also wonderful for baking cookies and roasting vegetables) on the peel before turning the loaves onto it, then slide the loaves and the parchment into the oven.
This is how you get that pretty white pattern on the tops of your loaves (the dark parts are where the crust "bloomed" after it was scored just before putting it into the oven). And, more importantly, your crusts will be thicker and bolder because extra flour will have embedded itself in the dough while it was rising.

Freshly baked Oatmeal Toasting Bread (recipe here)
I used to be really bad about doing this, but I now find it indispensable. Each time you bake bread, simply take a few minutes to write down everything you did, from the amount of ingredients you used to the length of each rise, to how the finished bread looked and tasted. The more detailed your notes, the better.
There are so many things that can affect your bread baking; everything from the brand of flour to the weather can make a difference in how your bread comes out. For instance, when it's cloudy because of a low pressure system in the area, bread dough actually rises more quickly because it has less atmospheric pressure on it. Taking notes allows you to not only look back and see what worked and what didn't, but also helps you figure out why.

Farmhouse White ready for the oven (recipe here)
Each time I bake bread, even if I'm making my Farmhouse White for the 200th time, I pull out one of my bread notebooks and make detailed notes about the entire process. I also record the indoor temperature and humidity, the outdoor temperature, what the weather is like, and any other variables I can think of. This information can be especially helpful for the breads you don't bake very often.

Honey Whole Grain Bread baked using tips 2,5,6,7, and 9
13. And finally: Practice, practice, practice.
There is nothing that will improve your breads more than simply making them over and over again. And the best part is, there is nothing that will thrill your friends and loved ones more than receiving the results of your bread baking efforts.
So that's all there is to it. Just take these tips with you into the kitchen, and in no time at all you should be hearing those sweet, magic words, "This is the best bread I've ever tasted!"
Got more flour left? Check out these other Farmgirl Fare bread recipes:
Beyond Easy Beer Bread (my most popular recipe)
Whole Wheat Beer Bread
Onion Rye Beer Bread
How To Make Pita Bread in About an Hour
Savory Feta Cheese & Scallion Scones
Cranberry Christmas Scones (tasty any time of year!)
Meyer Lemon (or Regular Lemon) Scones
Whole Wheat Scones with Currants & Oats
Oatmeal Toasting Bread (makes wonderful rolls and burger buns too)
Italian Rosemary Raisin Bread
Fresh Tomato & Basil Whole Wheat Sourdough Bread
Carrot Herb Rolls (and a great bread book for beginning bread bakers)
My Favorite Easy Pizza Dough Recipe
Still hungry? You'll find links to all my sweet and savory Less Fuss, More Flavor recipes in the Farmgirl Fare Recipe Index. Enjoy!
© FarmgirlFare.com, the warm and crusty and slathered with butter foodie farm blog where Farmgirl Susan shares recipes, stories, and photos from her crazy country life—and everything is better with homemade bread.
I've read it
2015 Update: Baker's Blues, the third novel in the Bread Alone series is out! Click here for a special conversation I had with Judi about food, writing, and her long awaited new book.
Yet another similarly titled book is Sarah-Kate Lynch's By Bread Alone, a quirky novel I enjoy re-reading every couple of years.
2. Start with the best ingredients.
Depending on your point of view, this may sound either completely obvious or totally unnecessary. Flour is flour, right? Water is water? But when you are creating something with only four basic ingredients (flour, water, salt, yeast), the quality of those ingredients is crucial.
Wheat that is grown in dead soil and doused with chemical pesticides and herbicides, then sprayed with more pesticides once it's been harvested and is sitting in storage so it doesn't get bugs in it (yes, this is what is often done), and then highly processed and chemically bleached so that it's nice and white—this flour will never give you great bread.
Wheat that is grown in dead soil and doused with chemical pesticides and herbicides, then sprayed with more pesticides once it's been harvested and is sitting in storage so it doesn't get bugs in it (yes, this is what is often done), and then highly processed and chemically bleached so that it's nice and white—this flour will never give you great bread.
Organic flour is the way to go. Stoneground if possible. It's hard to find stoneground white flour, but Heartland Mill produces their white flours using equipment that is very kind to the wheat. I use organic bread flour (sometimes called high-gluten flour) for sourdough loaves, pizza dough, and combined with organic all-purpose flour in other breads like Farmhouse White.
Water should be pure. My water comes from a spring-fed, 300-foot deep well (actually 600 feet deep if you figure we're already 300 feet down in a valley). It's run through a large outdoor filter to remove sediment, and then I filter it again at the faucet. Municipal tap water is full of chlorine and often other contaminants. These do not make good bread.
Salt is a chic ingredient these days, and some of it is incredibly expensive. There are many natural alternatives to common table salt, which is pretty nasty stuff. Sea salt is nice, but it can be heavily processed, and some people recommend not using any sort of sea salt since our oceans have become so polluted. Kosher salt, a coarse salt which can come from either mines or the sea, contains no additives.
Look around, see what you can find, what you like the taste of, and experiment with it.
2016 update: I've been buying this pure Himalayan pink salt in bulk for several years (at a very reasonable price) and using it for everything from baking bread to taking baths. It's wonderful.
Look around, see what you can find, what you like the taste of, and experiment with it.
2016 update: I've been buying this pure Himalayan pink salt in bulk for several years (at a very reasonable price) and using it for everything from baking bread to taking baths. It's wonderful.
Yeast is always a topic of hot debate among bread bakers. Some highly respected professionals swear by "instant" yeast—which can be mixed right into the dry ingredients—while others refuse to even utter the words.
Fresh yeast is another hot topic; again, some people swear by it, while others say it's too much trouble as it doesn't stay fresh for long and can be hard to find. I've never baked with it. My sourdough loaves don't use any added yeast. Once you have a sourdough starter, that's all you need.
Fresh yeast is another hot topic; again, some people swear by it, while others say it's too much trouble as it doesn't stay fresh for long and can be hard to find. I've never baked with it. My sourdough loaves don't use any added yeast. Once you have a sourdough starter, that's all you need.
If you do use yeast, make sure that it's alive—no matter what kind. I use instant yeast, which I buy in economical 1-pound packages. I store it in a jar in the freezer where it keeps for over a year, though others say it won't, and still others say you should never, ever freeze yeast. See how it can get really confusing?
You can read more about the different types of yeast available here.
You can read more about the different types of yeast available here.
Oatmeal Toasting Bread 'Old' Dough (oatmeal bread recipe here)
3. Use a sourdough starter or a sponge or a poolish or a lump of old dough.
There are all different types of 'starters.' Some are made in a few hours, some in a few days, and some live in your fridge forever.
If you make bread two days in a row, you can just save a lump of dough from the first batch and mix it into the second, or you can freeze it for another time, like the Oatmeal Toasting Bread dough pictured above.
Any kind of starter will vastly improve the crust, crumb, and flavor of your loaves. It's simply a matter of finding which one works for you. I've had my two sourdough starters ('regular' and rye) for nearly four years. The older they get, the better they make your bread. I made them using the directions in Bread Alone.
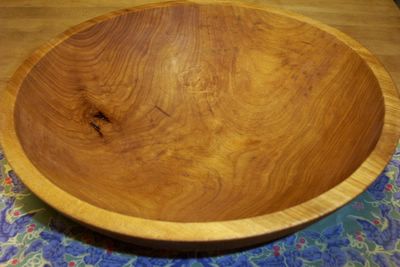
4. Find a wooden dough bowl and use it forever.

2008 Update: While I still love using my wooden bowls, most of the time I now let my dough ferment (the first rise) in a straight-sided food grade plastic container with a snap-on lid, which makes it easy to see when the dough has doubled in size. There's no need to grease or flour the container.
2017 Update: I recently bought this 12-quart Rubbermaid container and this lid for big batches of dough and it's really nice.
2017 Update: I recently bought this 12-quart Rubbermaid container and this lid for big batches of dough and it's really nice.
The wooden bowl is the bread baker's equivalent of the cast iron skillet. The more you mix and rise your dough in it, the more seasoned it becomes. Clean it with only a plastic scraper and a damp cloth. Wash it with water if you must, but never use soap (though if you buy a used wooden bowl, you'll need to clean it thoroughly with soapy water and soak it briefly in a mild bleach solution before the first use).
Old yeast cells will survive in the bowl, enhancing fermentation and building flavor in your doughs.
I've been using the same antique wooden bowl for a dozen years. It's four inches high and about 13 inches from rim to rim. It will hold enough dough to make three good-sized loaves. Every so often I take a cloth and rub almond oil or food grade mineral oil into the wood to keep it from drying out. It should really be done once a month. You can also use almond oil and mineral oil on wood cutting boards and rolling pins.
New wooden bowls are available in various sizes, or you might luck out and find one at an antiques store or flea market or on ebay. Old bowls are often very pricey though, because decorators and antiques collectors love them.
If you want to buy a new wooden bowl, I would check out The Bowl Mill in Vermont. I haven't purchased any of their bowls, but they appear to be of superior quality and workmanship. If treated properly, a wooden dough bowl should last for many years.
Whether you decide to buy a new wooden bowl or an old one, remember that you don't want one that has been painted or stained or is cracked.
5. Sprinkle in the flour and stir like crazy.
When you're mixing up your dough, add only about a handful of flour at a time. Use your whole arm to stir, making wide sweeping motions (I use a wooden spoon.) This will "whip" the dough and allow the gluten to develop.
This technique works best with a wide, shallow bowl. Take several minutes to mix in all the flour, saving one cup to add while kneading. Then turn the bread out onto a floured surface and begin kneading it.
This technique works best with a wide, shallow bowl. Take several minutes to mix in all the flour, saving one cup to add while kneading. Then turn the bread out onto a floured surface and begin kneading it.
6. Give it a rest and then add the salt.
Honey whole grain dough ready for a little rest

Honey whole grain dough ready for a little rest
This tip not only greatly improves nearly any type of bread, but it also allows you to decrease your kneading time (which improves the bread even more). Autolyse (pronounced AUTO-lees and used as both a noun and a verb) is a French word that refers to a rest period given to dough during the kneading process.
When making your dough, mix together only the water, yeast, flour, and grains until it forms a shaggy mass. Knead it for several minutes, and then cover the dough and let it rest for 20 minutes. I simply leave the dough on the floured counter and put my wooden bowl over it.
During this time, the gluten will relax and the dough will absorb more water, smoothing itself out so that it is moist and easier to shape. After the autolyse, knead the dough for several more minutes, mixing in any other ingredients such as herbs or nuts or dried fruit.
Since salt causes gluten to tighten, hindering its development and hydration, it should not be added to the dough until after the autolyse. And if you're using the "old dough" method (where you add a lump of finished dough from a previous batch of bread to your new dough rather than use a sponge or starter), do not mix it in until after the autolyse either, as it contains salt.
When you incorporate an autolyse into your bread baking, you will be rewarded with loaves that have greater volume and a creamier colored crumb, as well as more aroma and sweet wheat flavor. They will also look nicer and taste better. Bread doughs that contain a high proportion of white flour will benefit the most from an autolyse.
7. Keep the temperature low & the rise slow.
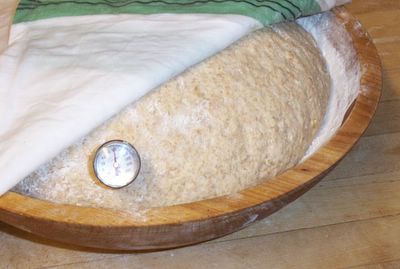
Taking the dough's temperature before the first rise

Taking the dough's temperature before the first rise
The fundamental art of bread baking can easily turn into a scientific study full of confusing technical jargon and complicated explanations. Since this is only an article and not an entire book, I am going to simply skip straight to the bottom line with this tip: the longer your dough is allowed to rise, the better your bread will be.
The two ways to extend rising times are by adjusting the temperature of the dough and the amount of yeast you put in it. The lower the temperature, the slower the rise. The less yeast used, the slower the rise.
Crusty, European-style breads often rise for many hours. For example, the sourdough breads I make contain no added yeast at all, only the sourdough starter—actually called a chef—that lives in my refrigerator.
Crusty, European-style breads often rise for many hours. For example, the sourdough breads I make contain no added yeast at all, only the sourdough starter—actually called a chef—that lives in my refrigerator.
The night before I plan to bake bread, I mix the chef with flour and water and set it in a place that is about 70° Fahrenheit for 8 to10 hours. The next day, this mixture becomes the base for my finished dough, which will rise for a total of another five to six hours before it's finally baked.
Many bakers agree that the ideal room temperature for bread dough to rise is between 70° and 75°. If you're baking in a kitchen that is cooler than 70°, you can easily raise the temperature of your dough by using warm or hot water (or milk)—or just let it rise a little slower, which will improve your loaves. Keep in mind that kneading the dough will also increase its temperature by a few degrees.
Many bakers agree that the ideal room temperature for bread dough to rise is between 70° and 75°. If you're baking in a kitchen that is cooler than 70°, you can easily raise the temperature of your dough by using warm or hot water (or milk)—or just let it rise a little slower, which will improve your loaves. Keep in mind that kneading the dough will also increase its temperature by a few degrees.
If the air in your kitchen is above 75°, you can use cold water in your dough (and can hopefully find a cooler place to let it rise). Storing your flours in the freezer is another way to lower the temperature of your dough, and it will also keep whole grain flours fresher.
An instant read thermometer is a handy item to have for taking water, flour, and dough temperatures, and it's indispensible if you're a serious bread baker.
2017 Update: Last year I finally switched from the instant read dial thermometers pictured above to this digital version, and I'll never go back! I also use it to check everything from roasted chicken to the hot water for our beloved aeropress coffee/espresso maker.
Using less yeast than is called for in a recipe will allow the dough to rise for a longer period of time. A basic rule you can apply to nearly any bread recipe is to simply use half the yeast and double the rising time. You may have to make adjustments, but this is a good place to start.
By doing just this one thing, you should see a great improvement in your breads. They'll have more grain flavor, a nice, dense crumb with irregular air pockets, and a pleasant chewiness.
8. Catch yourself a Couche.

Pain Au Levain rising in my homemade couche
Couche is the French word for "couch" or "resting place." In the bread baking world, a couche is a piece of heavy canvas that is dusted with flour and used to support freestanding loaves, such as rolls and baguettes, while they are proofing. (When making bread, the second rise—after the loaves have been shaped—is referred to as the "proofing" phase. The first rise is the "fermentation.") As you can see in the photo, the couche cradles the loaves, keeping them straight and preventing them from sticking together.
Couches made of special heavy baker's canvas can be purchased from commercial bakery suppliers. My couche is made from a yard of raw canvas I bought several years ago at a fabric store for about $4.00. Before using it the first time, I washed it in hot water (without any detergent) to remove any sizing from the material. Since then, I have simply shaken it out well after each use. If you do need to wash your couche, use cold water (so the flour doesn't turn to glue) and no detergent.
You can place your couche either directly on a counter or on a large baking sheet (I can't imagine life without my commercial half-size sheet pans) if you need to move the loaves somewhere else to rise. Sprinkle it generously with flour and rub the flour into the canvas. Long loaves such as torpedoes or baguettes should be placed in the couche seam side up.
When you're ready to put the loaves into the oven, flip them over onto your baker's peel (or an upside down, large rimmed baking sheet) so that the seam is on the bottom and the floured side is facing up. I have several different peels and prefer the wood-handled aluminum ones the best because the thin metal easily slides under the crusts. I recommend buying the largest size you can.
To keep your loaves (and pizzas) from sticking to the peel when you slide them into the oven, lay a piece of unbleached parchment paper (which is also wonderful for baking cookies and roasting vegetables) on the peel before turning the loaves onto it, then slide the loaves and the parchment into the oven.

This is how you get that pretty white pattern on the tops of your loaves (the dark parts are where the crust "bloomed" after it was scored just before putting it into the oven). And, more importantly, your crusts will be thicker and bolder because extra flour will have embedded itself in the dough while it was rising.
9. Turn your oven into a stone hearth.
A baking stone will simulate a stone hearth in your oven and is a must if you are trying to bake crusty, free form loaves. (It's also the secret to making fantastic homemade pizza.) It will allow your breads to bake more evenly, and the initial, intense burst of heat on the cold dough will help to create high, richly colored loaves and chewy, better-tasting crusts.
There are many shapes and sizes and thicknesses of pizza or baking stones available. (Update: Now you can even buy baking stones made from steel, which some bakers swear by.) Be sure to choose one that leaves a 2- to 3-inch gap of space on all sides in your oven so air can circulate. My baking stone is 14"x15" and about 3/4" thick and I've had it for 18 years. It's now dark and seasoned. After each use, I just brush it off. If you need to wash yours, use only water, never soap.
You should season a new baking stone by heating it once or twice in a moderate oven before using it. When making bread or pizza, always allow your baking stone to preheat in the oven for at least 45 minutes so that it's nice and hot.
I find that placing my baking stone on a rack in the center of my oven gives me evenly baked breads. If the bottoms of your breads are burning before the tops are brown, or vice versa, try placing your baking stone on a lower or higher oven rack. For pizzas I place the baking stone on the lowest oven rack and crank up the heat to 500 degrees.
Freshly baked Oatmeal Toasting Bread (recipe here)
2009 Update: A few years ago I started baking all of my pan loaves on my baking stone. I place the cold stone in the cold oven like usual, let the oven heat up, and then put the loaf pans full of risen dough directly on the hot baking stone. I really like the results, and the loaves are nice and brown on the bottoms and sides.
Heavy duty commercial loaf pans really make a difference. I love my Chicago Metallic pans (pictured above is the 1-pound size; I also use this larger size), and these USA Pans are really nice too.
10. Make some steam.
Have you ever wondered how some European-style breads get that gorgeous, glossy shine on their crusts—and why your loaves never turn out looking like that? Well, they can. All you need to do is fill up your oven with steam during the first part of baking.
Steam slows crust formation, which allows for the best possible oven "spring." It also gelatinizes the starch on the surface of the bread so that it develops a thin, glossy, beautifully brown crust.
There are two easy ways to create steam in your oven. One is to fill an inexpensive plastic spray bottle with water and mist the walls and floor of the oven for several seconds right after you put the bread in. Repeat this two more times at two or three minute intervals. (Warning: Do not spray the oven light! It makes a really big mess when it shatters.)
Try to open the oven door as little as possible when you're misting so that you don't lose all your valuable heat. You can set your oven 25 to 50 degrees higher than you need it to be to adjust for the heat loss while misting, and then just turn down the temperature once you're finished.
As long as your loaves do not have a decorative flour pattern on them (like the sourdough onion rye bread shown above), you can directly mist the dough as well. Or you can use a pastry brush to paint them with water before putting them in the oven.
The other way to create steam in your oven is by carefully pouring about a cup of hot water into a preheated pan you have set on a rack underneath your baking stone. Do this right after you have put your bread in the oven. Use a wide, shallow, old metal pan or a cast iron skillet (one of the most useful kitchen bargains around).
Do not use your favorite CorningWare baking dish, even though it's the perfect size. It will end up badly cracked, and you will end up in tears. If desired, you can also directly mist the loaves and oven walls at the beginning of the baking process when you use this method.
2009 Update: I rarely bother with the steam anymore, and I really haven't seen much (if any) difference in my breads. When I do want to create steam, I follow this tip from Daniel Leader's awesome book, Local Breads: Before you turn the oven on, place a cast iron skillet (one of the best kitchen bargains on the planet) on the rack below your baking stone. After you slide your unbaked loaves onto the hot baking stone, toss a handful of ice cubes into the hot cast iron skillet and quickly shut the oven door.
Oh, let's just make it an even baker's dozen tips!
11. Storing your edible masterpiece. Once you've baked a delicious loaf, you'll want it to stay as fresh as possible (assuming it lasts more than a few hours). Crusty loaves will keep best if you leave them unwrapped at room temperature.
You can store them, cut side down, in a breadbox or a cupboard or even on the kitchen counter. To re-crisp the crust, mist your bread with water and reheat it in a 400° oven for 5 to 8 minutes.
I store sandwich-style pan loaves in plastic bags at room temperature, but only for a couple of days. If the bread is whole grain, I usually leave the bag partly open. During our hot and humid Missouri summers I keep them in the fridge, which will make some people cringe, but I always toast refrigerated bread.
If you're not planning to eat your bread right away, consider freezing it. Bread freezes beautifully. I always bake several loaves at a time, no matter what kind of bread I'm making; there's no reason to go to all that effort for just one loaf.
I simply put whole or half loaves in heavy-duty freezer bags and toss them in the chest feezer, though some people recommend wrapping each loaf in aluminum foil first. You can defrost frozen bread at room temperature, or you can go straight from freezer to oven. For baguettes and large sandwich loaves (and all sorts of other things), I buy 2.5-gallon jumbo zipper bags, which I wash and reuse over and over.
12. Write everything down.
I used to be really bad about doing this, but I now find it indispensable. Each time you bake bread, simply take a few minutes to write down everything you did, from the amount of ingredients you used to the length of each rise, to how the finished bread looked and tasted. The more detailed your notes, the better.
There are so many things that can affect your bread baking; everything from the brand of flour to the weather can make a difference in how your bread comes out. For instance, when it's cloudy because of a low pressure system in the area, bread dough actually rises more quickly because it has less atmospheric pressure on it. Taking notes allows you to not only look back and see what worked and what didn't, but also helps you figure out why.
Farmhouse White ready for the oven (recipe here)
Each time I bake bread, even if I'm making my Farmhouse White for the 200th time, I pull out one of my bread notebooks and make detailed notes about the entire process. I also record the indoor temperature and humidity, the outdoor temperature, what the weather is like, and any other variables I can think of. This information can be especially helpful for the breads you don't bake very often.
Honey Whole Grain Bread baked using tips 2,5,6,7, and 9
13. And finally: Practice, practice, practice.
There is nothing that will improve your breads more than simply making them over and over again. And the best part is, there is nothing that will thrill your friends and loved ones more than receiving the results of your bread baking efforts.
So that's all there is to it. Just take these tips with you into the kitchen, and in no time at all you should be hearing those sweet, magic words, "This is the best bread I've ever tasted!"
Got more flour left? Check out these other Farmgirl Fare bread recipes:
Beyond Easy Beer Bread (my most popular recipe)
Whole Wheat Beer Bread
Onion Rye Beer Bread
How To Make Pita Bread in About an Hour
Savory Feta Cheese & Scallion Scones
Cranberry Christmas Scones (tasty any time of year!)
Meyer Lemon (or Regular Lemon) Scones
Whole Wheat Scones with Currants & Oats
Oatmeal Toasting Bread (makes wonderful rolls and burger buns too)
Italian Rosemary Raisin Bread
Fresh Tomato & Basil Whole Wheat Sourdough Bread
Carrot Herb Rolls (and a great bread book for beginning bread bakers)
My Favorite Easy Pizza Dough Recipe
Still hungry? You'll find links to all my sweet and savory Less Fuss, More Flavor recipes in the Farmgirl Fare Recipe Index. Enjoy!
© FarmgirlFare.com, the warm and crusty and slathered with butter foodie farm blog where Farmgirl Susan shares recipes, stories, and photos from her crazy country life—and everything is better with homemade bread.
The suspense is killing me!
ReplyDeleteTwo daily farm photos and bread tips coming soon! Love it. So excited.
ReplyDeletecan't wait for the bread tips!
ReplyDeleteBread is easily my favorite food (just ask my hips) and I swoon over a freshly baked loaf.
ReplyDeleteI like the wooden bowl tip. That's the next kitchen item I'm going to buy and I'm going to follow your directions.
By the way, what exactly is an "artisan bakery?" One that makes creative and homemade items? I've heard the term before, but I don't know exactly what it is.
They are great tips... can't wait for the next installment.
ReplyDeleteI just discovered the whip whilst you bake one, it makes a huge difference :)
The wooden bowl is also why you dont like to use oil.... :) see I remember... I need a new bowl for bread, I was thinking a big thick ceramic one but I will get a wooden one now.
Dont forget if you change the date at the bottom of your posts then the post will rise in your list on your blog. oh i explained that so badly...
hope it helps though.
Susan,
ReplyDeleteThanks for dropping by my blog, I like your's as well.
1. Do some reading.
Bread Alone is my favorite as well. But Hamelman's Bread is a good second book. And my copy of Beard on Bread must be 30 years old.
2. Start with the very best ingredients.
I would expand that to say if it's food, you should _always_ use the best ingredients you can afford.
3. Use a sourdough starter
Not as much trouble as owning a cat, but then it's less affectionate too.
4. Find a wooden dough bowl and use it forever.
That's the first time I've seen that recommendation.
5. Sprinkle in the flour and stir like crazy.
I confess I use a Kitchen Aid for all but the final kneading prior to first fermentation.
Michelle,
ReplyDeleteBread is definitely one of my favorite foods, too. That's great that you've decided to buy a wooden bread bowl. Can't wait to hear how you like it.
An "artisan bakery" is a shortened form of "artisanal bakery," and is based on the definition of the word artisan: noun, adj. A worker skilled in a trade such as fine wood working, masonry, and baking.
In her gorgeous book, Artisan Baking Across America (I've added a link to it in the text of my post), author Maggie Glezer goes on to say that "For bread to be considered 'artisan,' at least one part of its production must be performed by hand. Beyond that, artisan bread is most likely to be crusty European-style bread, sometimes sourdough, sometimes not; hopefully weighed, rounded, shaped, and slashed by hand; and baked directly on a hearth in a 'deck oven.' More difficult to define is the level of quality implied by the term, the concern for the color and flavor of the bread's flour, and for the naturally arising flavors conjured by careful craftsmanship."
Hope that helps. Makes me want to break into a crusty loaf just reading it! : )
Clare,
Yes, I saw an immediate improvement in my bread when I started using that whip/stir method.
Definitely get yourself a wooden bread bowl! And post a photo of it when you do!
Thanks for the date changing/post moving tip. I will use that to move the post up to the top of my blog when I finish the rest of the list.
Amy,
Yep, you need a bread bowl, too! I can't wait to see what kind everyone ends up with--and of course, how you like using them.
I think you will be very pleasantly surprised by what a starter can do for your breads. Even just using a "sponge" that sits around at room temperature for a few hours can make a big difference. Keep me posted (ha ha) on your progress.
Hi Kevin,
So glad you stopped by. Thanks for all your comments. I'm not familiar with Hamelman's Bread--will have to check it out. And I definitely need to dust off my copy of Beard On Bread, especially since you said the gorgeous sandwich bread you used for that BLT on your great blog, Seriously Good, is his sour cream bread. Yum. Sounds intriguing. And it definitely looked seriously good toasted!
And as I've already said to everbody else: Yes! Definitely get yourself a bread bowl!
Thanks, everybody. Glad you enjoyed this post. Hopefully I'll have the rest up soon.
Two words, f.g.: Thank you!
ReplyDeleteWonderful post. I need a wooden bowl.
Hi Nic,
ReplyDeleteYou're very welcome! Yes, you need a wooden dough bowl. You will love it!
How could I have missed this!!? I bake all our bread (by hand because we don't have a mixer)
ReplyDeleteWhat a great idea to use a wooden bowl for mixing! (I have a very large covered pyrex casserol dish that I use for bread mixing.)
I too loved the three books that you listed. I read all of them cover to cover (library copies) and I now own and keep a copy of Glezer's book in my kitchen and often refer to it. The other book that I found to be invaluable is "The Italian Baker" by Carol Field.
re: "Sprinkle the flour and stir like crazy" I love using Glezer's method of pretty much bunging in all the flour, stirring til it's pretty much mixed and then covering and letting the dough autolyse for 20 to 30 minutes. It really reduces a lot of the mixing and kneading labour.
Opinionated lot, aren't we? :^D
-Elizabeth
P.S. I still haven't worked up the nerve to make sourdough and/or capture my own yeast. (Have you read Jeffery Steingarten's chapter on yeast capturing in "The Man Who Ate Everything"? Hilarious.)
Excellent article, Farmgirl! I love baking bread, and of course, I do some things a little differently. :) It was interesting to learn the reason for the rest period. I had been taught that as a child but know, thanks to you, I know why to do it.
ReplyDeleteI am curious as to why you filter your spring water so heavily? We get our water from a spring too but don't filter it at all. There is a settling box for the little bit of sand but that is it.
Hi Walter,
ReplyDeleteWelcome to the farm! Glad you enjoyed the article. It's always nice to hear from a fellow bread baker.
Our water (which comes from a spring-fed well) can sometimes have a lot of large particle 'sediment' (for lack of a better word this early in the morning) in it. The large outdoor filter takes care of that. I filter it again once it's come out of the tap just to be cautious--the kind of filter I use takes care of any organisms or whatever (that are usually killed by chlorine) that might happen to be lurking in it. I do know that with or without the indoor filter, our water tastes wonderful! : )
hi, i'm tabitha-
ReplyDeletei have had my heart broken by bread too many times. there is a yearning part of me that wants to rush out and buy "Bread Alone" and a wooden bowl and *be* you. then there is that old hurt, the dense, inedible loaves... that the chickens wouldnt even eat... you know what i mean?
we need to be able to make delicious bread- we live in the midwest now! (moved here from california, where sourdough was cheap)
thanks for your tips, here, maybe i can love again.
tabitha
Hi Tabitha,
ReplyDeleteWelcome to the farm! Thanks so much for writing. I loved reading your comment, though your broken heart bread tales are so very sad (even the chickens wouldn't eat it?)
I sure hope you'll try making bread again after reading these tips. I know you can do it! You should see the success some other readers have had--even on their very first try at making bread. We bread lovers/bakers are a very supportive group. So be sure to let us know about your experiences. We will jump for joy with you over a beautiful loaf or send you e-pats on the shoulder when things don't rise right.
So go! Rush out and buy a copy of Bread Alone and that wooden bowl! You're in the midwest now, for crying out loud. You KNEAD to bake yourself some decent bread! : )
wow! thank you so much for the help. i just poured over this post with much "ahhh!" (lighbulb going off) and "oooo!". i was googling 'dense crumb' since when i make my loaves, i tend to get a dense crumb with no large air pockets--i want my bread to be a little 'looser'. i'll definitely try out these tips. but i am still scared of making starter... :)
ReplyDeleteI think your tips are great. Consistant with all that I have been practicing myself but also nicely succinct. I have grown to love Rose Levy Bernabaum's Bread Bible and also Peter Reinhart's books. Hamelman may soon become my favorite though. As far as Bread Alone, it has lots of good recipes but some of the techniques have gaps. For example, he never mentions autolysing and also he objects to bread flour. As a supplement to others, it is a great book.
ReplyDeleteGreat post. I'd add getting a good digital scale so you can weigh your ingredients and get more consistent results. Like Jonah, I'm working mainly with Hamelman's book, which really took my brain and kneaded it at first, but practice has made sense of most of it. Reinhart is my back-up/more pictures book. My co-workers are very fond of me, LOL.
ReplyDeleteI'm not sure you will respond since I just read about you taking a break from your blog; however, I am hoping for a reply from you or anyone reading your blog.
ReplyDeleteI have a wooden bowl and used it when creating my first unsuccessful loaves of herb bread and have a couple of questions.
1. Many bread recipies state the "glass" bowl needs to be oiled, as well as, the dough top to prevent a skin developing. Do I skip these two steps when using a wooden bowl? How do I prevent the skin/drying developing on the dough while rising in a wooden bowl?
2. Many bread recipies state to put fermented yeast in the bowl then add the flour slowly. Since I use the wooden bowl, do I use the flour first and make a well to add the liquid ingredients?
By the way, I'm a photographer and I enjoyed looking are your photos. Wonderful composition and perspective!
Hi Anonymous,
ReplyDeleteI apologize for not getting back to you sooner. Thanks so much for the kind words about my photos.
Okay, don't give up on your bread bowl! You will come to love it, I'm sure. As for your questions:
1. I never oil my dough or the bowl. Although that is the norm among bread bakers, personally I have never understood why. When I tried oiling the dough, I found that I couldn't knead or shape it after it had risen--it was too oily! Instead I use a combination of flour and damp cloths to keep the dough from sticking and becoming dry on top.
Once I've finished kneading, I generously sprinkle flour in the wooden bowl. Then I place the dough in it and rub some flour on the top. Then I cover the whole thing with a damp tea towel (nothing fluffy and linty!). That way the risen dough falls right out of the bowl, and the top is still soft. Once the loaves are formed, I do the same thing. Pans of dough are covered with a damp tea towel or cloth napkin. Freeform loaves rise in my floury cloche and are covered with a damp tea towel.
2. Different bread recipes call for adding the ingredients to the bowl in different orders. You can place liquid or dry ingredients in your bowl first--it doesn't matter which. I do both--just depends on the recipe I'm following. Also the type of yeast you use makes a difference. Active dry yeast is usually mixed with a small amount of warm water and left to sit for 5 to 10 minutes. But instant yeast (which I use sometimes) is mixed with the dry ingredients right in the bowl, then the liquid is added.
Hope this helps. I've gotta run--my newest bread experiment has just finished baking! : )
You saved my bread, Farm Girl! I've been working on making "bread like mom's" for years and I've got the recipe down but I've had all kinds of problems with the rise. Now I know why and what I can do about it! Thank you so much!
ReplyDeleteHi Sarah,
ReplyDeleteYou're quite welcome. Happy baking!
Hi Ktluvstx,
Welcome to the farm! Okay, to make a long, frustrating story short: I no longer own the oven that I used to bake the bread in these photos--and I wouldn't recommend it to anyone. For the past nine months I have been baking everything, including all my breads, in the oven of our new (splurge) Bosch range. It is dual fuel--gas burners (I can't imagine trying to cook on electric burners) and an electric oven. I am used to gas ovens, but am very happy with how this electric one bakes. (And it is good for me to get used to it as the enormous commercial deck oven I'll be using when we have our wholesale bread bakery up and running is electric.) It also has a convection setting, but I haven't gotten around to trying it yet.
My breads now look as good or better than the ones you see here. We spent a lot of time deciding what range to buy, and so far I am quite happy with pretty much everything about the Bosch, including the four different sized burners--so handy.
If you have any other questions or would like more details about our range (such as the model number), feel free to email me: farmgirlfare AT gmail DOT com. And happy baking to you, too! : )
Where can you buy a wooden bread bowl? My dad is a great baker and I would like to get him one for Christmas. If you have any suggestions, please share! Thanks!
ReplyDeleteHi Maria,
ReplyDeleteIf you're interested in an older or antique dough bowl, one place to look is ebay. Use search phrases like "wooden dough bowl," "antique dough bowl" "wood dough bowl" "wood bread bowl," "old wood bowl," etc.
If you want to buy a new wooden bowl, I would check out The Bowl Mill in Vermont. Click here to go to their website. I haven't purchased any of their bowls, but they appear to be of superior quality and workmanship. They have bowls of all sizes and made from several types of wood. The larger the bowl, the higher the price, of course. A 10" by 2-5/8" hardwood (usually maple) bowl is just $23.00. If treated properly, a wooden dough bowl should last for years and years.
Whether you buy a new or old bowl, remember that you do not want one that has been stained or varnhished or painted. Hope this helps!
Thank you for your help! I will check out ebay and the other site.
ReplyDeleteI learned to bake with Fr. Dominic on PBS--with very nice results. I like his book "Bake and Be Blessed" although it's mostly a spirituality book, not a baking book. Good to read while you're waiting for bread to rise. Any tips as to how to start a sourdough from scratch? I inherited one and used it faithfully for months, but then during a crisis this summer, it died...and I've never gotten it restarted successfully....
ReplyDeleteOH! And that no knead bread from the NY Times? Very nice. Thanks for the link.
ReplyDeleteHi Bridgett,
ReplyDeleteMy apologies for not getting back to you sooner. I know of Fr. Dominic, but I've never had the chance to see his show. I love the idea of reading his book while your bread is rising.
As far as creating your own sourdough "starter" from scratch, recipes abound. Everyone has their own theory--some bakers swear by a "wild" starter that you make with organic grapes. Others suggest you add a small amount of yeast, especially if you live in an urban area and you haven't been baking bread. The more you bake bread, the more "wild" yeast there will be in the air in your home, and the better your bread will be.
Yesterday I came across a sourdough starter recipe that called for yogurt and powdered milk but no yeast. I need to investigate the reasoning behind that.
Most starters take a few days to fully develop, but the actual hands on work is minimal. The starter I have been using for 5 years was made using the instructions starting on page 180 in Bread Alone by Daniel Leader--my all time favorite bread book. It takes 3 days and what you end up with is actually called a chef, the "seed from which the levain (sourdough starter) will be created."
I also have a sourdough rye chef that I made 5 years using instructions in Bread Alone.
Yes, that No Knead Bread is marvelous stuff. What I love most about it is that is has inspired so many people to try their hand at baking their own bread--and with impressive results.
If you (or anybody else reading this) is interested in baking bread (no matter what your skill level), I'll let you in on a little secret. Two bread baking buddies and I have just started working on a new project that will launch in early spring. It's called A Year In Bread, and you can click here for a sneak peek!
Thanks for the hints re: sourdough. Your new blog looks seriously yummy. I've got that Bread Alone book on order at the library...soon...thanks!
ReplyDeleteFarmgirl-- wow. I've been using some old-skool Tassajara-book methods for a while now, but haven't been totally satisfied. I just tried out your tips on a few crusty batards and I was utterly floored. I've never made loaves graced with such sublime texture. You've made a Manhattanite very happy through the magic of the internet ;) Thank you so much for sharing your expertise!
ReplyDeleteI had been living in France for 2 years and I just returned to the US and am eager to recreate the french bread that I miss so much. Your site is great and offers very useful and practical tips. Thanks so much and please keep posting!
ReplyDeleteGreat tips! It looks like you bake beautiful breads and I bet they taste awesome too. I am a huge fan of German style breads. I have been to Germany several times (my sister lives there) and I love waking up and having fresh baked bread (my Bavarian brother-in-law gets bread from a local bakery) with cultured butter, homemade jams and German spreadable cheeses. Heaven! The breads are crusty, dense (not light like most artisan breads in America) and have a wonderful sour flavor. By the way I do like the packaged German style dense, whole-grain (most of the time it's whole berry) breads that you can get here at supermarkets, but that is not the only type they make. Basically, what I am trying to say is I really love freshly baked breads that are crusty and dense. I have yet to find them in America. Does it just mean you add more flour to your artisan bread baking - is it just that? Maybe its more whole grain flour (be it wheat or rye) than white flour? I am so tired of light and fluffy breads. Even Whole Foods Market doesn't make dense breads - I guess because Americans do prefer crusty but light breads. I live in Evanston (just outside of Chicago)-do you know of any good bakeries here? Also, what about a recipe that I might like? Thank you so much for this spot!
ReplyDeleteGreat tips. Couple of questions. Where would you suggest I buy a wood bowl? eBay? Somewhere else? Also I have seen some comments regarding the baking stone that you recommend that it easily breaks. Any thoughts on that. Thanks! -mk
ReplyDeleteHi Anonymous 1/27/07,
ReplyDeleteYou're very welcome! Congratulations on your fabulous bread--and thanks so much for taking the time to write. Comments like yours just make my day. : )
Hi Anonymous 2/1/07,
Best of luck to you with your baking. And yes, I will certainly continue to keep posting about bread baking on FarmgirlFare.com. I am also involved in a new project I hope you (and others reading this) will find interesting. It's called A Year In Bread, and you can get a sneak peek by clicking here: AYearInBread.com. Come bake with us!
Hi Anonymous 2/8/07,
My apologies for not getting back to you sooner. Yes, most breads in America tend to be on the light & fluffy side. I make a very dense (but not brick-like) European style sourdough onion rye that I hope to share one of these days. In the meantime, if you would like to find good recipes for European style breads, I highly recommend the bestselling book Bread Alone by Daniel Leader--and signing up on our mailing list at AYearInBread.com. (Daniel Leader is coming out with a new bread baking book in August, and we will be interviewing Daniel about his new book on AYearInBread.com, plus giving away copies to some lucky readers.) Hope to see you there!
As for a good bakery in the Chicago area--I've never been there, but one of my A Year In Bread baking pals had this suggestion:
"I was in Chicago many, many moons ago and my advice is to get to a bakery or deli in a Jewish part of town - not sure about Evanston, but Skokie would have such. I'm sure there are other areas where the observant Jews have settled and built stores all in a small area (walking distance for the sabbath). I'd try those."
Hope this helps!
Hi MK,
Glad you enjoyed reading my article. Regarding finding a wooden bread bowl, please scroll up to my 12/4/06 reply to Maria for a couple of helpful links.
Regarding the baking stone I recommend: I read the two recent Amazon.com reviews you are referring to where buyers said their baking stones broke. I am not sure why this happened--one person even says they loved the stone, think they might have just got a "lemon," and will probably re-order the same brand.
I bought my baking stone over 12 years ago and it is doing just fine. I do treat it carefully and never put a cold stone into a hot oven. I ordered mine from a now defunct mail order company, and I am not sure what brand it was, but this Old Stone Oven baking stone sounds similar in size and thickness and quality. Many stones are much thinner, and I prefer the thicker kind.
I chose to recommend this one after reading the comprehensive product description, as well as over a dozen extremely positive Amazon.com reviews.
Here are some of thecomments currently on Amazon.com about the Old Stone Oven Baking Stone that aren't currently showing up on the listing at my Farmgirl Fare Favorites Amazon Store:
"Why pay more in those fancy cooking stores and sites for a pizza or bread stone when you can get [this] nice and thick high quality stone for much less?"
"I was helped in choosing this pizza stone by the hundreds of online reviews and suggestions posted by people from all over. Well, they were all right. Excellent item. I bought two stones and used them simultaneously for the first two homemade pizzas of my life... DELICIOUS! As others have suggested, I never remove the stone from the oven, and lately I just placed a pan containing the dough for an olive focaccia and it came out perfectly done. I am convinced that the stone works its magic also when not used to bake directly on it. I am extremely happy so far and I'd highly recommend this item. Buon Appetito!"
"I have been making all types of baked goods for almost 30 years, and can say without reservation, that this is the best pizza stone I have ever used. I've had mine for over a year now, and although it has blackened with use, it has never gotten one pizza stuck to it and never given off any noxious fumes or odors. I will definitely buy another in the future."
"I bought this baking stone, one year ago, after it received a recommendation from America's Test Kitchen. [Farmgirl's note: another reason to buy it--I trust America's Test Kitchen.] This is the first stone I've ever bought, at the age of 35. I finally decided to buy one after having my pizzas come out with either burnt or soggy crusts. I'm happy to say that it works just as well one year later after repeated use. If you are deciding between round vs rectangular stone, remember a rectangular stone gives you more surface area to work with."
Hope this helps. Just click here if you're convinced and ready to buy one!
Great. One more thing, I'm debating between the 14x4 or the 13x3.5 maple wood bowl. There is a 26 dollar difference. Any suggestion here? -mk
ReplyDeleteHi MK,
ReplyDeleteHmmmm. That doesn't sound like much of a size difference between the two bowls, but I bet it probably is. My wooden dough bowl is 12 inches from inside edge to inside edge (about 13" from outside edge to outisde edge), but it's a little over 4 inches deep. It will hold enough dough to make three 1-1/2 pounds loaves, but sometimes I wish it were a little bigger.
My personal philosophy when it comes to investing in things for the kitchen that you plan to use for a long time is to go with the biggest (and best) you can afford. For example, when I decided I wanted a Lodge Enamel Dutch Oven, I went ahead and chose the 7-quart size rather than the 5-quart size--and I'm so glad I did. There's nothing I can't make in the 7-quart that could be made in the 5-quart, and over time that $20 difference in price will become negligible.
My opinion is that if you are planning to use (and treasure) your dough bowl for years to come, I'd opt to go ahead and spend the extra $26 for the larger size. : ) Hope this helps. Happy baking!
I've been experimenting for a few months with a starter that used to be a commercial yeast but has been overtaken with some good old, stinky, local yeast. I've also been searching the web for a few months on baking some good bread, and I love this page! Your tips are fantastic and your pictures are wonderful too. Waiting to add the salt until after the first rest is one example of the fine 'been there, done that' advice I've been combing for. Thank you SO VERY much for taking the time and effort to share some of your experiences with us noobs.
ReplyDeleteGod bless,
Patrick
Thank you so much for these tips! After the autolyse, my dough was like a cloud-- so easy and nice to knead. This was only my second time making bread but the first time using your suggestions and already the bread is much better :) Now to find a bread bowl... wondering if you know how to clean it initially? I want to get an antique one but I feel icky about not cleaning it with soap, so what do you suggest?
ReplyDeleteBy the way, I have read your blog many times before an I love it. Thanks again!
I second the last comments question about cleaning an antique bread bowl.... I have been looking at them on ebay but I've been hestiant to buy one and use it for food. I wonder if I could sand the inside of the bowl a little bit? Hmm...
ReplyDeleteSorry to comment on such an old post, but it's such a GOOD post. :)
Hi Patrick,
ReplyDeleteThis is a very belated You're Welcome! Thanks so much for taking the time to write. : )
Hi Samantha,
My sincere apologies for not getting back to you much sooner. Congratulations on your bread baking success! I'm thrilled that I'm partly to blame. : ) I hope you'll come over and bake with us at A Year In Bread.
As for how to clean an antique/old wooden dough bowl. Good question. I've been using mine for so many years I honestly can't remember how I cleaned it before using it, but recently I purchased another one that definitely needed to be cleaned. I started scrubbing it over and over with a scrub sponge under warm running water and realized that it seemed to have some sort of stain in the wood which was making the water run dark even when the bowl looked "clean."
I got sidetracked with the project (farm life, LOL), but my farmguy Joe said that we could definitely give it a very light sanding and that should bring it down to bare wood, if indeed there is a stain on it--it may simply just be really dirty, I can't say for sure.
Anyway, after we do that, I'll probably wash it again with a very mild bleach solution--just a couple of drops of bleach mixed in water. That should be enough to sterilize the bowl but not bleach the wood.
I'll also put some Nature's Miracleon it. This is an all natural stain/odor removal product I've been using for about 15 years. The stuff is incredible. It's mainly for pet stains/odors, but you can use it on laundry and all sorts of other things. It'll work on old stains--I once saved an antique wood cabinet with some! I like to wipe down my butcher block counters in the kitchen with it every once in a while. It isn't harmful at all and won't hurt the wood. So it's fine to use on a dough bowl.
If you're not familiar with Nature's Miracle, click here to read more about it and/or to order it from amazon.com. This is a really great price, and it's only a flat $5.95 shipping for up to $125 in merchandise from the seller.
Hope this helps!
Hi Darby,
So glad you enjoyed this post. As you can see above, you were right on track with the sanding idea. Best of luck and happy baking to you! I hope you'll join us a AYearInBread.com, too.
And now I have to dash back to some resting bread dough in the kitchen! : )
Hey Farmgirl,
ReplyDeleteI just recently found your blog. After much searching, I have found and purchased a wonderful dough bowl. It is hand made by J P Madren. doughbowlmaker.com. I searched e-bay, the link on your site,and the internet. I believe that others would like to look there, also.
thanks for the tips. Missippi farmgirl.
Dear Farmgirl,
ReplyDeleteMy husband and I are trying to perfect the perfect baguette in our kitchen this Winter, and we have been trying your recipe. One problem we have encountered is that no matter how we try we cannot get our crusts crispy. We follow your instructions to a T, also checked the misting instructions from Bernard Clayton's book, and STILL our crusts are NOT CRISPY, or they only remain crispy for a few minutes whilst still hot. ANY SUGGESTIONS would be so welcome, it's driving us nuts. We have made at least a dozen loaves trying different tweaks, HELP!!
Thanks,
Sandra in MD
Hello, I just ran across your site while I was seeking bread advice. I'm trying my hand at European breads and came upon some issues. Your site is fantastic! It gave me the information I needed and opened my eyes to a new community- thank you. I began a sourdough starter for the first time yesterday..that little baby is just brewing and I'm excited to see if it will pan out. Ill continue to check out your page as I go- Thanks again!
ReplyDeleteSusan,
ReplyDeleteA question:
If my dough has risen twice and I cannot get to it to bake as planned, can I punch it back down again and reshape it? Or will that be a disaster?
Love the bread tips, they are very helpful, especially about the crust- I miss sourdough french bread from California so much.
Suzy
Hello Farmgirl,
ReplyDeleteI recently stumbled onto your blog and just love it. Your 10 tips are most excellent. I have been trying to make 100% whole wheat bread and see that your recipe uses 1/3 bakers flour, and 2/3 whole wheat. Do you have 100% whole wheat recipes?
My bread turned out a bit more dense than before, but maybe if I take your suggestion to write things down I can figure out why it was different. I will have to incorporate some of your other tips (or all if I can)...
What type of wood are the bread bowls made with? I've been using ceramic bowls... well because I am a potter, but anything I can do to make a better bread, as mine is currently just average. Someday I hope to live up to the stories I heard of my great, great, great, great-grandmothers bakery breads.
Which brings up my next question, you bake on a stone. Are all your loaves baked on the stone?
Well that's probably a enough questions.
Thanks so much,
Cat
I am so grateful to have found your blog! I was simply looking for an easy bread recipe, as I had decided to start making all my own bread in an effort to avoid the "yucky" ingredient labels on the shelf, when I came across YOU! Thank the good Lord for you! I was very nervous initially as I had never really worked with yeast breads, but you have spelled everything out so well for us newbies.
ReplyDeleteMy initial batch was not very good. It was my own fault as I had not mixed the salt as well as it needed to be so there was one particular loaf which was, well, waayyy too salty and one which didn't really seem to have much salt at all! My husband wanted to know was I going to continue to make my own bread (before we realized, I had sent him off to work packing a couple of very salty sandwiches!), but I was not to be deterred. Aside from the salt, the loaved "looked" quite lovely and I knew I could make them taste as good.
Before I found your blog I had tried another recipe. I felt it left much to be desired. Then I found your Farmhouse White recipe. After reading all your tips, I went out and purchased all new ingredients. Wow! What a difference. My next purchase was a big 13-1/2 x 4-1/2 inch wooden bowl I found on ebay. Sooo much nicer to use than my big stainless bowl! My bread rises so well and comes out so perfectly now. It rises so much it completely fills my big bowl! Wow! I have been making this recipe for about a month and a half now at least once a week. I actually made it yesterday and again today! I just invested in three more loaf pans so that I can do two batches staggered on the same day. I originally was starting it in my Kitchen Aid and then taking over by hand to add the salt, but I have found over the last week that it seems just as easy to do it all by hand and then I don't have the extra KA bowl and dough hook to wash. It actually seems like it maybe rises a little better too.
Today I let my 14 year-old daughter take over after I had done the first rise. She divided it, shaped the loaves, set them for the second rise and baked them. They came out beautifully! Next time I may let her do the whole thing! Yes, you have made it that easy for us! Your breakdowns and pictures in your recipe have been very helpful.
I think I am now ready to venture into some of the healthier recipes. I just found a coop where I can order organic flours and grains in bulk quantities. I have seven children and so I need to make more bread than the average person. The cost in the local grocery for the organic flours seems so high, so I am excited to find this source (Frankferd Farms in PA). I am eager to try new recipes now that I feel comfortable with the first. I have printed some of yours you have on your sites, but maybe my next investment should be your favorite book.
Yes, all this from someone who was afraid to make yeast breads and really knew nothing about it. I sincerely thank you for taking your time to share all your wonderful knowledge, saving me many hours of trial and error, and perhaps even just giving up!
I know our family will reap the benefits of having healthy home-baked breads. I am also thrilled that I can pass this ability on to my children.
I have "favorited" you (and your joint site) and will pass your link on to everyone who seems impressed that I am actually baking all my own breads!
Again, I thank you from the bottom of my heart!
Help ! My sourdough starter seems to be stalled ! It is made from warm potato water with rye flour and yeast. It bubbled nicely for a few hours but is vry quiet now. I wonder why? Is it too cool? I added a teaspoon of honey just now to try to restart it. I'm waiting for results. Any advise?
ReplyDeleteHi Anon,
ReplyDeleteAs my bread baking pal and A Year in Bread partner Beth so succinctly put it:
sourdough...patience... it bubbles, stops, starts again... feed it and wait
Yours is probably just fine. And one of these days we're going to get around to covering sourdoughs on A Year in Bread. We had a slight setback (well, a several month setback actually) with our plans to get back up to regularly posting over there when Beth managed to shatter her wrist last month. But we'll be back and baking better than ever. In the meanwhile, have fun with your new starter! : )
Thanks for the tips. And chance we can get a recipe for the Honey Whole Grain Baked pictures in the Tops post? Mine always comes out so dense; like a brick. Yours looks lighter. Secrets?
ReplyDeleteHi Anon,
ReplyDeleteAsk and ye shall receive! My favorite Honey Bran Whole Wheat Sandwich Bread Recipe" is now up at A Year in Bread. : )
As for baking secrets for this kind of loaf, I don't have any - but do know that this isn't 100% whole grain bread, which means the white flour included in the recipe will make the dough lighter and the resulting bread taller, 'fluffier,' and less dense.
A lot of people head straight towards 100% whole wheat bread recipes when they decide to bake their own, and this often results in disappointing 'door stop' loaves. My suggestion is to start with a basic white loaf (like my super popular Farmhouse White) and move on from there once you're comfortable with the basic process. You can simply begin by swapping a few cups of whole wheat flour (or bran) for white flour in the original recipe, which is actually how I created the Honey Bran Whole Wheat.
White whole wheat flour can also help, as it's 100% whole grain but made with a 'lighter' variety of wheat that acts more like white flour in baked goods. This is actually what I used in the Honey Bran recipe.
Happy baking!
Hi,
ReplyDeleteI've newly returned to weekly bread baking. I have a question about using a wooden bread bowl.
Do you only using it for rising? or for mixing as well?
I'm glad I got back to baking my own bread--so much better tasting, but now I eat more of it as well :)
Hi Anon,
ReplyDeleteWelcome back to homemade bread! I use my wooden dough bowl for both mixing and rising, though lately I've been using it just for mixing and then letting the dough rise in straight sided plastic containers with snap on lids. So easy to keep the dough moist and to see when it has doubled. You can see a photo of a container of dough if you click on my Carrot Herb Rolls Recipe post on AYearInBread.com and scroll down. Happy baking! : )
Hi,
ReplyDeleteI found another site that sells wooden bowls finished and unfinished for reasonable prices.
http://www.hofcraft.com/wooden-bowls.html
I'm going to order one from there rather than getting a used one from ebay.
Hi, Farmgirl!
ReplyDeleteI am a citygirl who used to bake bread weekly for my family, and then had to go out into the big bad world to work, and had trouble finding time for the rise, so . . . I am just getting back to the weekly bread baking, too.
I eased myself back into the bread baking by baking breadsticks for the weekly soup suppers at church during Lent, and they are very well received and practically perfect in every way, to quote Mary Poppins.
However, when I try to bake a loaf of bread using the same recipe, the bread always turns out too crumbly for slicing and sandwiching, etc. Do you have a tip for making the bread better for sandwich use?? I tried to do all whole wheat flour, and now am mixing it partially all-purpose or bread flour.
I think I will try longer risings and a 20-min rest between risings and see how that helps. I got those ideas from your tips blog. THANKS!!
Another easy way to create steam is to put an ice cube in the bottom of the oven just as you put your dough in - it slowly melts and creates good steam for about 2-3 minutes.
ReplyDeleteGreat tips! I am going to borrow your tip on creating steam in the oven with my gluten free breads and see if I like how the crust turns out. I have been basting with egg white wash, but for my egg free consumers this might be a better trick for a nice crust.
ReplyDeleteAlso, air pressure really does make a HUGE difference in gluten free breads, even to the point of failure...
Hej!
ReplyDeleteI think this is the best Bread post. Ever.
Thank you!
All the best from Over seas.
Malin
ps. maybe my blog can inspire too. Feel free to check out http://elmlid.com
I recently stumbled on your blog ... excellent! Thanks. I have made bread for my family for a number of years and then recently for many health related reasons have gone "gluten free". You don't happen to have any tips/experience with that by chance? Just can't seem to get it right now.
ReplyDeleteHi Anonymous,
ReplyDeleteSorry to hear you've had to go gluten free, but you're in luck! We recently did a round up over on A Year in Bread of tried and true gluten-free bread recipes from some of the most popular gluten-free bloggers on the web. You can find it here. Happy baking!
This is a fabulous set of tips, Susan.
ReplyDeleteI know I've read this post in the past, but it was so helpful coming back to it again. Thank you for all of the wonderful information. I'm participating the the Bread Baker's Apprentice challenge and it's been quite an adventure. There's always something to learn each time I make bread. Even though I blog my breads, I'm terrible at taking notes. "Oh, I'll definitely remember" is my excuse as I'm going along, but inevitably, I'll forget 3/4 of what happened. Which is why I love the notebook idea. I'm a list and notebook freak, so I have plenty of spare books around to use.
ReplyDeleteThanks again, Susan! I love your blog. I've been a faithful reader for years. I think yours is one of the very first I put in my RSS feed.
Dear Farmgirl: I am living in Nepal where the flour appears to be from soft spring wheat, great for chappaties and cakes, but too low gluten for yeast bread. My bread comes out flatter and heavier than I have ever seen it. I am going to try your beer bread recipe and see if that helps. I do have access to millet flour, white flour, "wholewheat" flour, buckwheat flour, and corn flour (we milled that down the road). Would adding those help? Thanks.
ReplyDeleteHi P Grace,
ReplyDeleteHmmmm. Usually white (wheat) flour will make higher, lighter loaves than whole wheat flour, so I would definitely try a 100% white flour loaf and see how that works. In the U.S., you can buy 'bread flour,' which is sometimes called high gluten flour, though most bread recipes work fine with all-purpose white flour.
Any of those other flours will probably add nice flavor and texture, but I'm pretty sure they're all much lower in gluten than wheat flour.
Many whole grain flour bread recipes call for adding 'vital wheat gluten' to the dough - usually 1 Tablespoon per cup of flour will help, though some recipes call for quite a bit more.
Vital wheat gluten looks like fine, darkish flour and can often be found in natural foods stores, either packaged or in the bulk section. I have a feeling you may not be able to find it in Nepal, but you might ask around.
And I'm sure you've probably thought of this already, but if there's anybody selling yeast bread that seems to be coming out 'right,' I would ask them how they do it. :)
I hope this helps. Good luck and happy baking!
If using a wooden bowl for raising dough what do you treat the bowl with so it does not stick?
ReplyDeleteHi Anon,
ReplyDeleteWhen letting dough rise in a wooden bowl, I simply sprinkle the bowl and the dough with flour before setting the dough in the bowl. The dough doesn't stick to the bowl, though it will leave some residue, which I scrape out with a plastic/dough bowl scraper like these.
If you're making a super sticky dough, such as ciabatta, you might want to go ahead and let your dough rise in a straight sided, lidded plastic container instead. I never have dough stick to those, and although some people recommend oiling the plastic first, I never do.
If I need to wash my wooden bowl, I only use water - no soap - and then rub food grade mineral oil all over it. This helps seal and protect the wood.
I love all the comments, spent an hour reading them all.Can't wait to try out your tips to make a better loaf. From the United Kingdom a big thank you. Keep up the good work and I shall be back. Wonderful site. Where can I peek at your new oven you have installed?
ReplyDeleteI have tried so hard to make bread but I failed every time, first it would not rise then the shape was horrible or the bread was so heavy it could sink a ship. But that's all changed now. I fallowed your recipe for a single loaf and the results were beautiful. I wish you could see it, the loaf sprung up almost 5 full inches after I put it in the oven, is crust turned out perfectly golden and the first slice practically melted in my mouth. As soon as I tried it I pulled out my equipment and started on another full three loaf batch. I could Kiss you thank you so much
ReplyDeleteWow! That's more help than nearly all the bread books I've tried! You are so right about starting with pizza dough--it wasn't till I mastered it that bread started to happen that was recognizable as "bread" and not "bricks." I'll be coming back to this post I know!
ReplyDeleteWhat are your feelings about bread machines?
ReplyDeleteHi Amber,
DeleteI don't have any experience using a bread machine, but I'm all for them if they get people to start baking their own bread. That said, nothing compares to the experience - and taste - of a handmade loaf. And it really isn't difficult to make! :)
I'm having a hard time figuring out what kind of wooden bowl to get? Should it be a finished lacquered or unfinished bowl? I'm new to making bread my hand, and not quite sure what would be the best.
ReplyDeleteYou want a hardwood bowl that isn't finished with anything except a food grade oil, such as mineral oil. Check out bowlmill.com for some very nice wooden bowls.
DeleteOr you can do what I do now and let your dough rise in a large, straight sided, food grade plastic container with a snap on lid, like these containers here. They make it really easy to see when your rising dough has doubled in size. Happy baking!