

The Pita Project (or Pita, Pita, I Too Much Eata!)
Three Weeks & 60 Minutes to Yum

Three Weeks & 60 Minutes to Yum
Homemade pita breads are stuffed with crunchy Greek salad, baby spinach, and a quick and easy kalamata olive tapenade for a healthy light supper or lunch (recipe here).
There's homegrown ground lamb mixed with fresh basil, rosemary, thyme, onion, and garlic in the fridge. There are lemon cucumbers and white and yellow onions and San Marzano tomatoes and Italian parsley and Greek oregano and lots and lots of basil in my kitchen garden. And there are tiny drops of water falling from a cloudless sky, which can only mean that it is so hot and humid that sweat is dripping off the sun.
So what does a farmgirl do? She cranks the oven up to 500 degrees and makes pita bread of course! And just how does she do that?
She pulls out a recipe she has made only once (two years ago), and then, caught up in a seductive haze of gorgeous garden bounty and warm pita bread, she snaps a photo and posts it along with the promise of a recipe.
This promise receives such an unexpected, enthusiastic response that she becomes the tiniest bit nervous, since she has never before posted a recipe she hasn't made so many times she could prepare it in her sleep.
And so she decides she should probably make one more test batch.
Three weeks and six batches of pita bread later, I am ready to report my findings. And I have much more to share than just a recipe. I even created an amazingly scrumptious, quick and easy version of one of my favorite foods. I also spent more time crouched down in front of the oven than I have in my entire life. But let's start with the recipe.
I found it in Bernard Clayton's New Complete Book Of Breads, a book I claimed in my Ten Tips For Baking Better Artisan Breads at Home post was worth buying just for the pita bread recipe. I still agree (though I do hope to one day try some of the other 300 recipes this enormous book contains).
Here's what Bernard has to say about pita bread:
"At the heart of the Middle East cuisine is a flat disk of bread known as pita in some countries and peda in others. As it bakes, the dough puffs to leave the center hollow. Not surprisingly it is also known as pocket bread. The pita can be torn or cut open and filled with meat or other delicacies, or a bit of it can be used as a spoon or as a 'pusher'."
The pieces of dough must be rolled flat before they are placed in a hot (500°) oven. The dough should be rolled to a thickness of no more than 3/16 inch. This is the thickness of a wooden yardstick, the kind given away at fairs and by auto dealers and paint stores. It can be used as a gauge."
The oven heat generates steam inside the pita and immediately the dough puffs into a ball. Later, as it cools, the bread will collapse. The oven must be hot. If it is not hot, the piece of dough will think it is meant to be a bun, and will rise slowly but without the all-important pocket in the center."
While this is a yeast dough, it puffs up because of steam. The yeast adds only flavor and texture. Don't overpower the dough with flour or it will be too dry to allow sufficient steam to be generated. Leave the dough on the soft side. Sprinkles of flour will take care of the stickiness."
What caught my interest was not only his claim that the steam (rather than the yeast) was responsible for the puffing, but also the fact that he only let the dough "rest" for 20 minutes and did not bake his pitas on a baking stone. That meant freshly baked pita bread in under an hour, as opposed to the two or three hours other recipes required.
After all of my experimenting (which I will discuss below), this is the recipe I am sticking with. It's essentially Bernard's, with a few minor adjustments.

Farmgirl Susan's Pita Bread after Bernard Clayton
Makes 8
2½ cups organic bread flour (I used Heartland Mill Organic Strong High-Gluten), plus more for sprinkling while kneading & rolling out dough
2 teaspoons salt
1 Tablespoon granulated sugar
1½ teaspoons instant yeast
2 Tablespoons extra-virgin olive oil
1 cup warm water (105 to 110°F)
8 eight-inch squares of aluminum foil for baking pitas
(Bernard claims that "placing the rounds on foil rather than on a baking sheet or stone allows a softer heat to surround the dough. A direct thrust of heat from a baking stone would form a crust difficult to puff.")
In a large bowl (I used my wooden dough bowl), combine 1 cup flour with the salt, sugar, and yeast. Add the oil and water. Beat vigorously with a wooden spoon for three minutes, then stir in the rest of the flour 1/2 cup at a time.
The dough should be a rough, shaggy mass that will clean the sides of the bowl. If the dough is moist, add a small amount of additional flour.

Pita dough ready to knead
Turn the dough onto a lightly floured work surface and knead for 6 minutes.
Preheat the oven to 500°.
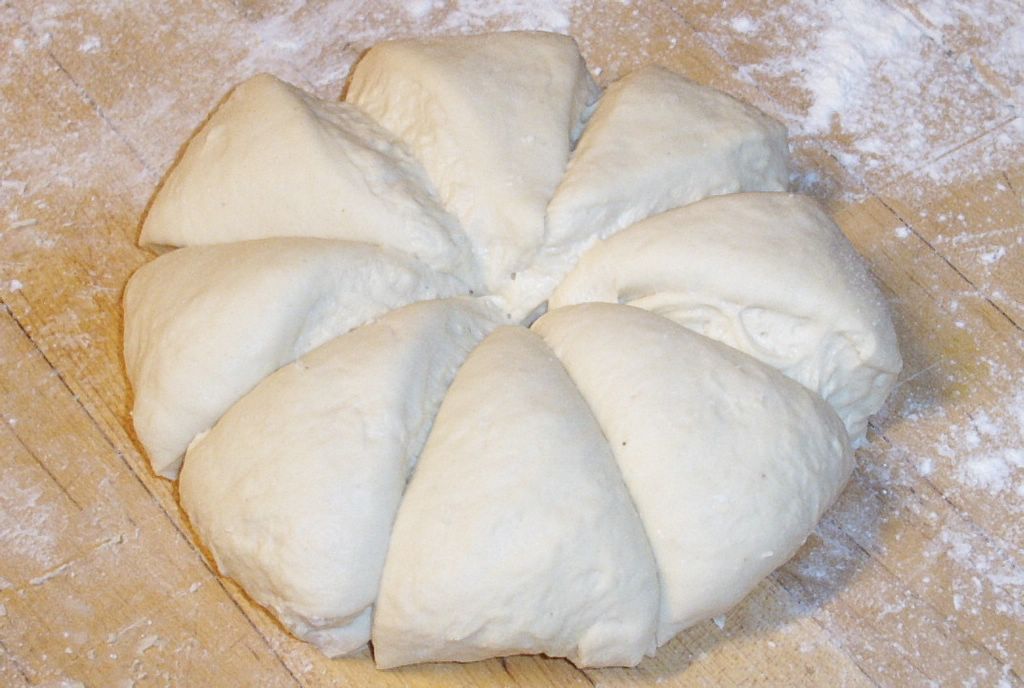
Divide the dough into 8 pieces. I patted the dough into a circle and used my metal dough scraper (these things are so handy) to quickly and evenly cut it into eighths, as if cutting up a pie.

Divided Dough (it "stuck" back together while taking the picture)
Roll into balls, dust lightly with flour, and cover with a damp tea towel. Let rest for 30 minutes. (I increased this from Bernard's 20 minutes.)
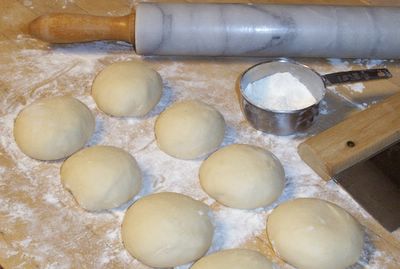
Dough balls ready to be rolled out
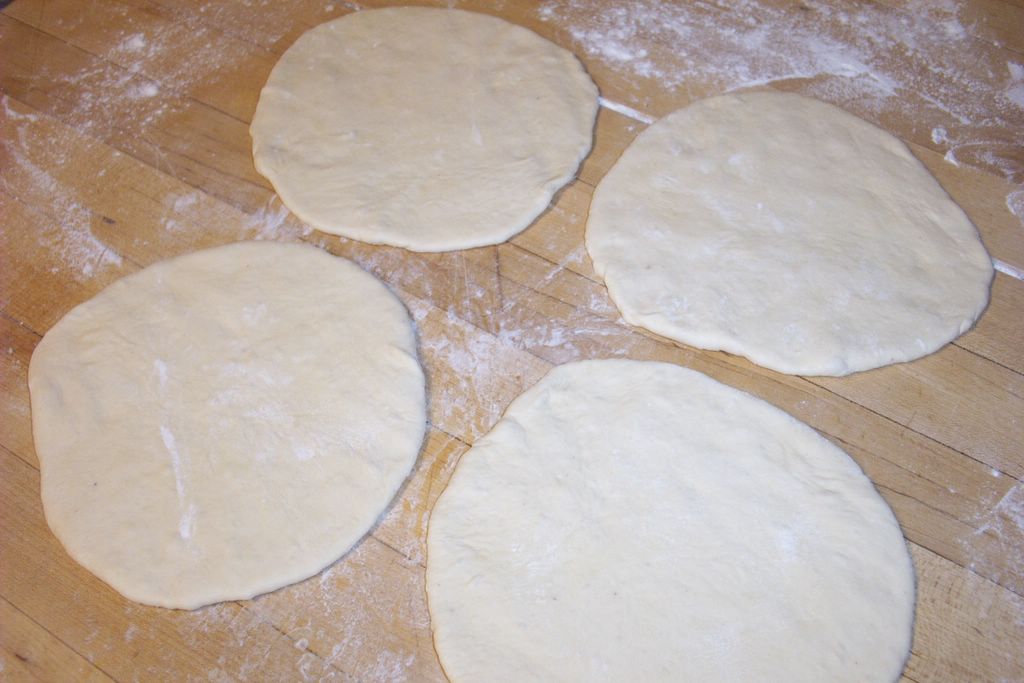
Use the palm of your hand to flatten each ball into a disk. Finish with a rolling pin, flattening the dough into a disk about 6" in diameter and 3/16" thick. Their thinness is more important than making them perfectly round. Irregularity adds charm, says Bernard.
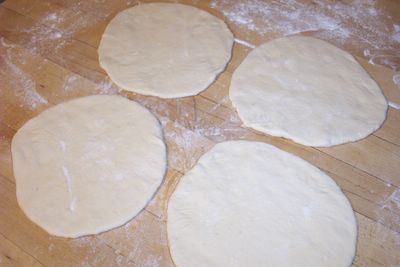
Rolled out disks ready for the oven
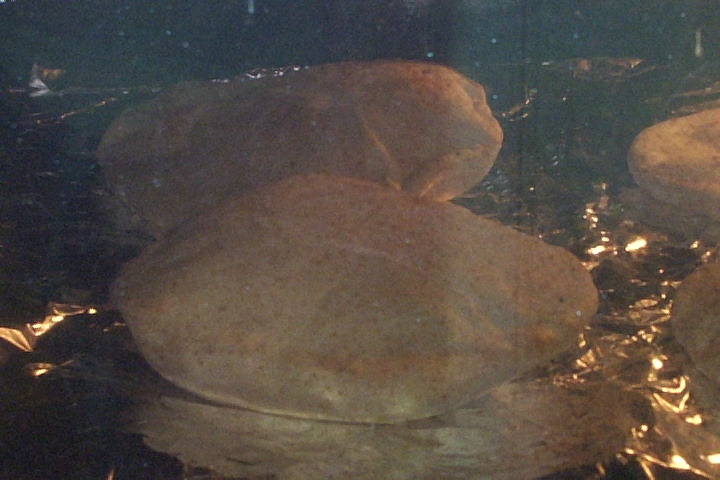
Place each round on a square of foil, and carefully place 3 or 4 of the rounds directly on the oven rack. Bake for 5 to 8 minutes, or until they are puffed.

Pitas puffing in the oven
Repeat with the remaining disks.

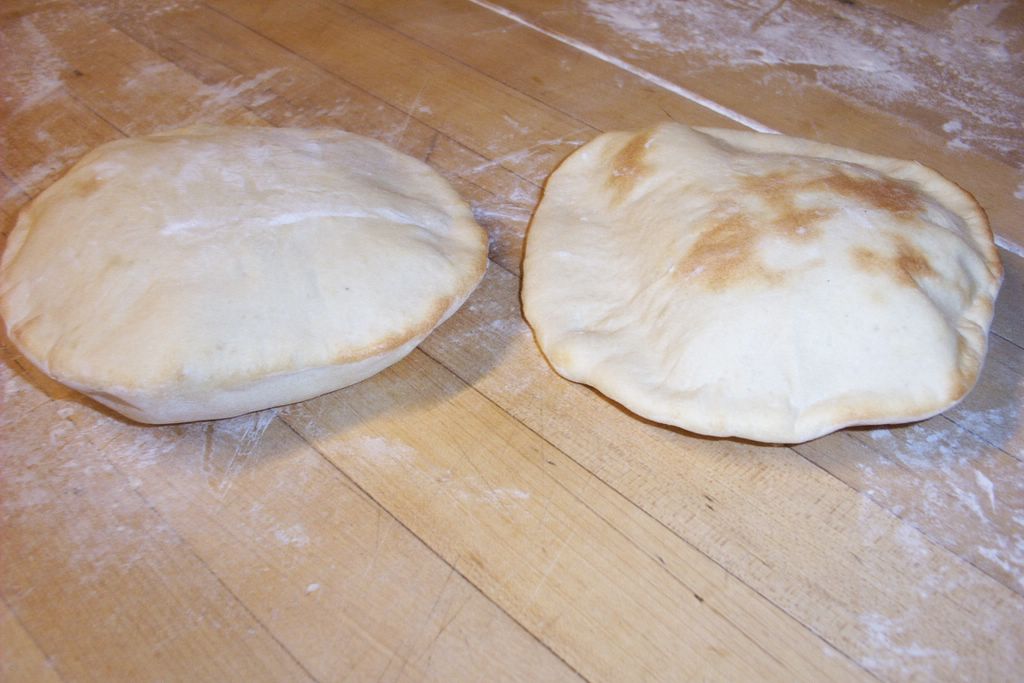
Hot puffed pitas ready to be wrapped in foil
When you remove the breads from the oven, stack them up and wrap them in a large piece of foil. This will keep the dough soft while the tops fall, leaving a pocket in the center. Cut them in half (so you can fill the pocket) and serve warm or at room temperature, or let cool, wrap tightly in aluminum foil, place in a zipper bag, and freeze.
Thaw frozen pitas before using (this only takes about 5 minutes at room temperature). To reheat, stack several in a pile, wrap with foil, and place in a 375 degree oven for 10 to 15 minutes.
Pita pockets can be filled with all sorts of wonderful things. They are especially well suited for holding soft fillings that tend to squish out the sides of sliced bread sandwiches, such as tuna salad, or egg salad made my favorite way with still barely warm farm eggs and lots of Hellman's (Best Foods) mayonnaise.
You can even fill your pita with a 'real' salad of chopped greens, diced tomato and cucumber, grated carrot, perhaps some sweet red pepper, and a sprinkling of vinaigrette or nice bottled dressing.
It doesn't get much better than this.
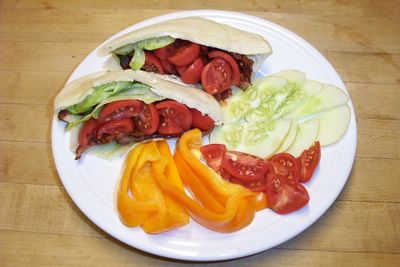
A BLT pita made with homegrown heirloom tomatoes and local bacon is about as good as it gets. Tuck in some sliced avocado and you would probably be whisked straight to heaven.
But my favorite thing to do with pita pockets (which was the reason I made them in the first place) is to make gyros. I am not sure if my version is authentic or not. It is basically like a Greek-style taco.
First you mix finely chopped onion or shallots and garlic with plenty of parsley, basil, thyme, rosemary, salt, and pepper into some nice ground lamb. (If you want some very nice ground lamb, buy lamb stew meat from the butcher and grind it up yourself at home, or see if they'll grind it for you. ) Do not overmix the meat.
Dried herbs are fine, but use fresh if you have them. Amounts are simply a matter of taste. This mixture is more flavorful if allowed to chill for several hours or overnight, but if you are pressed for time you can use it right away.
Brown the meat in a skillet. While it's cooking, stir together some chopped tomatoes and onions and put them in a small bowl. In another bowl, combine a chopped, peeled cucumber with plain yogurt and/or sour cream and a clove of garlic that has been minced with a little salt. (Lemon cucumbers taste delicious, are easy to grow from seed, and don't have to be peeled; miniature white cucumbers taste great and are easy to grow, too.)
Bring the hot lamb mixture, the warm pitas, the tomatoes and onions, and the cucumber/yogurt mixture to the table and let everyone assemble their own dinner. If you really want to gild the lily, you can offer a little dish of grated sharp cheddar cheese as well.
Warning: people can and will devour a great number of these in record time. The first time I made them, it was was just me and my mother at the table. Silence ensued as our complete attention was focused on our plates. As I casually reached for another pita, my mother looked over at me and said, "How many have you had?" I admitted that this would be my third.
"Why, how many have you had?"
"Five."
You've been warned.
This ground lamb mixture also makes lamb burgers fit for a king, especially when cooked on the grill, topped with melted sharp cheddar, and served on toasted homemade rolls or bread (or stuffed into warm pitas) that have been spread with a thin layer of dijon mustard.
So now you not only know how to make delicious pita pockets in under an hour, but also what to do with them. There is just one tiny problem. During my intensive research, I discovered a deep dark secret: Not all pitas puff. Oh, I know there are people out there who claim that every pita puffs perfectly for them, but this was not my experience (and I suspect they may be lying).
I tried everything. I altered the recipe. I rolled the dough balls out to different thicknesses. I let them rise for less time and more time. I baked them on one big piece of foil instead of lots of little ones. I baked them on a heavy duty rimmed commercial baking sheet and on a very hot baking/pizza stone (the secret to incredible homemade pizzas and crusty artisan breads).
I even turned to my very favorite bread book, Bread Alone by Daniel Leader, and tried his recipe, which called for only 1/4 teaspoon of yeast, no oil, no sugar, less salt, and two and a half hours of rising time. The pitas were baked on a hot baking/pizza stone at 400°.
I did have a slightly better puff rate than with Bernard's recipe, but the pitas were not nearly as flavorful (no oil or sugar and less salt will do that to a thing). I started to become just a little bit frustrated.

What to do? What to do?
I finally realized that I'm never going to get 100% pita puffage. And I no longer care, because I have traveled down The Road of the Unpuffed Pita, and there is no turning back. I'm in love.
If your pitas don not puff properly, there is no need to panic. As I see it, you have three tasty options.
The first option is to gobble them up straight from the oven and pretend they didn't exist.
The second is to turn them into pita chips.
So what does a farmgirl do? She cranks the oven up to 500 degrees and makes pita bread of course! And just how does she do that?
She pulls out a recipe she has made only once (two years ago), and then, caught up in a seductive haze of gorgeous garden bounty and warm pita bread, she snaps a photo and posts it along with the promise of a recipe.
This promise receives such an unexpected, enthusiastic response that she becomes the tiniest bit nervous, since she has never before posted a recipe she hasn't made so many times she could prepare it in her sleep.
And so she decides she should probably make one more test batch.
Three weeks and six batches of pita bread later, I am ready to report my findings. And I have much more to share than just a recipe. I even created an amazingly scrumptious, quick and easy version of one of my favorite foods. I also spent more time crouched down in front of the oven than I have in my entire life. But let's start with the recipe.
I found it in Bernard Clayton's New Complete Book Of Breads, a book I claimed in my Ten Tips For Baking Better Artisan Breads at Home post was worth buying just for the pita bread recipe. I still agree (though I do hope to one day try some of the other 300 recipes this enormous book contains).
Here's what Bernard has to say about pita bread:
"At the heart of the Middle East cuisine is a flat disk of bread known as pita in some countries and peda in others. As it bakes, the dough puffs to leave the center hollow. Not surprisingly it is also known as pocket bread. The pita can be torn or cut open and filled with meat or other delicacies, or a bit of it can be used as a spoon or as a 'pusher'."
The pieces of dough must be rolled flat before they are placed in a hot (500°) oven. The dough should be rolled to a thickness of no more than 3/16 inch. This is the thickness of a wooden yardstick, the kind given away at fairs and by auto dealers and paint stores. It can be used as a gauge."
The oven heat generates steam inside the pita and immediately the dough puffs into a ball. Later, as it cools, the bread will collapse. The oven must be hot. If it is not hot, the piece of dough will think it is meant to be a bun, and will rise slowly but without the all-important pocket in the center."
While this is a yeast dough, it puffs up because of steam. The yeast adds only flavor and texture. Don't overpower the dough with flour or it will be too dry to allow sufficient steam to be generated. Leave the dough on the soft side. Sprinkles of flour will take care of the stickiness."
What caught my interest was not only his claim that the steam (rather than the yeast) was responsible for the puffing, but also the fact that he only let the dough "rest" for 20 minutes and did not bake his pitas on a baking stone. That meant freshly baked pita bread in under an hour, as opposed to the two or three hours other recipes required.
After all of my experimenting (which I will discuss below), this is the recipe I am sticking with. It's essentially Bernard's, with a few minor adjustments.
Farmgirl Susan's Pita Bread after Bernard Clayton
Makes 8
2½ cups organic bread flour (I used Heartland Mill Organic Strong High-Gluten), plus more for sprinkling while kneading & rolling out dough
2 teaspoons salt
1 Tablespoon granulated sugar
1½ teaspoons instant yeast
2 Tablespoons extra-virgin olive oil
1 cup warm water (105 to 110°F)
8 eight-inch squares of aluminum foil for baking pitas
(Bernard claims that "placing the rounds on foil rather than on a baking sheet or stone allows a softer heat to surround the dough. A direct thrust of heat from a baking stone would form a crust difficult to puff.")
In a large bowl (I used my wooden dough bowl), combine 1 cup flour with the salt, sugar, and yeast. Add the oil and water. Beat vigorously with a wooden spoon for three minutes, then stir in the rest of the flour 1/2 cup at a time.
The dough should be a rough, shaggy mass that will clean the sides of the bowl. If the dough is moist, add a small amount of additional flour.
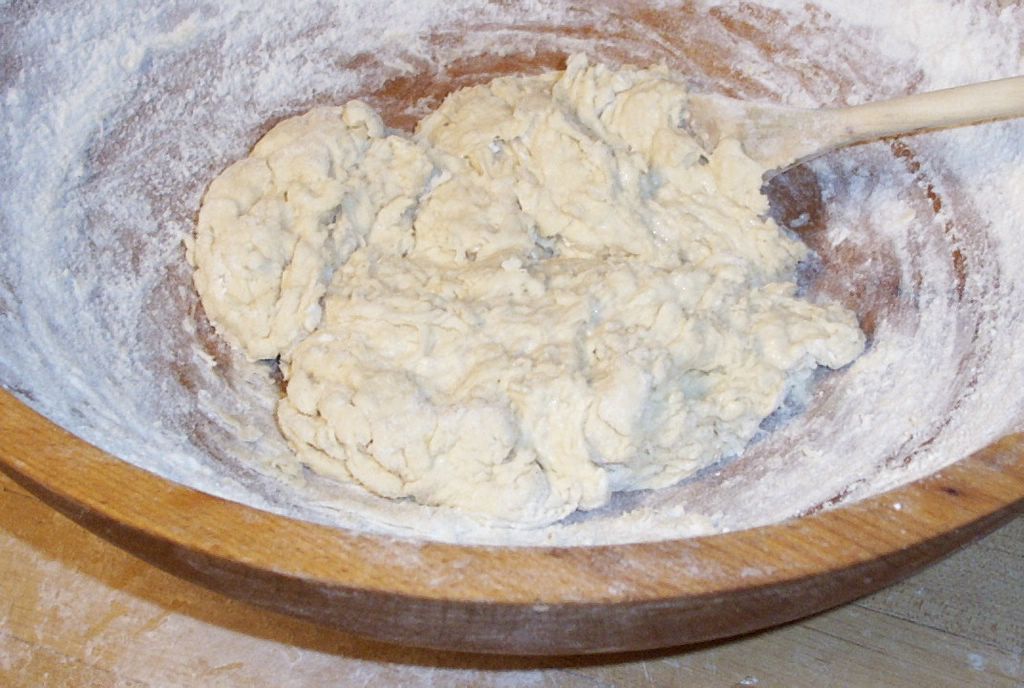
Pita dough ready to knead
Turn the dough onto a lightly floured work surface and knead for 6 minutes.
Preheat the oven to 500°.
Divide the dough into 8 pieces. I patted the dough into a circle and used my metal dough scraper (these things are so handy) to quickly and evenly cut it into eighths, as if cutting up a pie.
Divided Dough (it "stuck" back together while taking the picture)
Roll into balls, dust lightly with flour, and cover with a damp tea towel. Let rest for 30 minutes. (I increased this from Bernard's 20 minutes.)

Dough balls ready to be rolled out
Use the palm of your hand to flatten each ball into a disk. Finish with a rolling pin, flattening the dough into a disk about 6" in diameter and 3/16" thick. Their thinness is more important than making them perfectly round. Irregularity adds charm, says Bernard.
Rolled out disks ready for the oven
Place each round on a square of foil, and carefully place 3 or 4 of the rounds directly on the oven rack. Bake for 5 to 8 minutes, or until they are puffed.
Pitas puffing in the oven
Repeat with the remaining disks.
Hot puffed pitas ready to be wrapped in foil
When you remove the breads from the oven, stack them up and wrap them in a large piece of foil. This will keep the dough soft while the tops fall, leaving a pocket in the center. Cut them in half (so you can fill the pocket) and serve warm or at room temperature, or let cool, wrap tightly in aluminum foil, place in a zipper bag, and freeze.
Thaw frozen pitas before using (this only takes about 5 minutes at room temperature). To reheat, stack several in a pile, wrap with foil, and place in a 375 degree oven for 10 to 15 minutes.
Pita pockets can be filled with all sorts of wonderful things. They are especially well suited for holding soft fillings that tend to squish out the sides of sliced bread sandwiches, such as tuna salad, or egg salad made my favorite way with still barely warm farm eggs and lots of Hellman's (Best Foods) mayonnaise.
You can even fill your pita with a 'real' salad of chopped greens, diced tomato and cucumber, grated carrot, perhaps some sweet red pepper, and a sprinkling of vinaigrette or nice bottled dressing.

It doesn't get much better than this.
A BLT pita made with homegrown heirloom tomatoes and local bacon is about as good as it gets. Tuck in some sliced avocado and you would probably be whisked straight to heaven.
But my favorite thing to do with pita pockets (which was the reason I made them in the first place) is to make gyros. I am not sure if my version is authentic or not. It is basically like a Greek-style taco.
First you mix finely chopped onion or shallots and garlic with plenty of parsley, basil, thyme, rosemary, salt, and pepper into some nice ground lamb. (If you want some very nice ground lamb, buy lamb stew meat from the butcher and grind it up yourself at home, or see if they'll grind it for you. ) Do not overmix the meat.
Dried herbs are fine, but use fresh if you have them. Amounts are simply a matter of taste. This mixture is more flavorful if allowed to chill for several hours or overnight, but if you are pressed for time you can use it right away.
Brown the meat in a skillet. While it's cooking, stir together some chopped tomatoes and onions and put them in a small bowl. In another bowl, combine a chopped, peeled cucumber with plain yogurt and/or sour cream and a clove of garlic that has been minced with a little salt. (Lemon cucumbers taste delicious, are easy to grow from seed, and don't have to be peeled; miniature white cucumbers taste great and are easy to grow, too.)
Bring the hot lamb mixture, the warm pitas, the tomatoes and onions, and the cucumber/yogurt mixture to the table and let everyone assemble their own dinner. If you really want to gild the lily, you can offer a little dish of grated sharp cheddar cheese as well.
Warning: people can and will devour a great number of these in record time. The first time I made them, it was was just me and my mother at the table. Silence ensued as our complete attention was focused on our plates. As I casually reached for another pita, my mother looked over at me and said, "How many have you had?" I admitted that this would be my third.
"Why, how many have you had?"
"Five."
You've been warned.
This ground lamb mixture also makes lamb burgers fit for a king, especially when cooked on the grill, topped with melted sharp cheddar, and served on toasted homemade rolls or bread (or stuffed into warm pitas) that have been spread with a thin layer of dijon mustard.
So now you not only know how to make delicious pita pockets in under an hour, but also what to do with them. There is just one tiny problem. During my intensive research, I discovered a deep dark secret: Not all pitas puff. Oh, I know there are people out there who claim that every pita puffs perfectly for them, but this was not my experience (and I suspect they may be lying).
I tried everything. I altered the recipe. I rolled the dough balls out to different thicknesses. I let them rise for less time and more time. I baked them on one big piece of foil instead of lots of little ones. I baked them on a heavy duty rimmed commercial baking sheet and on a very hot baking/pizza stone (the secret to incredible homemade pizzas and crusty artisan breads).
I even turned to my very favorite bread book, Bread Alone by Daniel Leader, and tried his recipe, which called for only 1/4 teaspoon of yeast, no oil, no sugar, less salt, and two and a half hours of rising time. The pitas were baked on a hot baking/pizza stone at 400°.
I did have a slightly better puff rate than with Bernard's recipe, but the pitas were not nearly as flavorful (no oil or sugar and less salt will do that to a thing). I started to become just a little bit frustrated.
I finally realized that I'm never going to get 100% pita puffage. And I no longer care, because I have traveled down The Road of the Unpuffed Pita, and there is no turning back. I'm in love.
If your pitas don not puff properly, there is no need to panic. As I see it, you have three tasty options.
The first option is to gobble them up straight from the oven and pretend they didn't exist.
The second is to turn them into pita chips.

I cannot claim responsibility for the invention of pita chips. I also cannot believe that I lived this long without them, since I am now a certified pita chip addict. The other night I was so desperate for some that I actually made them using my frozen stash of puffed pitas. They are ridiculously easy to make, and a million variations abound.
Nic at Bakingsheet likes to spray hers with olive oil and sprinkle them with salt, pepper, cumin, and paprika. Shuna at Eggbeater simply brushes them with olive oil and sea salt, while Sam at Becks & Posh makes hers with homemade chile oil.
The pita chips in the photo above were my first attempt. Some of them were brushed with a yummy herbed olive oil/canola mixture I swiped from a container of tiny marinated mozzarella balls. Others were brushed with extra-virgin olive oil and sprinkled with finely grated Pecorino Romano and a little salt.
I won't admit how quickly this first batch disappeared. Let's just say that there was no need to make dinner that night—and they go very well with a glass or two of red wine.
Baking time depends on the thickness of the pitas and how crisp you desire them. I baked various batches in a 400° oven for anywhere from 6 to 15 minutes. I also baked some in my beloved toaster convection oven at 400° for 6 to 10 minutes on the convection setting.
I don't know if pita chips store well, because I never had any last that long.
The third way of dealing with pocketless pitas has inspired my new motto: When life gives you unpuffed pitas, make pizza!
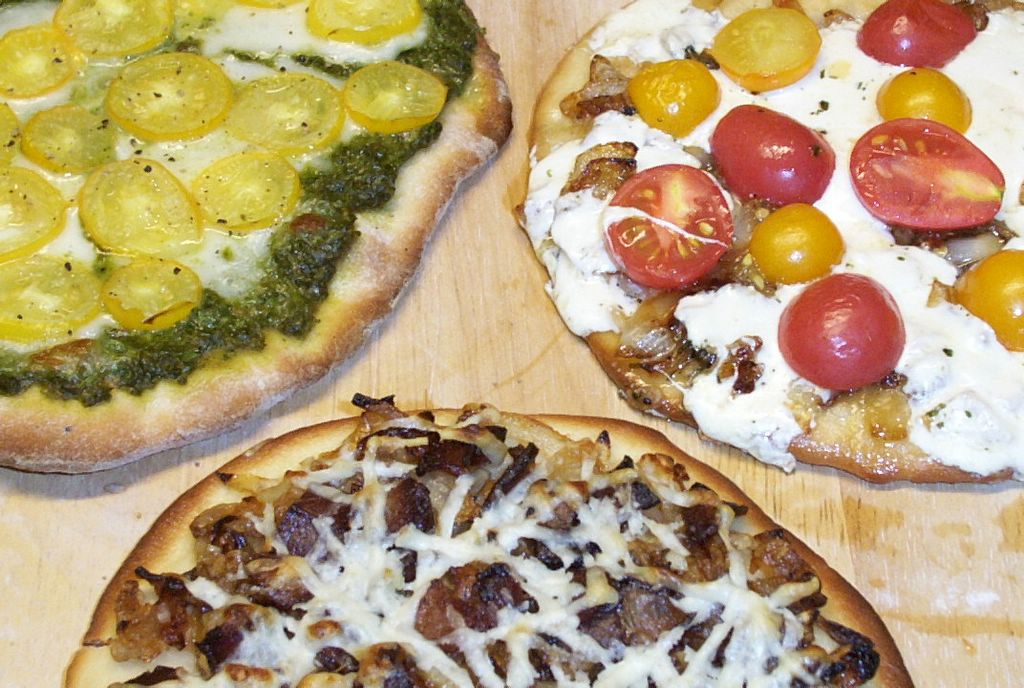
Pita bread pizzas: my new favorite 'fast food'
Making heavenly homemade individual pizzas just got a whole lot easier. You simply top the unpuffed pitas however you desire and pop them in the oven for about 6 minutes. I baked these in my toaster convection oven on a homemade hearth (click here for more info) at 425° for 6 minutes. I reheated cold leftover pita pizzas at 425° for 5 to 8 minutes.
Both times I let the hearth heat up for 15 minutes. During this time you could fix a garden salad or heat up a bowl of homemade soup to have with your pizza.
Suddenly a recipe gone wrong has turned into a fabulous gourmet dinner that is ready in less than 30 minutes and can be prepared on the spur of the moment with whatever ingredients you happen to have hanging around. All you need to do is keep a supply of unpuffed pitas in the freezer.

I made this pizza using a frozen pita. It's topped with a thick layer of homemade pesto, slices of fresh mozzarella, the first orange banana tomatoes from the garden (well worth the wait), and a sprinkling of Pecorino Romano. I ate half of it standing up in the kitchen.
So there you have it. The complete Pita Project.
I can't offer you 100% success rate with this recipe, but perhaps you'll fare better than I did. On the other hand, after tasting a couple of rejects, you may just find yourself crouched down in front of the oven, fervently hoping that all of your pitas don't puff.
More links for bread lovers:
Ten Tips on How To Bake Better Artisan Breads at Home
Beyond Easy Beer Bread
Whole Wheat Beer Bread
Onion Rye Beer Bread
Three Onion & Three Cheese Pizza
Tomato Pesto Pizza & My Favorite Basil Pesto Recipe
Fresh Tomato & Basil Whole Wheat Sourdough Bread
No-Knead Crusty Freeform Bread
Oatmeal Toasting Bread
Savory Cheese & Scallion Scones
Cranberry Christmas Scones
Spicy Pumpkin Pecan Raisin Muffins
Best Blueberry Bran Muffins & Other Bran Muffin Variations
Still hungry? You'll find links to all my sweet and savory Less Fuss, More Flavor recipes in the Farmgirl Fare Recipe Index.
© FarmgirlFare.com, the (mostly) puffed up foodie farm blog where Farmgirl Susan shares recipes, stories & photos from her crazy country life on 240 remote Missouri acres.
ooooh! Pita!
ReplyDeleteI love pita. The description of food stuffs in your possesion is quite mind boggling, especially when I remember that I need to go shopping!
Very jealous :P
Oh, you sly bitch.
ReplyDeleteoh good! it's been years since i tried it, but if i reall correctly, my pita pockets unpredictably so i am hoping you divulge the magic technique...
ReplyDeleteI saw your blog today and found myself smiling as I read it. When I started blogging, I decided to link to my site any blog that made me smile. What a lovely blog.
ReplyDeleteSusan,
ReplyDeleteThanks for the note.
Pita has long been on my list of breads to make "one of these days." Please let me know when you get the pita post up -- I don't want to miss it.
Homemade Pita bread ! I've never made bread before and now I want to make pita bread.
ReplyDeleteWhat a gorgeous photo!
ReplyDeleteI made pita bread for the first time earlier this year. I was so surprised by how easy it was. I thought there would be a trick to it, but no...you slap it on the baking stone and...PUFF!...up it goes. :-)
Hi Everyone,
ReplyDeleteWow. I'm overwhelmed by the response I've already received from this post. I'm hoping to have the recipe up in the next day or two. (Really.) Am resisting the temptation to make them again and take pictures of the process--that will just delay things, and I don't think you'll need them anyway.
Hi Clare,
Yes, the garden is in full swing now. It's so wonderful to just walk out and pick dinner--especially when any store is miles and miles away. And of course we don't have the amazing cultural foodshops and markets you have in Sydney!
Hi Stephanie,
Thanks so much. Always nice to hear from you.
Hi Cookiecrumb,
Oooooooh, cranky! But now can you see why I wanted to get this photo posted before the one above it? (Even at the risk of people thinking, If she says "soon" one more time. . .) And it's not like I said "Ha ha ha, I made this yummy pita bread, but I'm not going to tell you how I did it! So do you forgive me? : )
Hi Kitchenmage,
I had no idea how pitas became pockets before I tried making them. They do seem like magic, but they're really not. Well, I guess they sort of are. But easy magic. You'll see. : )
Hi Finijo,
Thank you and welcome to the farm! It's always nice to know I'm responsible for creating a smile. : )
Hi Angelika and Gino,
Thanks for tagging me for the Childhood Food Memories meme, but I've already done it! I was actually one of the very first people to be tagged. Back in early July, my pal Amy at the wonderful Beauty Joy Food was tagged for a Childhood Memories meme and decided to turn it into just food memories, and she tagged me. We've enjoyed watching it zipping around the world ever since. And it's come full circle because you're the second person this week to tag me! She's hoping to start tracking it on Beauty Joy Food.
If you're interested, there's a link to my post in the sidebar under Previous Posts, or you can just click here. I enjoyed reading your answers--especially the one about fresh lard. I render my own now whenever we have a hog butchered, and you sure can't beat it for pan-frying things like venison and homemade potato chips--and of course in pie crusts. (And for those who are cringing, here's an interesting little fact: lard actually has less saturated fat than butter, if you can believe that!) But I wouldn't buy it in the supermarket--too many toxins are stored in the fat of commercially raised animals.
Hi Kevin,
Will do!
Hi Leigh,
You should definitely try making it. It's a much simpler process than regular bread. Very quick and easy--and fun!
Hi Jamie,
Thanks and welcome to the farm! Yes, the "puff" is definitely the best part! : )
Hi Shakti,
Welcome to the farm to you, too! So glad you enjoyed your visit. And yes, be sure to check back for the recipe. I really didn't plan to post the teaser photo without it, but as I told Cookiecrumb above, I had a good reason! : )
It's wonderful to hear from so many new people. Thank you all for taking the time to write.
Mmmm, pita! I've not made it but we have made naan and chapatis - very similar.
ReplyDeleteWe recently discovered that naan can be baked on our gas barbecue! No need to heat up the kitchen oven. It's pretty amazing. You just shape the bread as usual and then turn on the barbecue - it heats up pretty quickly. Put the shaped bread directly on the rack (it doesn't fall through, I promise), have your tongs ready to turn the bread and hey presto, it's done very soon.
-Elizabeth
P.S. So glad you found me again and left such a nice comment about the preserved lemons we tried recently.
Hi Scoop,
ReplyDeleteThanks. I'm working on it! : )
Hi Elizabeth,
Hmmmm. Bread on the gas grill, you say? I may have to try that. Or should I say, the Grillmaster may have to try that. I mean, he's already out there watching the steaks or lamb chops, right? Bread baked for me but not by me--sounds good to me! : )
I made pita bread once and it was the most fun I've ever had (either it really is fun...or I lead a boring life.
ReplyDeleteEither way, I encourage everyone to try making it if Susan's kind enough to post her recipe. Can't wait for the Farmgirl Fare Cookbook!
David
our recipe for flatbreads
ReplyDeleteI googled to look for pita recipes and see that our focaccia recipe (without the rosemary) is very similar to those I saw.
So until Susan posts her tried and true pita recipe, you could use the focaccia ingredients and the naan method....
Incidentally, we have baked the focaccia in the gas barbecue as well. (*Ahem* when I say "we", I mean "he" - I don't even know how to turn the barbecue on... But I do mix, knead and shape the dough whenever we make bread.)
David, I really don't think that you lead a boring life - it IS fun to make bread! (Of course, there is always the possibility that I too lead a boring life.) There is something absolutely miraculous about the way it rises.
-Elizabeth
Oh, the pressure! I've been doing a little research on other pita bread recipe variations, and actually just made finished making a test batch using my recipe. I even took some pictures of the process.
ReplyDeleteBut I had to escape from the kitchen because I already inhaled two of them straight out of the oven! Don't worry about rejects that don't puff; nobody will ever know they existed. . . : )
I hope to have the rest of the post up soon! (Really.) I think I need to go out and do some physical work first. : )
Oh David,
ReplyDeleteThere is no way you can lead a boring life in Paris! Besides, I know you don't. I read your hilarious (and delicious) blog : )
Wow, thanks Susan. I just made some flatbread tonight... one version w/an Asian spread baked on (peanut butter, sweet soy sauce, garlic) and then another w/olive oil, garlic and parmesean. So, I'm going to have to move on to the pita next! I usually buy mine at the Farmer's Market and I freeze them to make pizza throughout the week alllll the time!!! You're right, it's a great go-to meal!!
ReplyDeleteThanks again for your research!
Wow oh wow, this post is going to inspire me! If I wasn't about to fall over w/ exhaustion right now, I'd get to work making pitas to replace the store purchaed ones I am using for lunch tomorrow!
ReplyDeleteLOL!!!!
ReplyDeleteYAY!! Pita recipe!!!
But I would like to ask WTF is 3/16 of an inch????
Oooh look, research and everything! My list of things to make is growing longer every day, but I want to get my pita down to a fine art so I can make it whenever and this is a great start.
ReplyDeleteYour comment about the flavor difference in the two recipes you worked with got me started thinking. Dare I ask about preferments--did you run across any recipe that used one? Think it would help, hinder, make no difference?
So is that glass of wine the same one as in mail, or was that another glass? And what kind of goes best with pitas?
Wow! Is this exciting or what? My heart can't take much more!
ReplyDeleteHi,
ReplyDeleteI just wandered over here from a link on Cooking with Amy. I'm really glad I did!
I found a pita recipe in an old middle eastern cookbook that used no yeast. You cooked them in a pan, but I wouldn't be surprised if it originated from something like a tandoori oven kind of thing.
I made them for an outdoor party I had, in addition to the burgers, I made sausages with souvlaki meat. These were to be eaten in pita pockets with tzatziki dressing. As you pointed out, pitas are great for things that would be way too messy for a bread sandwich.
Anyway, you rolled out the rounds of dough, put them in a hot pan and watched them puff, flipped them once, and you were done.
So, it was practically instant. Really just 20 minutes from start to finish. And it was fun standing around with the guests chanting, "puff, puff, puff...yay!" when they did. :G: Easily amused.
Hi
ReplyDeleteJust wanted to let you know that I tried out your recipe here and had so much fun making home-made pita bread! Thanks for sharing the recipe and the word: All pitas do not puff :D In my case, only 50% of them puffed and I would have been very depressed if I hadn’t read that part of your post. Thanks again ;)
Okay okay, I'll make pita!! I'm a little bit like the contrary goddess and prefer pita with some whole wheat. So I'm making mine with 1/2 whole wheat flour and 1/2 unbleached white.
ReplyDelete(In your instructions, you might want to add a note to "allow the dough to rise in a no-draught area til it doubles" between knead for 6 minutes. and Preheat the oven to 500 degrees)
My dough is rising now. I'll post results in my blog. I've got my fingers crossed that I'll be lucky with my first time at pita baking and that they'll all puff.
-Elizabeth
Hihi...
ReplyDeleteI love your site! I have been wanting to make pitas for the longest time. Thanks for your extensive experiment and report. I shall try it out soon!
Oh, I had just inherited a used DeLongi Oven with a hot stone. But the manual is in a language I cannot read so well :O Do I put the pizza dough directly on the hot stone or do I place it on a baking tray then the tray on the hot stone? Also when pre-heating the oven, do I place the stone in the oven too? Sorry for asking such stupid questions. I'm really new to baking and I'm excited to get started.
Since we have the same/similar oven, maybe we could try to bake something together, at least we know that the baking environment is controlled/close.
Anyway, keep posting!
oh, care to share your homemade pesto recipe?
ReplyDeleteTabehodai, you can do it directly on the hot stone. But I think Farmgirl bakes them on aluminumfoil sheets that are laid directly on the rack.
ReplyDeleteWhen I made pitas for the first time after reading about this adventur, I let the dough rise til it doubled before I divided it into 8 pieces.
-Elizabeth
I liked the texture and flavor, I had 6 out of 8 puff! But, 2 tsp of salt for 2 1/2 cups of flour is a lot!, about half of that amount is the standard in the flour/water ratio used. But then again, Bernard Clayton tends to like more salt than most, His biscuit recipe from his book "new complete book of breads" just about did my family in...
ReplyDeleteEver since I read this post I wanted to try, and last night I finally did! And it worked like a charm, I couldn't stop glowing (and rambling) over my pita breads all night! They were so much better. I mixed your recipe and Beth Henspergers, baked some on alu foil and some on a silicon mat right on the rack and only 1 out of 10 didn't puff! Wooha! Sorry, rambling again....Off to take a cold shower...And thanks!
ReplyDeleteHmmmm. This is very odd. I distinctly remember responding to the last several comments here. I wonder what happened. Oh, now I think it's all coming back to me. I answered the questions in this catching up post. Okay, now I don't feel as if I've lost my mind (well, not all of it at least. : )
ReplyDeleteAnonymous,
Congratulations on your pita success. As far as the salt, what can I say? I like salty bread (and I guess I'm not the only one.) : )
Baking Soda,
Hip hip hooray! Three cheers for you and your gorgeous pitas! So is it on to conquering scones next??? : )
Baking Soda,
Thanks for this AWESOME post. The pita bread was the centerpiece for my Valentine's Day dinner.
ReplyDeleteBy the way, I got better puffing by letting the dough rest for 5 minutes after rolling. Your results may vary.
William
Oooooh! Pita! What a wonderful bread it is but I've also never made it. After reading your blog, I will forge ahead now!
ReplyDeleteI've always loved pita and my favorite (besides those from the middle eastern deli) have been from Trader Joe's. I'm going to try putting some sesame in mine as TJs has....
I'm glad someone else has discovered pita pizzas - they have been a fast food staple for my house for almost 20 years. There is just nothing quicker and they certainly are tasty.
Your blog is great with all the farm photos - what a bucolic life! OK I know it's not all bucolic, but it looks that way! :)
Thank you for sharing...
Tried the recipe twice, and it is a hit! I cooked the pitas in a cast-iron skillet today (it was too hot to turn the oven on),and they were still delicious-no puff, but they turned out more like the thick, soft pitas you buy at some greek delis. MMmmmmmm, wonderful. Great with refried beans and tomatoes, too. :)
ReplyDeletere: no puff pitas
ReplyDeleteI don't bother to split them--just brush with a little melted butter as they come out of the oven, and roll up with your fillings inside. Warm, chewy, buttery heaven!
Just wanted to report that we had pitas and gyros last night per your instructions and they were great! My puffing rate wasn't too good, but that didn't stop them from being consumed anyways! Thanks!
ReplyDeleteHey Farmgirl, I'm trying the pitas
ReplyDeletetoday. I have made them before but didn't do so well... So I am going to try your recipe. Nummy nummy and my daughter loves any kind of bread so this is a nice way to make a quick lunch, dinner or just quick meal.. You have inspired me!
The pictures are very inviting and makes me want to make this for some friends. Thank You! Kimmerz
Your Pita recipe is PERFECT !
ReplyDeleteI came home with the parts for tzatziki.
But no pita at the ethnic store,so I decided to make it myself,found your BLOG,dang that pita with the ziki was GOOD!
Followed your recipe and I got about half that puffed up perfect on my first try!
I used a small convection oven @ 475 and recipe worked great.
Thank's !
tzatziki=
Strained whole yogurt(strain 4 hrs.in a strainer with coffee filter ) add 1 large peeled/seeded grated cucumber(dehydrated the same way as yogurt),4-6 cloves of garlick crushed,dash of lemon juice and fresh dill if you have it.
I enjoyed the warmed pitas with the Tzatziki.
I like it spicy,so I put on some Sriracha chili sauce for spice...it was NICE !!!
HELP! OK what went wrong!?!? Maybe the fact that I used regular unbleached flour instead of bread flour? My pitas came out hard and only the top part puffed up. No inside pocket or anything :( I followed all the other steps precisely. I was so looking forward to some soft chewy pita bread. Please let me know what you think happened so I can try it again.Thanks!
ReplyDeleteOh my goodness, I love you. Yes, when I cook something that didn't quite turn out as planned, I love to gobble it all up and pretend it never existed... hehe.
ReplyDeleteHi Anonymous,
ReplyDeleteHmmmm. I hate to say this, but I'm not sure what to tell you. As you can see by many of the comments, a lot of pitas didn't puff, but nobody said anything about them being hard. I don't think using all purpose flour instead of bread flour would make a huge difference.
The first thought that comes to mind is that they simply overcooked. Pitas are pretty thin and can probably turn into pita chips in the blink of an eye. Even if you didn't bake them for any longer than the recipe specified, bear in mind that there are so many variables you are working with when baking anything: actual temperature of your oven, placement of the items in the oven, thickness of dough (a slightly thinner dough will cook faster), wetness of dough depending on humidity & weather & flour, etc.
I'd suggest taking a gamble with another hour of time and trying another batch because even when they don't puff, they're usually really tasty. Sorry you didn't have better results the first try! : )
Hi Kamitatsubane,
So good to know I'm not the only one out there who slyly eats her mistakes! : )
Well, I don't know if I should toss bruised apples at you or become a dear friend....
ReplyDeleteI once lived on 360 acres in Southern Missouri, many many years ago, (was 11 when we moved) now I am stuck in the "city" -- Springfield.
I HATE IT !
I have spent the last 3 yrs here in town, YUK...
Before that, I was truly in the Ozark Hills in Northern Arkansas.
I want my farm back!
So where are you exactly, and how about a cup of coffee some day & swap bread tasting????
Thanks for the wonderful informative post on Pita bread making. I attempted it several years ago and was utterly disappointed that only half of them puff. They all tasted fine but they were not what I had in mind. Maybe it is time for another crack at it. I love your site.
ReplyDelete–Jill-
I have been reading your blog from the beginning for the last couple of days, and your pita project inspired me to bake bread for the very first time. I used 100 percent whole wheat four, and though my pitas failed to puff (I forgot to roll them thin enough) they were delicious. Thank you so much!
ReplyDeleteOh my goodness, you have a lot of comments. My family loves the pitas so much. We like to cook our own stuff, you see, and we usually cook enough to last a week. Well, we tried making 10 last week, but those lasted like three days. So today, we're making 50!
ReplyDeleteHmmm, what a way to spend a Sunday afternoon, eh?
Anyways, love ya! Abby out...
Hey, i waz reading the posts, and about halfway through, i posted myself. Now that i'm done reading the rest of the posts, i just wanted to mention some things.
ReplyDeleteFor instance: We used whole wheat flour (absolutely nothing added to the flour prior to our cooking) and the pitas puffed with like an 85% puffage rate. With the pitas that didn't puff, well, their gonna be dinner tonight.
We also make bread, like loaves of bread. We've found that you need to truely kneed the dough. When you kneed the dough, don't just push it and pound it. Start with your ball of dough, and flatten it until its like 3 inches think. Make it into a rough ball, and repeat for the whole six minutes.
It increases puffage, believe me.
Anyways, abby out...
HI there! I am foodie and food blogger..was looking for the ultimate pita recipe..well guess I just found it on yr blog :-). Good job!!
ReplyDeleteyour blog is absolutely wonderful! you made my day. I can't wait to go home and make some pita.
ReplyDeleteThanks so much for posting your pita experience. I tried 5 times and couldn't get my pita to puff. I read your blog saw that you used the recipe in Bernard Clayton's book which I own. Finally, my pita were successful. They turned out great!
ReplyDeleteWOW! My friend and I baked pitas for the first time today using your recipe, and we were floored by the taste, texture, and general yumminess of our pitas! We were also amazed at how relatively easy they were to make.
ReplyDeleteAt the same time, we also made hummus for the first time, and happened to make a recipe that is extremely close to the best hummus we've ever tasted, at a local lebanese restaurant.
Lucky us, it was a very good baking day!
i have a new name for your project: P.I.T.A. ;-)
ReplyDeleteseriously, though, iam having a very hard time getting mine to puff! i think 3/ 24 puffed today.
i'm grumpy. i guess i just keep trying?
-tabitha
I envy all of you who have said it is so easy, so far I have not even had one pita puff! Tastes wonderful, just not what I was hoping for. I read someone else's post that you need to make sure you knead for the full 6 minutes, so I'll check that next time. I also find the dough is very sticky with the 2 1/2 cups flour. I try to keep the amount of flour I sprinkle as I knead to a minimum. Could this be what I am doing wrong?
ReplyDeleteI envy all of you who have said it is so easy, so far I have not even had one pita puff! Tastes wonderful, just not what I was hoping for. I read someone else's post that you need to make sure you knead for the full 6 minutes, so I'll check that next time. I also find the dough is very sticky with the 2 1/2 cups flour. I try to keep the amount of flour I sprinkle as I knead to a minimum. Could this be what I am doing wrong?
ReplyDeleteAnonymous, flour is weird and so is yeast. If you pitas don't puff, try testing the water for the yeast with a finger--stir for several seconds; if it is too hot to stir with you pinky, it is too hot for the yeast.
ReplyDeleteAlso, altitude makes a difference. The higher up, the more puff. The amount of flour required for any bread recipe will vary with the weather, so start with less and add more SLOWLY till it feels right.
Mountain Mom
Well, I finally got around to making these pitas and they only need one word to describe them. AWESOME, no wait, another word, Incredible! They are just AMAZING. I only bake with whole grains, so I used whole wheat flour and a 1/2 cup of gluten. Everything else was the same and they were just wonderful. Only 3 did not 'puff' while baking, but even unpuffed, they were outstanding. We only have 2 left... :( Served them up with some Avocado Tunafish salad and they were incredible and hummus to dip the pita into... just wonderful. Thanks Susan so much for sharing the great recipe and tips! You are a welcome delight in my kitchen! Keep baking!
ReplyDeleteMeg
I watched Julia Child on TV making pita. Her secret to uniform puffed-up pita was to use cake flour.
ReplyDeleteFarmgirl-
ReplyDeleteI just hit the link to your site on a signature you left on Elise's site.
Your Pita recipe looks simple enough that even I can't mess it up.
I just picked up a new smoker and am thinking of making up some lamb. Which of course would be nice with some pita's.
Best,
Gary in Massena
I tried the pita recipe tonight and it was wonderful. I ate one pita with honey and it reminded me of eating sopapillas for dessert when I was little... I can't wait to make some pita chips now...
ReplyDeleteI am curious about how the whole pocket pita thing came about. I've essentially married into a Greek family who moved here in the 70s (and have moved back and forth since then). They say that none of the pitas in Greece have pockets-- why is there such a discrepancy between our idea of pitas and theirs?
Hey Susan,
ReplyDeleteThanks for sharing your recipe with us. Your blog is too good. I totally love it! Incredible stuff.
Oh, there is no 'Other' here. I will have to do with the nickname then.
I've been looking for a good pita recipe for a rotisserie leg of lamb (for gyros)... i'm a culinary student and the one in my baking book lacks... as you stated... oil and other delicious fat.
ReplyDeleteThe only thing i would add is that while best foods mayo is alright, home made mayo is soooooo much better and only takes a few minutes, plus you can add other seasoning like fresh garlic or herbs an make an aoli.
oooohhhh farmgirl! I was looking for you and I didn't even know it. I found you yesterday, while innocently searching for a pita recipe on-line. I tried yours today, using whole and white spelt flour (allergic to wheat, I am) and NONE of them puffed, and I am sooooo happppyyy! They are delicious, and my two and a half year old daughter had a lot of fun playing with all the little balls of dough. But I digress. The point is I have been sucked into your blog, and I am not a bloggy sort of gal. But you may have just inspired me to become one. Because I could go on and on writing to you, and that makes me think I should be going on and on in my own blog. The point (apparently I have many) is: you are an inspiration in so many ways. Thanks for doing all you do, for doing it so well, and for a damn fine pita recipe! I look forward to making many, many pitas, and finding the secret to making them puff.
ReplyDeleteVera
Tried your pitas tonight. I had a few recipes but went with yours because of the Farmgirl thing. I'm a country girl trapped in the city married to a city-slicker and raising a bunch of country kids that drive us crazy asking for horses and cows and dogs and a house in the country. Someday. Anyway, the scones were absolutely delish!
ReplyDeleteThese pita's were soooo easy to make. I'm eating them right out of the oven (not waiting for seperation) and dipping in tzatzkiki... mmmm !
ReplyDeleteNext we are eating them with veggies in the middle!
Farm girl I am so excited to make these. I have made pitas in the past and cooked them too long or not hot enough or something and they were dried out. But guess what/ Yep I ate them anyway. So here I am in Maui to avoid the cold "springtime' of Alaska. I have 15 avocados in my ref. all just to walk outside and pick up and eggplants are given to me weekly. So I needed some delicious bread as I have have more time than money. Yea! I can't wait. Your blog is magnificent.
ReplyDeleteAloha Jeannie
I made this recipe tonight and none of them poffed! They were delicious though. I discovered if they don't poff just cook them a little bit less and they are really soft like flat bread. I'll have to try kneading longer next time.
ReplyDeleteHi Farmgirl...
ReplyDeleteI love breaking my own bread. Something very relaxing about the process. I went in search for a great pita recipe and found it on your site. Everything turned out just right except for one thing. After I cut the pita in half(after it cools)it is so difficult to open in order to put the filling in. It's like the two sides are stuck together. This is weird because the texture and the taste are wonderful. Can you help? I would really appreciate your insights... mindboggled
After looking through several recipes on the net, I tried this recipe.
ReplyDeleteOh my God, it was tasty, I ate 2 of them without nothing in it ;)
It is soft, salt and sugar level is just perfect. The instructions are perfect... I DEFINITELY recommend that you try this recipe.
I used all purpose flour, I'll try it with bread four too.
Hello from Canada!
ReplyDeleteGreat recipe, but, I admit, I changed a few things. Please don't take offense, I have a habit of changing every recipe into something entirely different. But what I did was completely based on your recipe, so thank you!....I used organic spelt flour, and instead of using all that white sugar, I used a pinch of brown sugar. I also used half the yeast, which is for flavour more so anyway, so I used engevita yeast. The last thing I did was make them a bit thicker. They are amazing!
I'm not sure who decided to start making pita so thin. In fact, both the middle east and the parts of Greece that I know of leave the pita thicker (1/2 cm when cooked) for the most part. Maybe there are instances of using a thinner pita that I don't know of....
As for the "authentic gyro" thing, sorry but no that would not be it. For the Gyro they use a specific special smoked meat which are sliced, grilled and placed on the pita (they don't open it) with all the toppings (tomato, onion, tzaziki) and wrap it up like a cone. You don't have to worry about whether the pitas have pockets or not! They do this for souvlaki pitas too, only they use the skewered souvlaki meats (chicken, pork, lamb).
For Middle Eastern food like the falafel pitas or schwarmas they do a similar thing with the pita and the toppings are different (taboule, pickled turnip).
But really, you can eat them with anything! I really love a simple hummus and yogurt.
Thank you so much for the recipe, and especially after all the research and trials!
I blame you entirely for the necessity of purchasing an upright freezer. I used to make pita the time-intensive way, and only did it rarely because the cost in effort did not outweigh the benefit of homemade pita.
ReplyDeleteThen I found your recipe. I have since made over 3000 pieces of pita for various events and am able to crank them out in such large batches on a Saturday afternoon that there was no reason not to.
Except I had no way to store them, and had to buy a freezer.
I now wind up making batches when I'm crabby, because beating the dough helps work off aggression and biting into the fresh, warm pita (often topped with homemade mozzarella) soothes the savage beast. The extras go in the freezer.
I'm making more today.
Thank You! These pitas are absolutely De-lish! About 1/2 of mine didn't puff, but I think it's because I rolled those ones too thin. Those ones I just treated like bread slices and I put my veggies between and ate them right up in the kitchen. The other 4 that did puff are waiting for dinner :)
ReplyDeleteThis is going right into my recipe notebook :)
Thanks Farmgirl! I recently moved to Ireland where I have not been able to find a decent pita. In desperation, I decided to try to make my own. Thanks to your Pita Project I am now well on my way. You saved me from many a late night cravings with absolutely no where to go! Keep baking.
ReplyDeleteHi Farmgirl - love your blog!
ReplyDeleteI just finished my first batch of these pitas - what fun it was watching them puff! An observation I had with my trial: The first four in the oven failed to puff (so thanks much for the suggestions on how to use the duds). The second four, while waiting about 10 minutes for the first to finish (under damp tea towel) & oven to reheat, puffed beautifully. Either I rolled them to thin - which they were, but I didn't bother to measure - or that little bit of rest/raise helped. Oh, and I also lowered the rack to the lowest position for the second set.
Can't wait to fill them tonight with organic Brandywines from the garden and crisp bacon!
Thanks FG - you're truely an inspiration!
Hi!
ReplyDeleteThose pitas look excellent. I've been searching high and low for a really chewy pocket-less pita I had last week. Could this be it??
Hi, I just made these tonight. They were absolutely delicious...tender and great flavor. I made the following alterations: I used 2 cups white bread flour and 1/2 cup whole wheat bread flour instead of all white. I used my bread machine on the dough setting for the 6 minute of kneading, then proceeded as directed. For baking my second set of four pitas, I turned the oven up to 510...they puffed a bit better. All in all I was very, very pleased with this recipe, and will never go back to buying pita bread, when these were so easy and fun to make. :-)
ReplyDeletePERFECT! I'll never settle for store-bought again. Thanks, Farmgirl!
ReplyDeleteHmm well they were delicious (we made pita and also home-made hummus for the first time). But only ended up with (some) partially puffed. None of them puffed all the way. I'm thinking (after reading through the comments) that it could have been our kneading maybe not energetic enough? Also, we used all-purpose flour, which may have been a problem. I'm sure we'll be trying it again though, as they were great anyways with our hummus!
ReplyDeleteI see you have tons of comments, but I had to add mine. These pita pockets are amazing! I think I've made these at least 4 times in the last two weeks! I've even tripled the recipe and still didn't have any left to freeze. (And I only have two of my kids at home!) Another awesome way to eat them is to put butter and cinnamon and sugar on top. Oh, my! It is delicious! Thank you so much for this recipe!
ReplyDeleteThis is why I LOVE the idea of archived blogs - you posted this in 2005 and here I am in 2009 drooling over the deliciousness, copying the recipe and heading straight for the kitchen! Thank you thank you!!
ReplyDeleteI am not a pro, but I have heard that kneading the bread more makes it more likely to have bigger bubbles. Have you tried kneading the recipe a little longer to see if this has any effect?
ReplyDeleteI've made this recipe a bunch of times over the years, but one frustration I have--with this and many other recipes--is that my yield is no where near 8 pitas.
ReplyDeleteI get no more than six 5" pitas from this recipe--much too small to stuff as sandwiches.
This is with carefully-measured flour and water at the correct temperature, proper kneading and rising time.
On the plus side, they do taste good and overall I've enjoyed this and other recipes from this site.
EXCELLENT Pita bread ! My first time and they turned out perfect ! They taste and smell so good ! Thanks so much !
ReplyDeleteI've been making pita bread for 25+ years and have never had a problem with the pita failing to puff. For what it's worth, here's my "secret": when rolling, start at the center and roll to the edge, turn the dough 180 deg. and, again, roll from the center to the edge. Rolling back and forth across the dough is the most likely cause of pita pockets that fail to puff.
ReplyDeleteThat being said, there's nothing wrong with flat pita bread -- it makes a great wrap. The Greeks use if for their gyros and, as Farmgirl said, it makes a great pizza crust.
Hi Susan. I found your blog while searching for a good, quick pita recipe. I tried it and it is perfect! The step-by-step photos really helped too. I posted my results (photos) on my blog, as well as a link to your blog. I will definitely save this recipe ... I expect to make it quite often!
ReplyDeleteAlso, I really love your blog. Thank you!
Hi Susan,
ReplyDeleteI am totally new to blogging, but do a food blog for women living in South Asia about how to make from scratch things we miss from the US. I love your pita recipe and have been using it for two years. I copied your recipe onto my blog with a credit and link. I'm not sure how all this linking stuff works, but just wanted to make sure that was okay with you! If not, let me know and I'll take it off. I told everyone they should check out your blog because it's got great stuff!
Thanks!
Just tried your recipe and used spelt flour instead. They didn't rise too much but I was quite pleased anyway ... they taste fantastic. Think I may make them a tad thicker but otherwise this is a simple recipe.
ReplyDeletethanks so much
I know this is an old post, but I've been using this recipe of yours for YEARS! I just added a link from my blog here, recommending that everyone immediately head over so they can make their own fresh, delicious pita!!!
ReplyDeleteThanks!
i have done pita before on gas grill. found that splashing in a little water to create steam got them to puff up nicely.
ReplyDeleteI'm WAY late coming in on this conversation. I've made pita bread for years now. There's a trick to getting the puff and it's not in more kneading because I made some today from the Master recipe in "Healthy Breads in Five Minutes a Day" and that dough doesn't get kneaded at all.
ReplyDeleteThe trick is in the rolling out of the dough. Many people, when they roll out their dough, "flatten" the edges. The take the rolling pin and roll over the edge and smash the dough to the table. I used to do it too. Somewhere or someone told me to just roll to the edges and then STOP. Since starting to do that, I've never had a pita not rise properly, unless I didn't get it into the pan or onto the stone correctly. Today I had one that twisted on me as I plopped it on the stone. I had to take my tongs and straighten it out. Where it had folded over on me, it did not rise in that section. All of the others rose perfectly.
So stop "flattening" the edges. Roll to them but not over them so much that they flatten to the table.
HTH
Little later me & Yes, I agree, don't flatten the edges. But did you know you can also cook these on a very hot flat cast iron pan and glass lid & watch them puff (any pita recipe will do but make sure the pan is super hot or it'll stick). After 1 minute or so you'll see it start to puff, lift the lid & set aside and turn pita over and with a spatula hold down the outer edges and spin it with the spatula around the edges as it puffs to one side or the other. It'll puff when you softly apply the spatula (I use a bendable heat resistant spatula), some also use just a small towel or papertowel wadded up to apply gentle pressure, this is easier to spin it with. As it browns turn it over again to the other side and do the same. You can also do this with flour tortillas. This way you don't have to bend for the oven view, and you can also do it outside or anywhere. I prefer gas stove on high though i've done it by campfire getting a bit of ancient cooking in, but without the glass lid.
DeleteHave fun trying this way.
Lili
I Love this recipe. Today will be the third time giving it a try. My husband and I are always happy after having a lunch of salad in a pita. So cheap and much better than the ones we used to buy from the store. Thank you so much from France n___n/
ReplyDeleteOMG!!! I just stumbled on her and I am so impressed! I can't wait to try the pita bread (I was trying to find a way to reheat pita's for some lamb gyros that I had made.
ReplyDeleteForget that! I am making my own from now on!
Oh my! Lovely pitas. They were perfect wrapped around our falafel this evening. Thank you!
ReplyDeletei am definitely trying this! i would love to make my own from now own. love making bread in general, but have never attempted pita. thank you!
ReplyDeleteaudra
www.oneloudlemon.blogspot.com
These were so incredibly easy to make and I made them 2 nights in a row for dinner. I will definately be making more pita (and looking ways to work them into dinner on a regular basis!)
ReplyDeleteGreat article! I look forward to trying your recipe! I made a couple of batches of pita bread today and they both didn't turn out as I had hoped, so found your recipe doing a Google search. I loved reading what you had written, and you gave some good ideas for what to do when the pitas don't cooperate! I think I will try making some pita chips with my bombed out pitas!
ReplyDeleteI did this recipe with one small modification and it turned out great!
ReplyDeleteModification: I always prefer to weigh my flour as volume has just too much danged variation. I did 300 grams total -- 225 of high quality bread flour, and 75 of whole wheat flour. They turned out perfectly! Only one didn't puff perfectly, and the taste is outstanding. Thanks for posting this!
Hi Susan,
ReplyDeleteThanks so much for putting this up - gosh, 7 years ago. I have made several batches of pitas with this recipe and so far, total success. I did have a funny experience the first time, because i didn't read the recipe carefully and didn't see where it said to roll out the dough so that the pitas are 6" in diameter. My first 4 were only 3" in diameter. I got cute, fat, little pitas - and they did puff. They weren't exactly pitas, but they were great.
Only problem is they go so fast I have to mix up batches of dough every two days. I wonder if you can freeze the dough. I am going to try. Fresh Loaf has a method of freezing other kinds of bread doughs, so I will try it with the pitas. Basically you just wrap up the dough real tight, freeze, and when you want to bake, unwrap, put in fridge overnight and then let rise as you would any other bread dough. Since pitas don't go thru a final rise, I don't think that's necessary. Just let them get to a temperature where you can shape them, shape them, let them sit the last 20 minutes, and go for it.
Again - great recipe and great pics.
So as I sit here devouring my first pita (filled with tzaziki sauce and tomatoes and cucumber), I have to say that these pitas were both a pleasure to eat AND make! The dough was so soft, easy to form, beautiful to work with. And even though many of my pitas didn't puff (or didn't puff all the way), they still formed a pocket inside! These are just lovely to eat, and I'm excited to make some pita chips and homemade pizza on some of them. The only thing that was difficult about these was that after I put the first batch in the oven, I found out that the oven light was burned out. Hard to monitor them without an oven light! So I believe part of the reason many of them didn't puff could be because I had to open the oven more than I should have, so a lot of heat escaped. No matter, they are beautiful and delicious and I will be making them regularly!!
ReplyDeleteI'm loving your blog! I came across your pita post and saw so many people having trouble with puffing that I just had to throw in a bit of wisdom I came across a while back. Spritz the tops of your pitas with water (one good spritz is sufficient) about 2 minutes before they go in the oven. I don't recall where I found this tip, but I've been using it for a couple of years and have had EVERY pita I've made since puff like a balloon.
ReplyDeleteI don't even use a pita recipe any more, I just use a sourdough pizza dough recipe and let it rise in the fridge overnight. I know that's not the quickie recipe you're using, but man, it sure is yummy! And gives me more chances to use my sourdough starter.
Hi Rose,
DeleteThanks for the great advice. I'll definitely have to try it! And I love the idea of making overnight pitas from sourdough pizza dough. :)
I tried out this recipe last night and it was fantastic. While I love to cook and bake, I'm far from a "real" chef or baker. Matter of fact I made banana nut bread that morning and was not at all pleased with how it turned out, and I've used that same recipe dozens of times. These, however, were amazing. Of the eight Pitas (pieces? loaves?), four were flatter than flat (my fault, I'm positive I rolled them too thin) and three were perfect puffs. One was kind of half and half. I used the flat ones to make little pizzas which we had for dinner. Amazing! My husband was very much impressed, and I was rather proud of myself. I will definitely be using this recipe over and over again.
ReplyDelete